Monday, January 30, 2017

8 Steps to Discovering What to Sell on Amazon

In a previous post, Spencer discussed how to make money on Amazon. In this post, I’ll go in depth on what to sell on the platform through Amazon FBA.

Fulfillment by Amazon is an initiative by the world’s largest online selling marketplace to help businesses store their products at fulfillment centers. Amazon is also be responsible for packing and shipping the products to buyers.

By signing up for an account, you place your delivery process and customer service support in the hands of Amazon. Doing so allows you to focus on your business instead of worrying about shipments and customer relations.

More importantly, you get to reach out to millions of users shopping on Amazon – 244 million active users and counting, to be exact. Making your products searchable on Amazon increases your chances of getting found by your audience and generating a sale.

Now, you might be thinking that Amazon FBA is not for you because you don’t have any products to sell. However, you don’t need to have a product on hand just yet. This post will help you determine what to sell on Amazon and the steps you need to take to bring your ideas to life and into your customer’s hands.

That said, we won’t be dealing with retail arbitrage in this post. We aren’t looking for retail products to be sold on Amazon at marked-up prices. While people have found success with retail arbitrage on Amazon, there is a threshold in earning from this method. Not to mention, replenishing your product stock on Amazon is a time-consuming process.

The disadvantages of retail arbitrage are what makes Amazon FBA a better option. You will have a better earnings potential by developing the products from scratch.

What to sell on Amazon

What you should do now is find a product that you can private label. China is the best place to search for products due to low production costs, which yields higher profit once sold.

More importantly, you need to figure out what to sell on Amazon, which is the most crucial component of your Amazon FBA strategy.

By choosing the right product, you can make a nice profit of up to $60,000 per month (or more). On the other hand, selecting the wrong product to sell won’t let you earn enough money. It won’t matter if you picked a high-quality product from a cheap supplier and optimized its listing on Amazon. What is important is whether or not people will buy it from you.

Therefore, this post is about the process of researching for a product that would sell through Amazon FBA. I will discuss the factors that you need to consider to determine the profitability of the product. I will also provide case studies that put the tips into actual practice so you can emulate them when you start conducting your product research.

1. Choose a product sold between $10-100

This is not a hard set rule.  However, if you are just getting started, the ideal price range of products to consider selling is under $100. Many sellers do well with higher priced products, and if you have the higher capital that is required (typically), then by all means go for it.

Ideally, choosing a more expensive product ($100 and higher) would be beneficial for you due to higher profit margins.

However, putting yourself in the shoes of customers, are you willing to pay $100 for a product immediately?

Unless you have all the necessary information about the product, you need to learn more about the product by reading reviews from other Amazon users. Paying for the $100 product with little information about it is not something all people are willing to do.

Therefore, you will probably have to search Google and Youtube to get a better understanding of how the product works. All this research should help you decide whether to buy the product or not.

However, imagine if you were to buy a product that ranges from $10-50. Would you spend the same effort researching it?

The cheaper the product is, the less likely customers will find more information about it. Moreover, consumers are more willing to purchase the product impulsively, given the low price point. As long as it addresses their needs, then there’s a big chance they will buy the product then and there.

When choosing a product, look for a product that costs $10-50 to sell and focus on selling it in volume.

Also, since you will be buying the products from China, you need to consider the cost of each part required to assemble your product, especially if it’s an intricate piece. Delivering items to be sold for more than $50 to your doorstep could get expensive. If you’re still new to Amazon FBA, then it is best to settle with simple and cheaper items to private label for now.

2. Choose a product with a good bestseller rank

The performance of your product on Amazon depends on the market. If people don’t have any use for your product, then nobody will buy it. Competition, in this case, is good because it is an indication that there’s money to be made with your product based on how well similar products are doing.

A metric that you can refer to in choosing a product to sell on Amazon is its bestsellers rank (BSR).

If similar products are ranking on top of the list, it means that there’s demand for them. Choosing products identical to the ones found in the list allows you to position your business on par with these bestsellers. As a result, you can attract the target market of bestselling products and get them to buy from you instead.

There are varying opinions regarding the BSR of a product that you should use. It is best to choose a product with competitors that have a BSR of 5,000 or less. The more competitors with the same or higher BSR, the better.

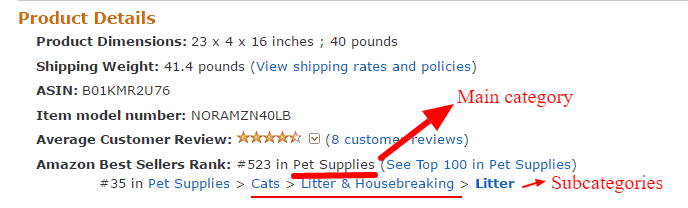
Also, the BSR I am referring to here is the main category. In the image above, the main category (Pet Supplies) hosts the product (under Cats > Little & Housebreaking > Little category). While the subcategory BSR of the product is impressive, its performance on the main category is what matters more. Since it will be competing against other pet supplies products, a high BSR means that it is an in-demand product.

Want a shortcut?  I recommend using Jungle Scout to automatically pull the Amazon bestseller ranks AND displaying the estimated monthly revenue for each product.

3. No recognizable brand in the market

The advantage that well-established brands have over non-brands is their track record. Assuming that the brand is known for selling high-quality products, the market will associate these qualities with the product they are selling on Amazon. Going up against Fujifilm for photography-related products, for example, is a bad idea.

Therefore, you need to sell a product without a distinct brand to compete against. You want to sell a product in a market that’s on level playing field. Capitalizing on a market filled with no-name brands positions yourself as a premium and go-to brand for your niche product, if done correctly.

Even if you haven’t heard of the competing brand, you should at least check to see if it has a website, social media followers, and other digital footprints. This gives you a better idea of what you are up against, should you decide on entering the market with your product.

4. Products with less than 50 reviews

Customer reviews play a critical role in determining which products appear on top of Amazon search queries. The higher the number of reviews (regardless of opinion) of a product, the greater its chances of appearing on the first page of search results.

If the keyword for your product returns results of products with over 50 reviews each, then you might want to consider a different product. As much as possible, you want your path to success to be as easy as possible. Products with lots of reviews will obstruct your path to making money through Amazon FBA.

You should target a product whose keyword phrase returns a result of at least two products with less than 50 reviews. Their lack of reviews give you a chance to take their spots on the first page. By positioning yourself in this spot on the search query for your keyword, you make your product page more visible to casual users, thus leading to higher number of clicks to view your page.

5. Choose a lightweight product

Again, this is not a hard-set rule.  However, when you are just starting out the logistics and shipping costs are much easier if you are not selling an oversized item.  But again, this is an ideal situation.  If you find what you think is a winning product that just happens to be oversized, don’t let this rule stop you…go for it!

A lot of the shipping cost has to do with the weight of your product. The heavier it is, the more expensive the shipping will be.

Another factor that affects product weight is the dimensions. Amazon identifies a product into different tiers, each of which considers weight and dimensions.

For more information about product size tiers, click here.

Also, each tier uses specific packaging materials with weights different than the other. The heavier the product, the heavier the packaging weight will be to keep the product safe and secure.

Ideally, you want to sell a product on Amazon that meets the criteria of Small Standard-Size tier to keep shipping costs low. However, the important thing is that the weight of the product does not distract customers from purchasing it instead of the competition.

If you already have a product in mind, find similar items on Amazon and the compare all their weights. Doing so will give you a better idea of how your product will cost once the weight and packaging are factored into the price.

6. Higher Margins are Better

Once you have a product that passes all the requirements above, you can now find suppliers who will provide you the product that you will private label at low costs compared to what you can sell it for (margin).

As mentioned, China is the first thing that people search for when it comes to affordable suppliers. A quick check on Alibaba for the product you want to sell will reveal to you a slew of results to choose from.

Open the pages of products you’re interested in purchasing and compare their prices with the ones on sale at Amazon. Ideally, you want to find a product that costs at least 75% less than the retail price on Amazon.

If not, choose the product that will provide you with the highest profit margin. Doing so allows you to have a cushion against the costs you will incur on shipping and miscellaneous fees from Amazon.

7. Finding a highly searched Amazon keyword

Similar to SEO, you need to find the best keyword for your product to maximize your earnings potential. Finding a relevant keyword with a high search volume on Amazon is your top priority. Unless they know the exact name of what you’re selling on Amazon, users can only see your product if they type in the keyword related to your product. By targeting the most searched keywords in the platform, you can increase your visibility to your target market in the hopes of getting them to buy your product.

There are a couple of tools that can unearth the monthly Amazon search volume for related keywords.

  • Keyword Tool – The tool helps you find keyword suggestions that you should consider to use for optimizing your product page.
  • Jungle Scout – The Amazon product research tool offers a comprehensive keyword feature that shows the different products which appear on search results.  Each product also reveals the BSR, estimated sales, estimated revenues, and more.
  • Merchant Words – The tool contains over 60 million keywords that Amazon users enter on the search bar to shop. It also shows the search volume for each keyword to help you decide which ones to optimize for.

Aside from these tools, Long Tail Pro allows you to find the average Amazon reviews for each keyword. As mentioned, you should choose a product with the least reviews as possible so you could get indexed on the first page of search results. By finding the least number of reviews for related keywords in conjunction with other data available from the tools mentioned above, you can determine which ones you should focus on.

8. Competitor pages not optimized

Aside from customer reviews, there are other factors considered in figuring out which pages that rank on the first page of Amazon search for a keyword. In short, the page should provide all the information necessary for users to make an informed decision about the product. Amazon has a page that details the best practices of developing your product pages to make them informative to users.

Frequently, the ones appearing on the first page of Amazon search have optimized product pages. However, there are pages whose elements still need improvement. Below are the most common mistakes that prevent product pages from performing well:

  • Few or low-quality product images
  • Non-descriptive product title
  • Limited description
  • Unhelpful bullet points

If you can find pages that commit these mistakes, then it is an opportunity for you to optimize your pages based on the weaknesses of the other ones ranking on the first page. For example, if one of the product pages have low-resolution images, then make your images high-quality.

Case studies

Now that we’ve discussed the things about what to sell on Amazon, it’s time to see these practices in action from the different case studies featured below.

Manny Coats – $75,762.35 in first month

Manny shares his impressive run selling private label products on Amazon in just a month. He details in this post and podcast the process of researching and selling the three products. Manny mentions the work that was put in launching the products (12 to 16 hours of work from Monday to Sunday). Not to mention, he also ran into some problems such as losing stickers to close the boxes and Amazon losing one of his shipments. Nonetheless, the results more than compensate for the work he’s put into this successful project.

Key takeaway: Manny chose a product in anticipation of the holiday season to maximize sales. He was selling a product under the toys category. The stock got sold out before Christmas, which is an encouraging sign. By choosing a product to sell based on trends and season, Manny was able to make the most out of his Amazon FBA campaign.

Spencer Haws – $60,000+/month


Spencer has no experience selling physical products on Amazon less than 2 years ago. However, upon reading about the subject, he saw the potential of earning money from this strategy and had to try it himself. As documented in this post, Spencer was able to quickly ramp up his earnings to over $4,000 in just his first month.

Since then Spencer had launched several new products and has discovered that focusing on more unique products is the way to go.  By focusing on more unique ideas, Spencer has been able to sell more than $60,000 per month for several months during 2016. (And of course, December was even more than that)

Key takeaway: Trying to figure out how you can be unique in the marketplace can be important.  Don’t just try to launch exact replicas of everyone elses products.  Even a small tweak to a product can help you stand out and make more sales.

Scott Voelker – $35,000+/month

One person that has encouraged lots of people to pursue selling private label products on Amazon is Scott Voelker of The Amazing Seller.  Spencer did a podcast interview with him to discuss his strategies.

Before venturing into the world of Amazon FBA, Scott owned a very profitable photography studio. He wanted to build a business that didn’t take much of his time, so he turned to Amazon for help. On the first month of selling products on Amazon, he earned $4,000, which wasn’t bad. However, after nine months of refining his processes, he made a solid five-figure income monthly and never looked back.

Key takeaway: Scott admits that there’s no shortcut to finding that product that would sell like hotcakes on Amazon. However, he emphasizes the importance of depth when it comes to choosing your business. What Scott means is that you have to pick a product on Amazon in which you can still make a substantial amount of sales in the position you can get your product page within Amazon search. By approaching your product research in a strategic manner, you can unlock your true earnings potential in Amazon FBA.

David Bryant – $1 million/year

Another person that has done well selling physical products is David Bryant. Unlike other so-called private label product seller gurus, David is far ahead of the pack as he discusses in a podcast Spencer did with him about the practices of importing products from China to be sold on Amazon. Aside from the usual route of searching Alibaba for the supplier, he recommends getting a sourcing agent. This person is responsible for finding you the best products to be sold for you.

Key takeaway: Unlike others, David believes that researching can help unearth the best product that you should sell, but he is an advocate of going with your gut when making decisions. Also, he suggests that people should start selling a product that they are passionate about. Since they are fully informed about the product, it will be much easier for them to sell the product to their audience.

Another tip he shares is choosing a product that has lots of potential for add-ons. For example, if you are selling mountain climbing shoes, you can branch out to selling related products like harnesses, ropes, and others.

Wrapping it up

Finding a type of product to sell is critical to your success for Amazon FBA. You not only need to be passionate about the product but need to put the work in to prove that the product will sell in the market.

The tips above should help guide you in choosing which product to go with. The research process is exhaustive and time-consuming, but it is a necessary step to make sure that you are doing everything correctly. At the same time, your research should provide you all the information you need to know to make it easier for you to succeed.

I also suggest that you read up on the case studies featured above to help you understand the level of commitment you should have to make the same amount of money, if not more!

Thanks for reading! If you have questions or comments, please feel free to shares your thoughts below.

This post was contributed by Christoper Jan Benitez

The post 8 Steps to Discovering What to Sell on Amazon appeared first on Niche Pursuits.


from Niche Pursuits http://ift.tt/2kGZTsD

How to Create a Killer SEO Plan for 2017

2017 is here! I get excited with the changing of each year because it always presents new opportunities and new ways to improve both in marketing and in life in general.

It also gives me motivation to make any adjustments I need to be a better marketer.

Of all the forms of online marketing, I think SEO is the most dynamic.

That’s simply because the state of SEO is ultimately in the hands of Google that’s perpetually tweaking and improving its algorithm for optimal user experience.

This means plenty of potential for those who stay on top of things and continually rethink their game plan.

And to me, success largely comes from planning ahead and always having a strategy in place for getting to where I need to go.

That’s why I brainstormed some key aspects of SEO that I feel are most important for 2017.

They’re elements you’ll definitely want to incorporate into your overall strategy to help you keep pace.

I also think they will take you much further than just 2017 and be instrumental in the success of your campaign for years to come.

With that being said, here’s how to create a killer SEO plan for 2017.

Put more attention on local search

Google Possum is an algorithm update that occurred in early September 2016 that specifically impacted local search.

In particular, it affected how websites ranked in the 3-pack and Local Finder.

Although Google never actually admitted to making any changes, countless experts in the SEO community noticed big changes to local search results.

An article from Search Engine Land illustrates just how big of a wave this update created.

Here’s a screenshot that highlights how positioning changed in local search results:

Screen Shot 2017-01-29 at 8.44.52 AM

And here’s a graph that illustrates this data:

image01

When you break it all down, “64% of keywords saw some type of change.” That’s pretty dramatic.

This tells me that the Possum update was a significant one and something that marketers will want to be aware of.

It’s especially important if you’re a brick-and-mortar business with a demographic that’s strictly located in a single city or region. If this is the case, Possum demands your immediate attention.

The first thing I recommend you do is check out this other article from Search Engine Land. It’s one of the most comprehensive and will fill you in on most of the details.

I also recommend you put more attention on local search in 2017 by doing the following:

  • diversify the local keywords you’re trying to rank for. For instance, instead of targeting “pet store albuquerque,” also aim for phrases such as “pet store albuquerque NM” and “albuquerque pet store”
  • update your Google My Business listing if you haven’t done so in a while
  • be aware that Google is using IP addresses when generating results

Put mobile first

So, mobile is kind of a big deal these days.

But seriously, I think 2017 is officially the year marketers will put mobile first and desktop a distant second.

Here’s proof:

image02

This is a graph from Moz.

It’s a little hard to read, but at the bottom, it explains that blue represents desktop search from 09 – 11/2016 and the orange represents mobile search from the same period.

As you can plainly see, mobile search is much more dominant.

Furthermore, Moz points out that, “20 industry niches out of 24 see mobile as their first source of traffic.”

Now, I’m not suggesting that you should abandon desktop completely. Of course, there’s going to be a sizable number of your visitors still coming through desktop.

But I truly believe that 2017 is the tipping point where SEOs should have a mobile-first mindset.

What exactly does mobile-first SEO entail?

  • Using responsive web design (RWD) if you haven’t done so already
  • Getting rid of interstitials (these will actually be penalized in 2017)
  • Simplifying your web design
  • Minimizing redirects

This article from Search Engine Land offers more helpful tips.

Go warp speed

Having a website that’s just fast isn’t fast enough anymore.

It needs to be warp speed, lightning quick—you get the idea.

While it was definitely important to have a fast site in 2016, I can’t stress enough how important it will be in 2017.

Research suggests that “40 % of online shoppers will abandon a website that takes more than three seconds to load.”

image05

This is especially true with the emergence of mobile where users expect a fast and fluid experience.

If your site is behind the curb, it’s going to hurt your number of visitors, leads, and inevitably conversions.

Google even launched the Accelerated Mobile Pages or (AMP) project, which “is a stripped-down version of the mobile web which runs on a reinvented version of the language used to create web pages: HTML.”

Long story short, this is a tool that helps websites speed up their load time dramatically.

I recommend checking out the AMP project and learning more about it.

You can also get my take on it from this post I wrote.

I also suggest going over a previous post on Quick Sprout that discusses how to make your site insanely fast.

Address voice search

If you’ve ever seen the movie Her, starring Joaquin Phoenix, where his character falls in love with his AI virtual assistant Samantha, you’ll know just how big voice search has become.

In fact, “Google says that 20% of mobile queries are voice searches.”

Just look at how the popularity of voice commands has grown over the last year:

image04

And this is a growing trend that’s only going to continue to grow. I know that I find myself using voice search more and more these days.

It’s just more practical and efficient than typed-in search. And if you’re driving, it’s simply a matter of safety.

That’s why I think voice search is most definitely something you’ll want to work into your SEO plan for 2017.

But how do you go about it?

Well, for one thing, you may need to rethink the way you approach keywords.

Here’s what I mean:

If someone was searching for a pet store in Albuquerque on their desktop, they might type in “pet store albuquerque.”

But if they were doing it through mobile voice search, they would probably say something like “Where is a pet store in Albuquerque?”

The point here is that focusing on longtail phrases involving questions is a logical strategy.

This graph provides a breakdown of the growth in question phrases year over year:

image03

“Who,” “when,” “where,” and “how” are ideal question words to begin with.

I also suggest writing content using a conversational tone. It should flow naturally almost like you’re having a dialogue with your audience.

A plus is that this approach should help you come across as being more personable and will bring a sense of warmth to your content.

This is important for making those all-important connections and building equity for your brand.

Think scannable content

Scannable or “snackable” content kills two birds with one stone.

First, it improves the user experience because readers can quickly move through a large volume of content and find the little nuggets of information they’re looking for.

In turn, you can improve engagement levels, increase shares, maximize your CTR, and so on.

Not to mention it’s easy on the eyes with plenty of white space breaking up a wall of text.

Second, it’s very helpful from an SEO standpoint.

By including plenty of sub-headers, bullet points, bold text, etc., you help search engine bots decipher your content and figure out what it’s all about.

This should ultimately have a positive impact on where your content ranks in SERPs.

I have written about the topic of scannable content in a few different places, but I really recommend checking out this post on Quick Sprout.

It will fill you in on the details.

Conclusion

I get the feeling 2017 is going to be an interesting year for SEO. I feel like the whole landscape is going to be shaken up like never before.

I also think that many of the formulas marketers have been following for years will be turned upside down and new approaches will be necessary for keeping up.

If you’re a mom-and-pop, brick-and-mortar type of business, I especially recommend revamping your local SEO strategy to account for the Possum update from earlier this year.

The good news is that if you’re located outside of your city’s physical limits (e.g., Hialeah rather than Miami, FL), you have a better chance of appearing in searches including the actual city.

I also suggest being a little obsessive about your site speed. Increasing the speed even by a second can yield big rewards.

You can use the Pingdom Website Speed Test for free to see what shape your site is in from a speed standpoint.

And as always, a successful SEO campaign requires perpetual maintenance, so be sure to keep up with trends as they unfold.

What do you think the most important elements of SEO will be in 2017?


from Quick Sprout http://ift.tt/2jmOYrj

Friday, January 27, 2017

How to Make Your Content Marketing Impossible for Competitors to Copy

The more advancements in digital marketing we make and the more information on how to spy on competitors we share, the more those things are being adopted in various industries around the world.

That means you’re more likely to be the target of a spying competitor.

It’s all fun and games until they start using the same tactics to replicate the work you’ve been doing.

Sometimes, competitors will piggyback on your hard work to steal market share and customers.

When you’ve got a direct competitor shadowing your content marketing strategy, social engagement, and audience outreach, it’s enough to inspire vengeance and make you lose focus!

I speak from experience. This has happened to me several times.

It makes you question whether it’s something that should be promoted. Where’s the line between spying to replicate a competitor and just monitoring for awareness?

It’s enough to make you question the ethics of competitive intelligence.

What drives the competition to shadow you?

I’m reluctant to put any kind of blame on influencers and marketers, but we should share some of it.

As an industry, we’re constantly creating content, teaching business owners:

  • how to analyze the social activities of competitors
  • how to steal their social followers
  • when it’s okay to swipe content from competitors and copy them
  • how to steal backlinks from competitors
  • how to swipe rankings and spy on the competition

Of course, none of that would be an issue if there weren’t people who wanted those shortcuts and resources in the first place.

The main issue is the individual who is your competitor. They are in business for the same reasons you are—to make money. They want to gain market share; they want the audience’s attention; and they’re willing to do whatever it takes to get it.

The problem is that many of them don’t have the resources to do what you’re doing.

When you create 10x content or find something that’s worth curating to provide value to your audience, your competitor grabs that same resource and shares it.

Then, they take your blog topics and spin them, maybe adding just a little more value to try to make them better than yours.

In my situation, many competitors have simply copied/pasted my articles onto their own blogs!

Why do people do this? It’s probably because they lack in one or more areas:

  • time
  • skill
  • resources
  • creativity

That’s likely one of the reasons why over 60% of marketers have trouble creating engaging content.

image00

Some of them are playing “follow the leader” rather than generating anything unique for their audiences.

They may not have the skill to understand who their audience really is or the creativity to come up with something original. Perhaps they feel that they don’t have the time to source their own materials, so they ride your coattails.

Here’s how you can shake them off and stop it from happening.

1. Produce the best content

Creating original content is not an easy task, especially packing in a lot of value. A long-form post can take hours to research and write. Some articles may even take days to produce. That’s a significant investment.

To prevent a competitor from spinning your hard work into a “new” piece by sprinkling in some extra value, make your content as comprehensive as possible.

This is the approach that helped Peep Laja build such a tremendous following when he first launched ConversionXL.

Rather than adding to the noise in the industry with shorter posts, he created comprehensive articles of great length around a specific industry gap, loaded with value for the reader.

Every data point, fact, and statement was backed by authoritative research and case studies. Peep’s posts were, and still are, exhaustive in nature.

If you take the same approach, you’ll make it virtually impossible for a competitor to spin your content into something with more value.

And because of the exhaustive nature of the content, they would need to commit considerable time to come up with a different angle—which is almost the same as researching and producing original content.

That’s something you know they’re not willing to do.

Competition aside, the biggest benefit is the value you’re providing to your audience. When you step up the quality of your content, your followers notice.

You will see not only stronger relationships develop with your brand but also a lot more shares and engagement around your content.

2. Don’t just curate. Cooperate

Finding great content to curate is like gold. It’s content you didn’t have to spend time producing, but your audience will still enjoy it and appreciate the information.

That’s why it’s all the more frustrating when your competitor keeps sharing the same things you post.

If you’ve got an influencer from whom you regularly curate content, make a connection with them.

Rather than simply sharing the content they produce, find some way to cooperate with them.

This could include:

  • Interviews
  • Guest posts on their site
  • Co-authoring great content
  • Working together on infographics or other visual content

If you co-produce something with them or guest-post, you can share that like curated content when it goes live. It’s branded to the influencer, so your audience will pay closer attention.

It looks like curated content but also carries your brand with it.

Do this on a regular basis with influencers and other businesses that share audience interests with you, and you’ll make it next to impossible for a competitor to swipe the content you’re “curating.”

That’s unless they want to share something that talks about your brand. If they’re not paying attention, that just might happen.

3. Diversify your content

If it becomes a recurring problem, remember that it’s relatively easy to take written content and spin it into something else.

The web is full of derivative content, with business owners and marketers echoing each other nonstop.

Diversification in your content can make it a lot harder for this to happen. Creating derivative content from a blog is easy, but it’s not as easy when things have a little more production value.

Put your greatest effort into creating other types of content that are far more difficult to swipe. That would include:

  • Branded explainer videos, how-tos, and tutorials to educate and entertain your fans
  • Shorter videos and branded images on Instagram
  • Detail-packed infographics
  • Comprehensive slide decks
  • Interactive content that boosts engagement

Any kind of content that requires more resources and skill to convert into a derivative will stop competitors in their tracks.

Likewise, by diversifying your content, you’ll be distributing it through different channels, which improves your overall reach and visibility with new audience segments.

Conclusion

If you’ve had enough with competitors gaining from your hard work, sweat just a little harder and create something that makes it impossible for them to capitalize on unless they work just as hard.

From that point forward, no measure of spying or chasing will earn them the market share you’ll be conquering as a result of your efforts.

Have you had a competitor attempt to follow your content strategy? How did you handle it?


from Quick Sprout http://ift.tt/2ktIfso

Thursday, January 26, 2017

Fiverr Success Stories – Building A Profitable Business On Fiverr

Honestly:

Making money online can be hard work.

But today I am going to share one readers success with you.

Not long ago they read one of my tutorials and took action.

Now they have built a highly profitable business on Fiverr.

So today they are going to show you exactly how they did it, so that you can achieve the same!

All you have to do is follow the steps below-

What You Will Learn

  • How to build a profitable business on Fiverr
  • What kind of skills are in-demand on Fiverr
  • How to quickly start selling on Fiverr
  • How to rank your gig at the top to start receiving clients
  • The strategy for raising prices without risking of losing your clients

With that said, I am going to hand the writing reigns over to Liudas to share his strategy-

The Underutilized Freelancing Platform – Fiverr

Several months ago I found this post on MatthewWoodward.co.uk “Make Your First $1 Online Today With This Step By Step Case Study“.

At that point, I was just learning about freelancing trying out sites like Odesk, Freelancer, Elance.

I was getting very frustrated because getting a job was extremely difficult.

A typical scenario went like this, you find a job listing, usually there are 10 skill requirements and the pay is less than what you could get at McDonalds.

You try to apply to that crappy job, but your chances of getting hired are slim because you don’t have reviews.

When I read the tutorial about Fiverr it immediately clicked with me.

I knew that it is crucial to get reviews if you want to get a chance of getting orders and it was all covered in there.

I have used the tutorial as my roadmap for my freelancing journey and so far it is responsible for making me a modest $1,128.00

Yes, it’s nothing much and I would probably have earned so much more, if not some of the roadblocks that I hit, which I will cover later in this post.

fiverr-success-earnings

The potential is there and it didn’t take me long to start receiving more orders than I can handle, but let’s start from the beginning.

Once I read about how to make serious money on Fiverr I started implementing, here’s how it all went and here’s what I learned.

Picking A Service To Offer

The first thing for any freelancer, either you are looking for jobs on Fiverr or not, is to pick a service that you can offer.

The service has to have a huge demand and you need to have the skills/tools to deliver it.

Here’s a short list of in-demand services that you can start offering on Fiverr:

  • Writing content
  • Transcribing videos
  • Logo designing
  • Ebook cover creation
  • Video creation
  • Voice over recording
  • Search Engine Optimization
  • WordPress help
  • Coding help
  • Web traffic

And there’s many more.

fiverr services

A good rule of thumb, if there’s a category on Fiverr, then there’s likely to be a demand for that skill. From this list you should find at least one service that you could offer.

If you don’t have an in-demand skill then spend several months developing a skill that you are interested in.

These days there are so much free information on the web that makes learning a new skill extremely easy. You could learn your new skill within a few hours easily.

I won’t tell you what skill to develop, that’s up to you. It’s important that you would at least mildly enjoy doing it because you will need to start doing it daily.

Even though I had no idea how to do it, I chose video creation, just like in this tutorial, to be more specific whiteboard animation.

I purchased VideoMakerFX, learned how to use it and got started.

Creating The Fiverr Gig

Once you have a skill that you are happy to offer as a service, you then need to create the Fiverr gig. It’s by far the easiest step.

creating your fiverr gig

Start out by searching for 5-7 top sellers, who are offering the services you want to offer.

You might be amazed, but even some top sellers have pretty mediocre gig descriptions and titles, but they are still doing very well so don’t overthink this.

You want to pick the parts that you like from each of your competitors gigs and craft your own Fiverr gig, but don’t copy it word for word.

Title

The title doesn’t need to be fancy, just tell them what you offer as clearly as possible.

If you plan to deliver your service within 24 hours it’s a good idea to mention it and I highly recommend that you offer 24 hour delivery.

Category

This is pretty straight forward, find the category that best fits your gig.

Gallery

You need to upload an image that’s 550 pixels wide and 370 pixels height. I wouldn’t put too much effort into it because once you upload the gig video the image becomes irrelevant.

The video will be the main thing that people will pay attention to and it will also be your thumbnail.

Still, if you offer design services it’s a good place to showcase your work.

Description

I have seen gigs that have a couple lines of text and do pretty well, but I believe it’s better to write an elaborate description.

State what are you offering, why should they order from you and write down your rates.

Looking at some other well performing gigs for inspirations is a good idea.

You might also integrate some of these copywriting tips to help you stand out from the crowd.

Tags

You can have 5 tags in total. They are important for ranking your gigs in the search results.

Screenshot 2015-03-11 21.29.20

You want to look at the same top gigs in your niche, scroll down to the bottom and check what tags they are using.

Copy the most relevant ones.

Duration

You want to set the delivery time to 24 hours, it’s very important because that’s a huge factor for attracting clients.

If you aren’t able to deliver the gig in exactly 24 hours there’s a little bit of flexibility, a buyer can only cancel an order after 3 days once it’s late.

So, in a sense you have 4 days to deliver an order.

Sure, the faster the better, but if you see that you won’t be able to make it just let the buyer know. The worst thing you can do is ignore him.

Communication is key, it can help avoid negative reviews and many clients will come back with repeat orders if you treat them with respect.

Instructions For Buyer

Set up the details for the delivery. It’s nothing special just let the buyer know what you need from him to deliver your service.

For example, to create a video I need a whole script or at least a general idea from the buyer.

If you’re selling articles you need a topic, if you are designing logos you need some guidelines etc.

Video

According to Fiverr, gigs with a video preview get 220% more orders.

So it would be silly not to have one, especially if you are choosing to sell videos.

Screenshot 2015-03-11 21.37.37

I recommend taking your phone and shooting the video yourself, or create a short presentation and do a screen capture video.

What to remember when recording the video:

  • Your video can’t be longer than 60 seconds
  • Show off your expertise
  • List out all your benefits
  • Mention that this is available exclusively on Fiverr

If you cringe just thinking about the idea of shooting a video, then by all means hire someone on Fiverr to do it for you.

It’s a small investment but it will have a big return.

Setting up the whole Gig shouldn’t take you more than an hour.

As I already said this is the easiest step, it sure is important to have a good gig page, but it’s not enough to start getting orders.

Without reviews, you can promise people the sky and they still won’t buy from you.

How To Find Fiverr Success

There’s a huge paradox on Fiverr. You can’t get sales without reviews and you can’t get reviews without sales. Just like with jobs and experience.

In this fiverr tutorial by Eze John, it is advised to create dummy Fiverr accounts to buy your own gigs and send some traffic to promote your gig.

To me, that sounds pretty extreme and very black hat.

To get the ball rolling, I thought of a different strategy. I contacted some friends and asked them to buy my Fiverr gig and I was giving them their money back.

Getting Fiverr reviews

This is a great way to get the ball rolling and you can start getting positive reviews instantly.

But I got tired of explaining to my friends what I’m up to, so I looked for a different way.

I searched for people who already know about Fiverr and have the same problem as I do.

I found a topic on the Black Hat Forum, where people are exchanging reviews.

Or you can use Facebook groups like this one to exchange reviews with other sellers.

How do the exchanges work? Well, there are two types of them. The direct exchange is when you find one person and you buy his gig and he buys yours.

A three-way exchange is when you find two people and person A buys from person B, person B from person C and person C from person A.

The direct exchange is considered risky though I didn’t have any problems using it. Still, the three-way exchange is becoming the standard.

Buyer Requests

Another legit way to spread the word about your gig and get those first crucial reviews that increase your gig rankings are Buyer Requests.

Buyers who don’t find a gig that would suit their needs or are just too lazy to search sometimes create a buyers request, where they say what they want to be done.

If your gig fits the description and you think you can do the task, then you send in your gig.

For extra chances of getting the job, I would also recommend writing a private message telling them that you would be willing to do it at a discounted price.

It’s up to you what road do you want to take.

  • Do you feel comfortable creating Fiverr accounts and buying your own gigs?
  • Maybe you better do review exchanges
  • Or you can do it the white hat long and boring way by finding real clients

Whatever you choose as long as you’re getting reviews you are golden.

After getting my 8 reviews, I started seeing some action. Slowly I started getting a sale once a week.

Depending on the competition in your area, it might take more reviews than that but keep on grinding until you start getting organic sales.

That one sale a week turned into two sales a week, then three and at one point I got seven sales in a day.

I reached a breakthrough, all I needed was to continue working, but then I made a mistake that set me back to square one…

How To Raise Your Prices Without Losing Your Clients

I was over booked, I was getting an average of 3 orders per day, tons of messages asking me about my services.

It was clear that it’s time to raise my prices because I couldn’t keep up anymore.

This all happened before Christmas, I thought I will take two weeks off and after that I will raise my prices.

Those two weeks, turned into three, because I had some health issues. After I went back I ramped up my rates and increased delivery time to five days.

The result, I stopped getting orders. Only my previous clients were ordering, I hoped that it will help me to slowly get back on track.

At that point I was very close to reaching Level 2 Seller rank on Fiverr. I have heard stories that once you reach Level 2 the revenue increases.

So I waited until I finally got it, but sadly I didn’t start getting more orders.

I started looking for some answers and lucky enough I got in contact with Eze John, the author of this tutorial.

He pointed out that my problem is that I increased my delivery time. That’s all.

I should have left it to 24 hours instead of 5 days. So, right now because of that mistake I’m not getting many orders, I’m waiting for my gig to get picked up again.

What To Do When You Have Too Many Orders

So what is the right way to act when you are getting too many orders?

If you are already a level 1 seller, I recommend starting out by adding some extras.

For example, in the beginning, I synchronized videos with voice overs for free. Now, it’s a $5 extra.

fiverr gig extras

I would go about introducing these gig extras one by one and see what effect it has on the amount of orders you are getting.

Once you have the gig extras and still too many orders, then you start raising your prices.

For example I was charging $5 for a 3-minute video.

Now I charge $5 for a 1-minute video.

If you write content, then you go from 1000 words for $5 to 800 words for $5.

Obviously, for every service the process will be a bit different, but don’t make the mistake like I did to immediately jump to the rates you would like to be getting.

Increase your prices very gradually and soon you will reach the level where you start getting paid the big bucks.

Remember to not increase the delivery time!

Building Your Long Term Business

Fiverr is quite unpredictable with how much work it’s going to send you.

As a freelancer you don’t want that, you want a stable stream of new clients and a predictable income.

So, focusing on long-term clients is a good idea.

Honestly, I would recommend looking for ways to get in touch with your clients off Fiverr, even though Fiverr is highly against it.

Think of Fiverr as a lead generation machine for your freelancing business.

Funnelling customers from Fiverr to your personal email will help you to build a much more stable and reliable freelancing career, where a single negative review or ranking fluctuation won’t leave you without any income.

The funnelling can be done by adding social media profiles to your Fiverr account or adding a link to your website (you can create this using about.me) in the portfolio section and asking people to go there to find your contact details.

With time you will build up a client base that will provide you with more work than Fiverr does.

Wrapping It Up

Fiverr is a powerful system, even though the name can sound like there’s a limited earning potential, but that couldn’t be further from the truth.

There are more and more serious freelancers choosing to start their career on Fiverr.

If you subscribe to the Fiverr newsletter, you will find that a ton of people start out with Fiverr success stories and end up opening businesses later on.

So the potential is there, you just need to take advantage of the platform.

As with anything, it takes time to get started but it’s completely worth it.

If you have any questions about getting started with Fiverr, please ask in the comments below!

Fiverr Success Stories – Building A Profitable Business On Fiverr was originally published on Matthew Woodward


from Matthew Woodward http://ift.tt/1F18hZR

Wednesday, January 25, 2017

How SEO Has Changed with the Possum Update

Google is totally unpredictable.

SEO practitioners know full well that things can change in an instant, and search engine dominance today means nothing tomorrow.

Or as Babe Ruth put it,

Yesterday’s home runs don’t win today’s games.

One of the more significant updates Google made in 2016 was Possum.

In fact, it’s arguably the biggest change Google has made to local SEO since the Pigeon update back in 2014.

As you might imagine, it’s shaken things up quite a bit and has switched up the SEO landscape considerably.

I’d like to dive into this topic and explain how it may have impacted your local rankings as well as what you need to know moving forward.

Why is it called Possum?

The first thing you’re probably wondering about is why exactly the SEO community called it Possum. Google usually names their updates after animals, but a possum isn’t as cute as a penguin or as awe-inspiring as a panda. Possum? Really?

Well, the term was coined by Phil Rozek.

According to Search Engine Land, “Rozek suggested the name, pointing out that it is fitting since many business owners think their Google My Business listings are gone, when in fact they are not. They have just been filtered—they’re playing possum.”

Okay, so the possum name is supposed to make you think of something playing dead when really, it’s not dead.

The details

It all went down on September 1, 2016.

Although it was never actually confirmed by Google, it was clear that a major change had occurred that specifically impacted the 3-pack and Local Finder, which you probably know better as the local results or Google Map results.

Here’s a screenshot from Moz’s Google Algorithm Change History:

image00

All of a sudden, many of the websites that had ranked so well for so long had lost traction and saw a dip in their rankings.

However, other sites that once had difficulty ranking saw a noticeable spike in their rankings.

To get a better idea of the implications, it’s helpful to take a look at some data from an article published on Search Engine Land.

In an attempt to determine precisely how big of an impact Possum had on local search, Search Engine Land reached out to Bright Local to conduct a study.

In this study, Bright Local “took a look at the ranking trackers for 1,307 different businesses, which were tracking 14,242 keywords. Then they compared the difference between September 7 and August 31 (the date before Possum).”

Here’s what they found:

  • 9% of the keywords had the business pop into the Local Finder when they weren’t there previously.
  • 11% of the keywords showed the business had increased in position by three or more positions.
  • 15% of the keywords showed the business had increased in position by one to two positions.
  • 35% of the keywords showed no change in position for the business.
  • 15% of the keywords showed the business had decreased by one to two positions.
  • 14% of the keywords showed the business had decreased by more than three positions.

Here’s a graph to illustrate how this all breaks down:

image01

The bottom line is that “64% of keywords saw some type of change.”

This is obviously significant, and it’s easy to see why so many people freaked out over Possum, especially those whose rankings were adversely affected.

What does this mean for local SEO?

Perhaps the most noticeable change was that businesses that aren’t located directly within the city limits now have a much better chance of ranking well.

Here’s an example:

  • Say there’s an Italian restaurant located in Hialeah, Florida. It’s very close to Miami but not located within the city limits.
  • Prior to Possum, that restaurant would have had difficulty ranking for keywords such as “Italian restaurant Miami” or “Miami Italian restaurant.”
  • But now, after Possum, that restaurant has a chance to rank for those keywords.

image02

And this makes sense when you think about it.

Why should businesses very close to the city suffer just because they’re not exactly within the city limits?

Odds are, many of those businesses would be just as relevant to the searchers as others located directly within a city.

This recent update basically levels the playing field between businesses located right within a city and businesses located in the suburbs and other surrounding areas.

As long as a business is within a close proximity to a city, it has the chance to rank when that city’s name is used in a search query.

In my opinion, this is a logical move that will be beneficial in the long run. This spreads the wealth and ensures that search engine users find exactly what they’re looking for.

IP address is a bigger factor

In the past, what popped up in search results was primarily based on the entered keywords.

But with Possum, Google will now take a search engine user’s IP address into account when generating search results.

This is Google’s way of ensuring users get the most accurate results when performing a search.

The main reason for this change is the massive volume of people using mobile devices.

image05

Google is continually looking for new ways to accommodate mobile search users.

Because people are often on the go, this ensures they’re always getting the best results based on their current location.

This is something you’ll want to keep in mind and use to guide your local SEO approach.

I think that Inc.com offers a smart suggestion:

“Your QA team should test your work as a user within the region of the business and not simply test it by Googling the business name and location.”

Doing so should definitely give you an edge over competitors still basing their strategy primarily on keywords (an outdated strategy as this point).

There’s more variance in search results based on keyword selection

Before the Possum update, users could enter similar keyword phrases and get virtually the same results.

For instance, entering “Italian restaurant Miami,” “Miami Italian restaurant,” or “Italian restaurant Miami FL” would generate pretty similar results.

But that’s no longer the case.

In fact, there could be a considerable variance depending upon the specific keywords a user enters.

Let’s look at an example.

Here are the results I got when I used “Italian restaurant Miami” as a keyword phrase:

image03

And here’s what happened when I used “Italian restaurant Miami FL” as a keyword:

image04

Notice by simply adding “FL” at the end, I got completely different results. Pretty interesting.

This just goes to show that Google is “spreading the wealth,” and even a small keyword nuance can produce entirely different results.

Why did it happen?

Because Google has been quite secretive about this update, it’s hard to say what their logic was.

We’re definitely not getting anything out of Matt Cutts for the time being.

But with a little deductive reasoning, I came up with four probable reasons:

  1. It’s likely a way to switch up the local search results and prevent only a handful of businesses from dominating.
  2. It’s yet another step in Google’s unending mission to destroy spam. By implementing this algorithm update, they made it more difficult for black hat SEOs to game the system.
  3. It’s another way to ensure that search engine results take user intent into account.
  4. It should enhance the mobile experience even further.

At least, that’s my take on things.

A final note

Unlike most other major updates, Possum only affected local search results.

That’s why I think it hasn’t received the same level of attention of past updates such as Penguin, Panda, Hummingbird, and so on.

If you’re trying to reach a nationwide or even global audience, the Possum update shouldn’t affect you all that much. It’s just business as usual.

But if you’re a mom-and-pop, brick-and-mortar type of business with a much more finite demographic in a specific region, it can have a tremendous impact on your approach to SEO.

In this case, you may need to restructure many elements of your local SEO campaign.

Conclusion

Google is always reinventing itself.

That’s been a major contributor to its success and longevity.

Possum is just one of many updates that influences the way SEO practitioners approach things, and I would imagine this particular update has received a mixed reaction.

It probably didn’t go over so well with many businesses located within city limits because their rankings took a collective blow.

However, it has leveled the playing field for those that aren’t within city limits but are located within a close proximity.

I’m sure these businesses are quite happy about the updates.

When it comes to search engine users, I think Possum should improve their experience.

I know I want to have the most accurate results possible when I’m searching for a business wherever I happen to be. Considering I’m a heavy mobile user, this should be beneficial to me.

And there’s one last thing I’d like to point out.

Since Google never formally “fessed up” to this update, it’s likely incomplete.

After doing a substantial amount of research on the subject, I get the idea that there are still more changes to be unrolled.

We’ll see what happens in 2017.

Have you noticed any major changes to your local search results since the implementation of Possum?


from Quick Sprout http://ift.tt/2k3vMy8

Monday, January 23, 2017

How to Start a T-shirt Business on Amazon Making $10,000+ Per Month

Hello Niche Pursuits! Many of you probably have no idea who I am, but just like you guys, I enjoy checking out what Spencer has going on and always learning what I can to fill in the gaps of industries I may not understand as well.

My name is Neil, and I have been self employed in the internet marketing industry (if you want to call it that), for almost 5 years now. I am going to show you exactly how to start a t-shirt business online.

You see, I first started out my Sophomore year of college by creating hosting affiliate sites. I pushed shopping carts at a local store down the road in order to pay for my living expenses and start building a PBN (yay 2012!). This first hosting affiliate enabled me to hit the 5 figure a month mark and I took the leap of faith to quit my job.

To accelerate this story a bit, since then, I have graduated college, decided not to pursue law school, created 10s if not 100s of Amazon affiliate sites, created a small time marketing blog that I tend to neglect, sold software and Clickbank products, ran all kinds of paid traffic, and now I sell t-shirts and other merchandise on Amazon!

The other day I stumbled into an article Spencer had written about how to make money using Amazon here, and noticed that I actually got a mention in that list for making over $150,000 on Amazon selling shirts through the Merch by Amazon program.

Today I want to go over exactly how I did it, and the steps you can take to replicate the process this coming year starting right NOW!

Merch by Amazon Program

Many of you are probably not aware, but the Merch by Amazon program launched a little over a year ago. For the first few months, almost no one knew this Amazon program that had just been released even existed and this is because you are probably not a developer.

If you still have no idea what I am talking about, let me explain. Merch by Amazon is a print on demand (POD) platform for selling t-shirts and MANY other products like mugs, etc. on their platform.

The way it works is that once you have an account, you upload artwork to the platform, pick a few shirt colors that your design looks great on, enter a title, brand, a few bullet points, and a description of your shirt, and click publish. Within just a few minutes of time, you now have a money generating page on Amazon selling your t-shirt to billions of monthly visitors.

Amazon handles the selling, the printing, the shipping, and even the customer service for the t-shirt sales you get, and all you do is collect a royalty on each sale.

If you have started to connect the dots, you would notice how massive of an opportunity this is. You can sell products to people with the full force of Amazon behind you and collect royalties! A lot of other people started to see this opportunity, people who were not app developers.

As the program was swamped by sign ups, Merch by Amazon quickly went to an invite only program. This caused wait times of up to 9-10 months for some. As it sits right now, they have not accepted new people to the program in over a month and are not tiering people up. This means that essentially, you can only post so many shirts on an account when you get one. You need to prove you can make enough sales with those slots you are given, before you get even more slots for t-shirts. If you want a really in-depth walk through of the backend of Merch and how it works, I wrote a merch by amazon guide here.

If your interest is peaked even a little, I highly recommend that you head over to merch by amazon and request an invite. You may be waiting a long while, but it can be really nice once you get in…

7 Steps for How to Start a T-shirt Business on Amazon

Merch by Amazon is not the only way to start selling shirts on Amazon, far from it in fact. You could always get your designs printed, and then send them in to be fulfilled by Amazon (FBA), or you could print and sell them from your home. There is also the possibility of dropshipping your shirts from Ebay or another marketplace by doing retail arbitrage.

What if there was a way to sell not only t-shirts, but hundreds of different items on the Amazon marketplace without holding a single piece of inventory and see the same level of success if not higher numbers than I saw over the last year?

There is, and I am going to go over exactly how to do it based on the brand new Amazon/Shopify Integration. You can set this up and be selling on Amazon today if you decide to take action.

Step 1: Understanding how Amazon Works

Before you even consider hooking everything else up, you first need to understand how Amazon works. These are Amazon BSR and Copyright/Trademark metrics.

BSR (Best Sellers Rank)

For every product that is selling on the Amazon Marketplace, they will have something called a Best Sellers Rank or BSR for short. This number given to you is going to be relative to the number of sales that item is receiving. This BSR number is also relative to the category that the product is in. 100k BSR in clothing is not going to be selling the same amount of units as 100k BSR in Gardening and so on.

If you were to go over and find a product, just scroll down to the product description and you should see a box that looks like this:

To give a very rough idea of what the BSR equates to, a BSR of 100,000 in clothing is selling around 1-2 units a day. The BSR in the picture above probably means they are getting a sale or two every few days.

The lower the BSR goes, the more units they are selling. I can tell you from experience that a BSR of around #2000 means you are selling 25-50 units a day. The more experience you get selling in certain categories, the better you get at estimating how many sales these listings are getting.

Copyright/Trademark

Copyright and trademark are very much different but they are both something that you need know well enough that you are not infringing on someone else’s rights. When putting designs on merchandise in no way should you ever straight up copy their designs. This is breach of copyright and will eventually get you banned from selling on Amazon after people report you.

Amazon does not want rip-offs, and they will punish you if caught. Why risk it?

Trademark is the other big one that you need to know how to use. These are recognizable expressions that people have protected. These can be signs, expressions, or logos. When dealing with putting designs up on Amazon, you need to avoid putting any sayings on your merch that have been protected. Make sure if there is any text or logo type work going on with your designs to run the phrase though one of these sites:

Step 2: Research

Now that you are familiar with BSR and copyright/trademark, we can actually get into the fun part; Niche Research. This is by far the most important step in selling merch on Amazon. If you do not do research properly you will fail.

Let me just say that again, you need to do your research properly or you will not succeed.

I have made a lot of money so far following a very simple strategy. Make better products than the competitors in niches where there is demand.

Simply put, I find what customers are buying, and I create more visually appealing products for them to buy at a fair price. I do this by analyzing keywords and Best sellers rank!

Keyword Search

Head over to Amazon.com and enter in any niche you want plus “t-shirt” and hit search. For this example, I am going to be using a niche example: Veganism.

Note: Niches where people are passionate about their cause sell the best.

This brings up the product page for your search. You can see some examples of shirts that are for sale. If you scroll to the bottom of the page you can see there are over 15 pages of shirts in this niche. Just because there are a lot of products does not mean they are selling well.

Start opening up all the different shirts you see! This process can take a long time, but open as many tabs as you can. Once you have many open, go to each page, and navigate to the “Product Description” section on the product page and locate the BSR.

Important Tip: I personally target any design around 100k-300k BSR. This generally means the design is selling once every day or so, and that if you come up with something better, you can make sales as well. This also seems like the sweet spot between a lot of competition, and making easy money.

I will then take every single shirt that has a BSR that is low enough and copy that URL into a spread sheet.

Designs that you find on these t-shirts might be simple, or they might be complicated. Your first goal is determine if you or a designer can make a BETTER looking product in the niche. If you cannot, do not add it to your list!

As you can see from the screenshot, if you go check out some of those shirts, they are selling very well. It would be extremely easy to compete against these because the shirts so far are mainly just text. A little bit of graphic design around the same idea, and you will have a better product!

I generally go through at least 5 pages at the bottom of the page looking at every single shirt to determine the BSR and saving my links in an excel file.

You will need to do this for every single niche you come up with. I would recommend coming up with 100 niches, and then going through the first 5 pages of shirts for each of those niches to make your initial file of potential designs to target.

Keep in mind this is a numbers game. If you want to put up 10 designs and think you are going to come close to big numbers, you are very very wrong. You want to eventually get to the point where you have thousands of designs online, each selling every day or two. Start at just a few designs and scale up as you make money. This is a process.

Brand Search

The second thing that I will do is tied into the keyword search that we just went over. Sometimes it can be extremely hard to come up with other niches on the top of your head, right? I love to let other people do this niche research for me!

The way we do that is by taking a look at brands that are already selling well on the platform.

If you go back to the screenshot about vegan shirts, you will see that there is this listing: http://ift.tt/2jVCm9O

Right above the title, you will notice the brand of the shirt. This shirt may or may not be selling well when you read this (currently #98k BSR), but you might wonder what other niches this brand has created merch around. Simply click the brand at the top of the page there.

As you can see, this brand has 169 shirts up right now! Simply scroll through the list to find new niches, and then open all the shirts in a new tab to check if they are selling via BSR (yes, open all 169 links, I know it takes a long time). Keep adding to that spread sheet you are making!

Keep following the keyword research and brand research that I have laid out above until you feel like you have a solid foundation for 100 killer designs. If you do exactly as I lay out above, you should have what it takes to make the kind of money that I screenshot near the top of this article.

Speeding Up the Research Process

These were the exact steps that I took to build my initial revenue stream. If you try it out you will notice that it can take forever! Since I still run a lot of large affiliate sites, this growing side business was taking up a ton of my time. I needed to keep the process going (because it was working) but needed to free up some of my time.

I, along with my business partner, decided to come up with a better way. We created our own software to complete the entire research process as automated as possible. As the merch income grew, so did the questions from the community. After many months of polishing our self use tool, we released it to the public and Merch Informer was born in October of 2016.

Merch Informer lets you pull up the top selling shirts for any keyword or any brand. These are in order by best sellers rank and you have the ability to save and download your links, images, descriptions, prices, as well as check keyword competition within Amazon. Using the Vegan example from above, you can see what it would look like inside the software. I use all of this information to send to my designers which we will go over in the next step. The easiest way to grow this business is outsource at light speed!

You can do everything I talk about in this article manually, or you can try us out with a 3 day free trial that we give everyone.

We spent a lot of time and effort putting together the most comprehensive Merch research tool available to the market. As a thank you to the Niche Pursuits community, please use coupon code NICHEPURSUITS for 20% off if you want to give it a go.

The biggest challenge that most newcomers face in the POD (print on demand) space is that they have problem finding niches that sell. With Merch Informer, we have basically created a keyword tool that pulls keywords in niches that are almost guaranteed to make you sales. How do we do this? We pull from Amazon suggest!

Amazon is a big data company so they use all this data in order to optimize how many sales they get. When you start typing a keyword, you will see that Amazon starts auto recommending or suggesting endings to that original seed keyword. They do this because they know from their data that if you were to enter in one of the suggested niche, you are a lot more likely to buy things.

Use everything I put in above along with Amazon suggest to ensure that your research is rock solid!

Step 3: Getting Your Designs Created

There are two ways you can get your designs created. You can either create them yourself or you can outsource them.

I ended up doing my first 100 designs myself but after I saw that the model worked, I started outsourcing. Since I am not an artist, I had to watch a few videos on Youtube to figure out what I was doing.

If you are going to create them yourself, you can use:

  • Photoshop
  • GIMP
  • Illustrator

GIMP is a free option that you may want to look into.

Note: When you are creating designs, make the dimensions 4500X5400. You want a large resolution so that when they get printed, they will look sharp and crisp.

If you are not an artist like me, it really just leaves you a single choice: outsource!

If you are familiar with outsourcing content to VA’s this is extremely similar. Since I was already hiring writers on Upwork, I decided this is the place I was going to get my graphic designs from. Turns out you can get graphic designers for around $4 a design. Here is the exact script that I used:

Hey, I am in need of 400 t-shirt designs in the time period of 2-3 months.

Your task will be pretty basic, I will send you ideas of t-shirts I want to make and you make them yourself in your own unique style. For example, I might send you a link of a already existing tshirt and I would need you to be inspired by it and create a better version that is in your own creative style.

I will leave a lot of 5* reviews so that you will be able to get jobs easier in the future and this is a long-term position. Once we have done the first batch of 400 – around 4 per day, we could continue if everything looks good.

I look forward to doing business with you!

I will then hire a few of them and give each person a few of the links from the research we did in the previous step. If they come back with good designs in their own unique style, then I hire them for the long term. Keep in mind you want to give them the links and or pictures as inspiration and receive something back that is a better product than what is currently being sold.

Step 4: Setting Up Shopify

Now that you have some pretty designs sitting around from your research, you need some merch to put them on! I mentioned in the beginning that the Merch by Amazon program was closed, so if you want to start a t-shirt business or any other merch business, there is a way around the merch program. Not only is there a way around it, this is a much better solution. It will allow you to put your designs on tons of different products besides shirts. The sky is the limit, and you do not need to hold any inventory.

The way we do this is through the brand new Shopify/Amazon integration. Since there are print on demand services that integrate with Shopify, and since Shopify now passes through to Amazon, you can set everything up to become completely automated.

Head on over to Shopify and sign up for a free trial (yes, this entire method works in the free trial).

Once you are signed up, then the back end should look like this:

What you want to do is scroll down to the apps section on the bottom and look for an app called Teelaunch. It will look like this:

Teelaunch is the company we are going to use in order to print our designs on products without ever touching them. See, when you get an order from Amazon (we will go over this in a minute), then the order shows up in your shopify store. Teelaunch automatically sees that order, prints it for you, and ships it to the Amazon customer. This all happens without any input from you!

Note: I went with Teelaunch because of their pricing meaning higher ROI. There are many print on demand services that integrate with shopify that you may want to use for this method.

After you get the Teelaunch app installed in the back end of shopify, you need to quickly set it up. Head on over to the app, and click on the “Account” button in the upper right hand corner. Fill out your information and put in a credit card that will be charged when you get an order. You will take the profits from Amazon and pay off this credit card every 14 days. Whatever is left over is your profit.

Before the comments start pouring in, if you are from another country, YES you can do this method. Simply Google “free USA address” and look through the options that will give you an address as well as a mail forwarder. Most people from overseas will handle returns by just refunding the customer and letting them keep the product.

Head back to the Teelaunch app, we are going to add our first product. Click on “New Product” from the top of the page.

Pick whatever type of merchandise you want to sell. In this example, I am going to go over selling shirts because that is what I started with.

Pick the shirt you want to print on. I went with the Gildan shirt because from personal experience they are great quality, and actually the cheapest choice.

Upload your design to the editor until it looks good, pick some colors, and then select a few sizes.

When you are happy with how everything is set up, give it a title and some bullet points in the back end and then publish it.

You now have a shirt in your Shopify back end. We will now need to attach this shirt so it shows up on Amazon.

Head back over to your Shopify menu, and click on “Add a sales channel”

From here, install the Amazon sales channel. This is where the magic happens Once the Amazon channel has been installed, you will need to connect it to your Amazon sellers account.

IMPORTANT: If you do not have an Amazon sellers account, go sign up for one. You WILL need a professional sellers account which is $39.99 a month in order for this entire integration to work.

Agree to the Amazon MWS agreement and you have successfully linked your account to Shopify!

Now that these 2 accounts are linked, you will want to go into the Amazon app, and click on “Sell on Amazon”. When you click this button, it will bring up a list of products that you have published in your Shopify store. From this screenshot you can see the shirt that I was creating earlier.

Since you are building your own brand here, select that the product is made by your brand. Pick the appropriate category, and start entering your title, your brand name, some bullet points, and a description.

Keep in mind two things. The first is that you will need to click the “Apply to sell in this category” before the shirt can go live on Amazon. This application asks you a few questions and you are approved INSTANLY. Also, you will need to make multiple listings for both male and female shirts. I actually prefer this as it gives us a chance to be more targeted in our keyword approach.

For each shirt you pick up, you will have variants. Each variant requires a UPC and a SKU.

SKUs are for internal use and can be made up. They are just a string of characters. I decided to make mine random by using a 10 digit random string: http://ift.tt/1G9b55h

UPCs however will need to be purchased. These are 12 digits long and can be purchased from a ton of places online. I got thousands of them on Ebay for only a few dollars. It is very important that when purchasing them, you get the 12 digit ones, and NOT the 13 digit EAN numbers.

Since you need a new UPC for EACH variant you want to put online, I recommend that you put your designs on other things that do not require sizes.

Once you have finished entering in the variants and have been approved for the clothing category, you can publish your design. It should take 30 minutes or so for the item to appear live on Amazon.

If ANY of these instructions are confusing, or you want a more detailed description of how to set up and connect the two, please read this article here.

Shipping Settings

Go into your seller central account and make sure you are changing the shipping time and the shipping price.  Teelaunch has been very fast on their shipping, but I like to extend it just a bit as well as lower shipping to $2.99 for the lower 48 states. This makes my products more attractive to the buyer.

Return on Investment Calculations

If you price your shirts around $17 on Amazon with $2.99 shipping, the customer will be charged around $20. If you figure that a typical t-shirt that we created is going to cost you $12.50 (this is with shipping included), and Amazon takes their fee of around $3, you are going to be left with over $4 per shirt sold.

This might not seem like much at first, but when you realize that you are selling on Amazon.com where there are millions of daily buyers, your perspective might start to change. I sell hundreds of shirts per day.

Shirts have a $4 profit margin but think of the other products you could sell. Mugs and sweatshirts might have a much higher profit margin depending on what you price at. Play around with it because the sky is the limit.

Step 5: Optimize Your Amazon Listings

When it comes to building your Amazon listing around the product you are building, there are only a few major points that need to be covered. These are: price, brand, title, bullet points and competition.

Price

This is a major one because it is one of the first things that a buyer will notice. Make sure you are pricing competitively. If everyone else in your niche is selling for $20, then why would you try and sell your merchandise for $25? Sure, you would make a better margin, but you will get drastically more sales. If you price about $20, you need to have an extremely good reason for doing so.

Let the market determine where you are pricing. Take a look at your competition. They might have the same product, but really give it a hard look and see if your designs are really that much better to ask for a higher price. I like to make sure that my prices are right in the middle. An easy way to do this is take all the prices on the first page, add them together, and then divide them by the total amount of listings on the page and then price your product at that price.

Brand Name

I used to recommend people on Merch by Amazon come up with a different brand for every shirt that they put online. This is no longer the case with this method because you are selling on Amazon seller central and have full control over reviews and other aspects of the listing. Pick one brand that would work for many products and roll with it!

Title

The title is extremely important to ranking on Amazon and where keywords will come into the picture. In order to talk about keywords, we need to go over competition.

For this example, say that you just came up with a really good design about “Cats”. When you are uploading your shirt, you want to actually look at what similar designs are out there and price to what the market is demanding. When you get to putting in your title, you may just want to name it “Black cat t-shirt”. This is a huge mistake!

Look at that! If you were to name it black cat t shirt you would probably be lost in almost 150 thousand different results showing up. You want to niche down if you are to stand a chance of making any sales.

Think to yourself “What would a customer search for if they were looking for this shirt”? Maybe your shirt has some ears in it.

Getting better, but still lots of results. Time to try and use a modifier to niche down even further.

Very close! I like to see if I can get under 1,000 results if possible. Niching down like this is the perfect way to add keywords to your title of your listings without looking spammy.

As you can see, by tweaking the title a little bit, we found out a way to lower down the competition you will be facing as well as putting in some keywords into the title for better rankings all around. This is what you want to practice with every product you are putting up.

Bullet Points

Bullet points are what get your merchandise ranked in Amazon from all the tests I have run. You need these bullet points to be keyword rich without keyword stuffing. To do this, make sure they are coherent sentences. Read them out loud to yourself to make sure they sound correct.

What many people do here is simple describe their product. Should you do this?

NO!

The bullet points are where you put on your marketing hat and SELL the potential customer. You have multiple bullet points to work with here, so really make sure you are marketing to them here. They will read these. Tell them why they want it!

I also like to put a last bullet point telling them to order a size up because these print on demand shirts often shrink a size in the wash.

Description

If the bullet points are where you are selling the customer, the description is where you want to describe what is in your shirt. Keep in mind that this section is what shows up on mobile and is often times used in the meta description for ranking in Google. Make sure you are filling these out and not leaving them blank.

Step 6: Scaling Up

This entire method is nothing but a numbers game and a pretty easy one at that. The majority of people will probably not even try it because of the time investment needed, but it works!

In order to scale quickly, you need to be able to either design yourself, or afford to outsource designs. I would suggest doing at LEAST 10 products a week if possible.

A lot of people reading this and who have listened to the entire process on my site have begun by putting up t-shirts on Amazon because that is what I used on Amazon.

DO NOT DO THIS.

Brand new Amazon accounts are limited to 100 variations a week. If you put up 1 shirt in 5 colors and all the sizes, you blow through almost 50 variations with a single shirt.

Instead, while everyone is focusing on putting up a few shirts a week, you can take your designs and put them on hundreds of products a week! Put them on products that do not require sizes.

If you look and the shopify app does not have the category you want to list in, list the product through seller central, and let it sync to the Shopify app.

Doing that one thing will set you apart from the competition and let you grow at an incredible rate.

Success Stories

If you are still here reading through this, have no idea who I am, you probably have no reason to believe me.

You get nowhere in life without at least trying, but people do always like to see some proof and I understand that.

You have seen some of the numbers posted above, but let me offer to you 3 people who have each found their own success through selling Merch on Amazon over the past year.

The first guy who I will not name, has been a friend for a long time. He is heavily focused on Amazon affiliate sites, but when I started talking his ear off about Merch right when it opened, he decided to give it a go and scaled up quickly. Here are his earnings:

The second is a guy named Tom. One of the most driven people I have ever met, he designed every single piece of artwork himself, and just look at what kind of earnings he is hitting. Keep in mind these are screenshots from ONLY selling t-shirts. Can you imagine what they will look like after he starts putting those same designs on other pieces of merchandise?

Finally, we have Albert from Canada. This guy is always the first to jump at an opportunity and test it out before coming to conclusions. Be like Albert! I have actually personally spoken with him just a few times. According to him, he heard about Merch through my tiny little marketing blog and hit the ground running with it. He managed to strike fast and create a few very well selling designs and ended up doing almost $6,500 his SECOND month of selling shirts online.

Then when the Shopify/Amazon integration happened, Albert saw the writing on the wall and started putting up his designs that he had already created on other products. In just 3 days he has made 8 sales! He only has a couple of designs up right now using the Shopify Method and plans to scale quickly.

Disclaimer: In order to see the same level of success as the above, you will NEED to be able to put in the time and effort. Do not expect to put up 10 designs and wonder why you are not making money. Dedicate yourself to it. Numbers matter, so go out there and hit numbers that your competitors can’t.

Wrapping It Up

That about wraps up the entire method and exactly how to start a t-shirt business today. Leveraging the millions of buyers on Amazon has never really been this easy. If you are lacking startup costs, you can do this on the cheap by learning to design yourself. There is ZERO inventory that you need to hold, and minimal issues you need to work around. Think of this entire process as starting an Ecommerce brand with the force of Amazon behind you.

I appreciate the Niche Pursuits community allowing me to bring this to the table today, and if you have any questions, drop them in the comments and I will make sure to answer. Good luck!

The post How to Start a T-shirt Business on Amazon Making $10,000+ Per Month appeared first on Niche Pursuits.


from Niche Pursuits http://ift.tt/2jL6TEQ