Sunday, June 30, 2019

HostGator Cloud Web Hosting Review (2019)

If you’re in the market for a new web hosting service, HostGator is certainly an option that will come on your radar. It’s a reputable company within the web hosting industry.

Like most web hosts, HostGator has a wide range of plans, options, and hosting types to accommodate the needs of different websites.

Today, I want to put more emphasis on the HostGator Cloud.

Cloud hosting is new compared to other types of web hosting. Rather than your website being hosted on a local server, it’s hosted on multiple remote servers.

One of the biggest benefits of cloud hosting is the ability to scale on-demand. So it’s a great option for fast-growing websites with high volatility in their site traffic.

For those of you who are interested in using the cloud to host your website, I strongly recommend that you review my analysis of HostGator Cloud. I’ll cover their plans, pricing, benefits, and everything else that you need to know before finalizing your decision.

HostGator Cloud Web Hosting Plans

HostGator Cloud Hosting

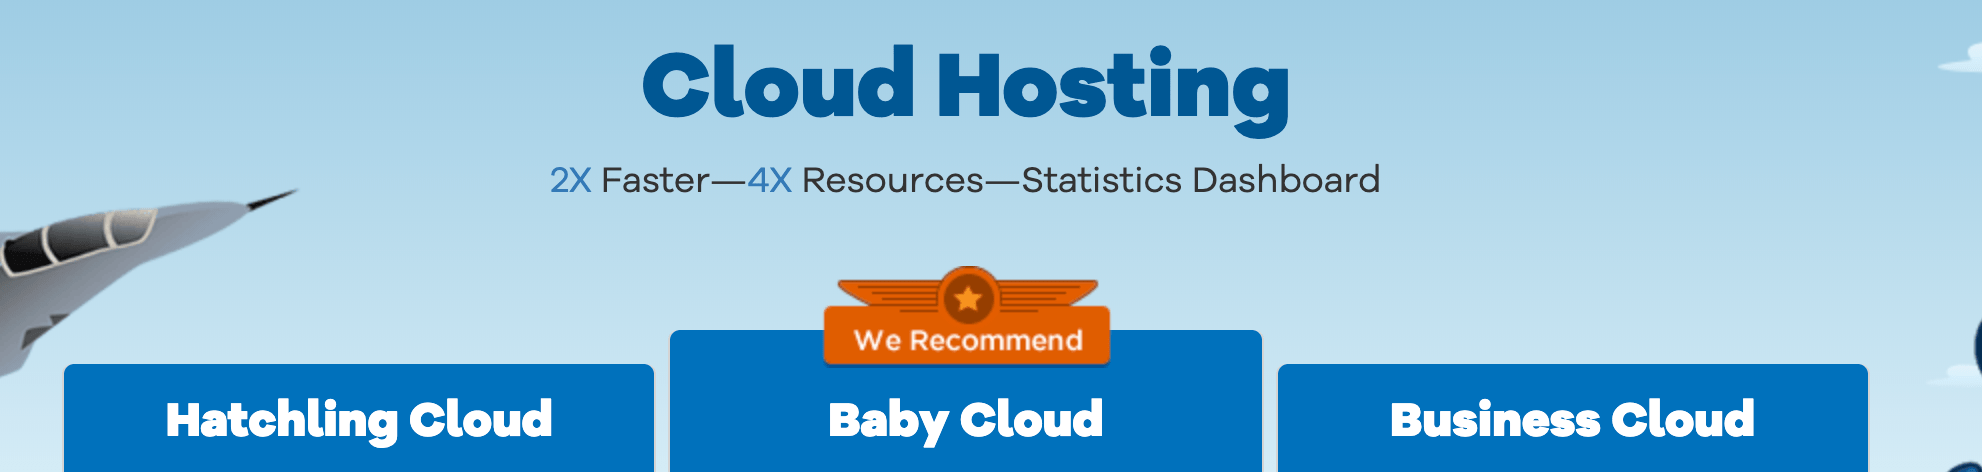
There are three cloud plans offered by HostGator. The cloud uses premium hardware, low-density servers, and multiple layers for caching. As a result, this speeds up your page loading times.

As your traffic increases, HostGator Cloud plans make it possible for you to increase your resources with a click on-demand. All of this happens without any downtime, reboots, or data migrations.

Regardless of the plan you choose, you’ll have access to HostGator’s intuitive dashboard. From here, you’ll be able to monitor all of the metrics related to your website’s performance.

That’s what you’ll use to allocate any additional resources accordingly. Basically, you have complete control of your usage with the HostGator Cloud.

Let’s take a closer look at each individual cloud hosting plan.

Hatchling Cloud

The Hatchling Cloud is the entry-level cloud hosting plan from HostGator. It’s made for hosting one domain and has 2 GB of RAM.

Like all cloud plans, the Hatchling comes with a free SSL certificate.

Pricing for this plan starts at $4.95 per month as an introductory offer. Your contract will renew at $8.95 per month.

You can add on SiteLock monitoring, CodeGuard site backups, professional email, and HostGator SEO tools for additional annual fees.

This plan is best for new websites that want to be hosted on the cloud. Even though you can allocate new resources on demand, you’ll likely want to upgrade as your total monthly traffic increases.

Baby Cloud

Here’s a quick glance at what the Baby Cloud offers compared to the Hatchling.

Baby Cloud

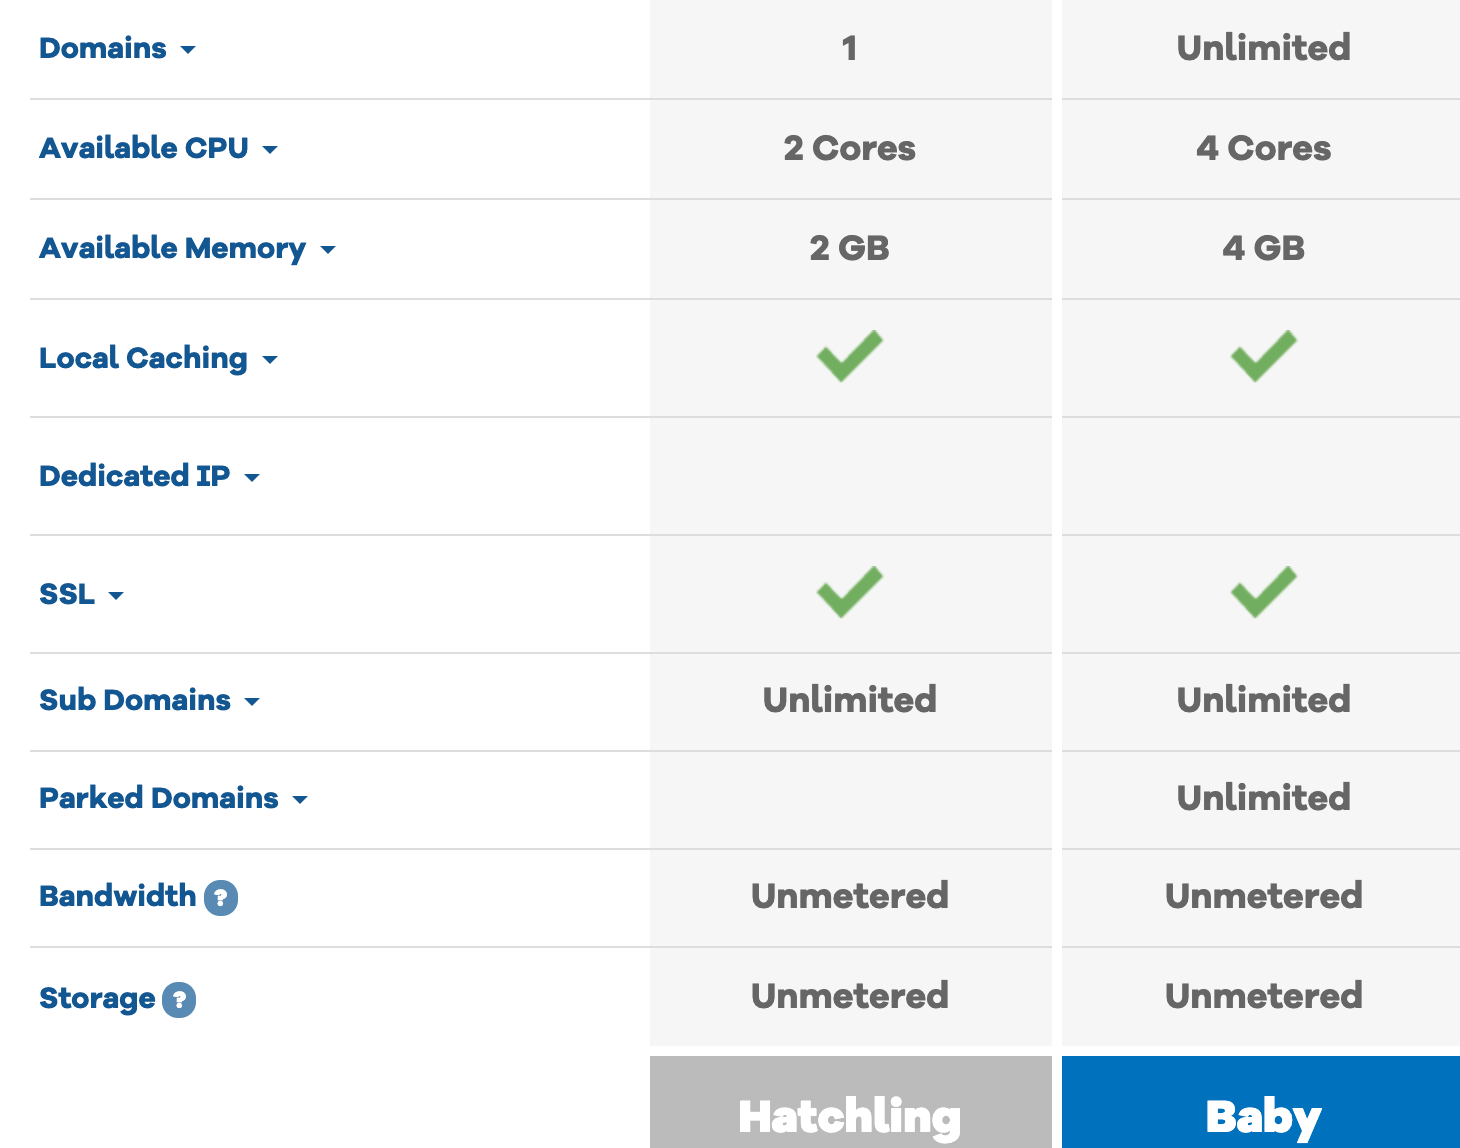
As you can see, the Baby Cloud can host unlimited domains, and has twice as much available CPU space, and double the memory.

The rate for new cloud customers is $7.95 per month, before renewing at $11.95 per month. Right now they’re running a deal where you can actually get the introductory rate reduced down to $6.57 per month, which is a great value.

All you need to do is sign up and the discount will automatically be applied at the checkout.

This is the most popular cloud hosting plan offered by HostGator. I’d say it will likely be the option that’s the most suitable for the majority of you.

Business Cloud

The Business Cloud is HostGator’s top-tier cloud hosting plan. Like the Baby Cloud, it also hosts an unlimited number of domains on a single plan.

However, the Business plan comes with access to 6 cores, as opposed to just 2 or 4 cores on the Hatchling and Baby plans. Your HostGator Business Cloud also has access to 6 GB of RAM.

It’s the only cloud hosting plan that comes standard with a dedicated IP address. This feature is not available on the Hatchling plan and it costs an additional $4 per month on the Baby Cloud plan.

Considering that the Business Cloud starts at $9.95 per month, that extra feature is a great value. However, it’s worth noting that renewals jump up to $17.95 per month once your initial contract expires.

Alternative Hostgator hosting options

While the primary focus of this review is on the HostGator Cloud, I would be doing you a disservice if I didn’t mention the other hosting options offered by this provider.

Cloud hosting isn’t for everyone. So if you’re in the market for a more traditional type of web hosting plan, you may want to consider one of these options as an alternative.

Dedicated server hosting

HostGator Dedicated Server

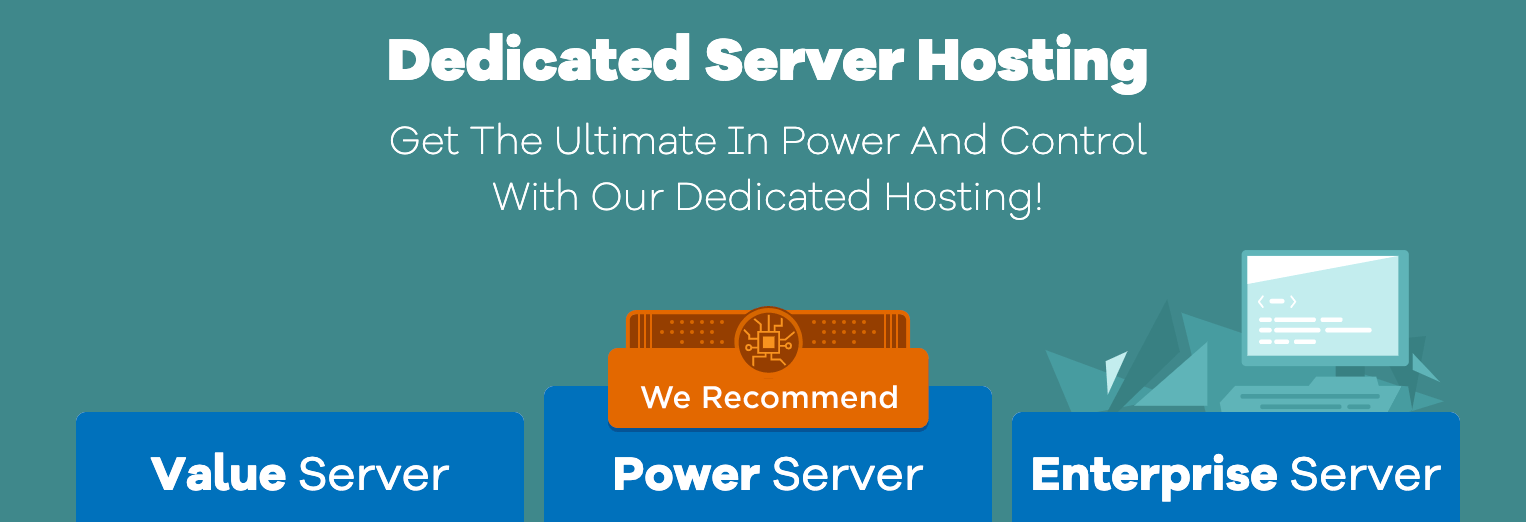
With a dedicated server, your website will be renting a physical server from HostGator. This server will only be used for your site.

It’s a faster option than shared or VPS hosting since you won’t be sharing any resources, storage, or bandwidth with other websites.

Dedicated servers are ideal for those of you who are a bit more tech-savvy. If you want complete control over your server in terms of security and flexibility, this is your best bet.

Pricing for HostGator dedicated servers starts at:

  • $118.99 per month for the Value Server
  • $138.99 per month for the Power Server
  • $148.98 per month for the Enterprise Server

Compared to the cloud hosting plans, these dedicated servers are priced significantly higher.

VPS hosting

Virtual private servers from HostGator give you flexible software options. You’ll gain full root access, which gives you added control in your environment.

The VPS plans are a step up from shared hosting, but not quite as in-depth or expensive as the dedicated servers. For comparison purposes, let’s take a look at how these VPS plans are priced, so you can weigh them as an option against cloud hosting.

  • Snappy 2000 — $29.95 per month
  • Snappy 4000 — $39.95 per month
  • Snappy 8000 — $49.95 per month

If you’re already using cPannel for web hosting, SiteGround will migrate you to VPS hosting for free.

Shared hosting

If you’re on a budget and don’t want to use the cloud, shared hosting is the bottom-tier plan offered by HostGator.

Plans start at $2.75 per month, $3.95 per month, and $5.95 per month, respectively.

The problem with this option is that you’re going to be sharing resources with other websites. So if those sites have traffic spikes or higher volumes of visitors, it will impact the metrics on your site as well.

So if you want to save some money, but don’t want to sacrifice performance, cloud hosting will be a better option for you. Shared hosting doesn’t give you the flexibility to manage your resources the way that cloud hosting does.

Benefits of HostGator Cloud for web hosting

Now that you’ve had a chance to see some of the other types of web hosting offered by HostGator, let’s get back to focusing on the HostGator Cloud.

The following benefits refer specifically to the cloud plans. So for those of you who are considering one of those alternative options, I can’t guarantee the same advantages.

High uptimes and fast load times

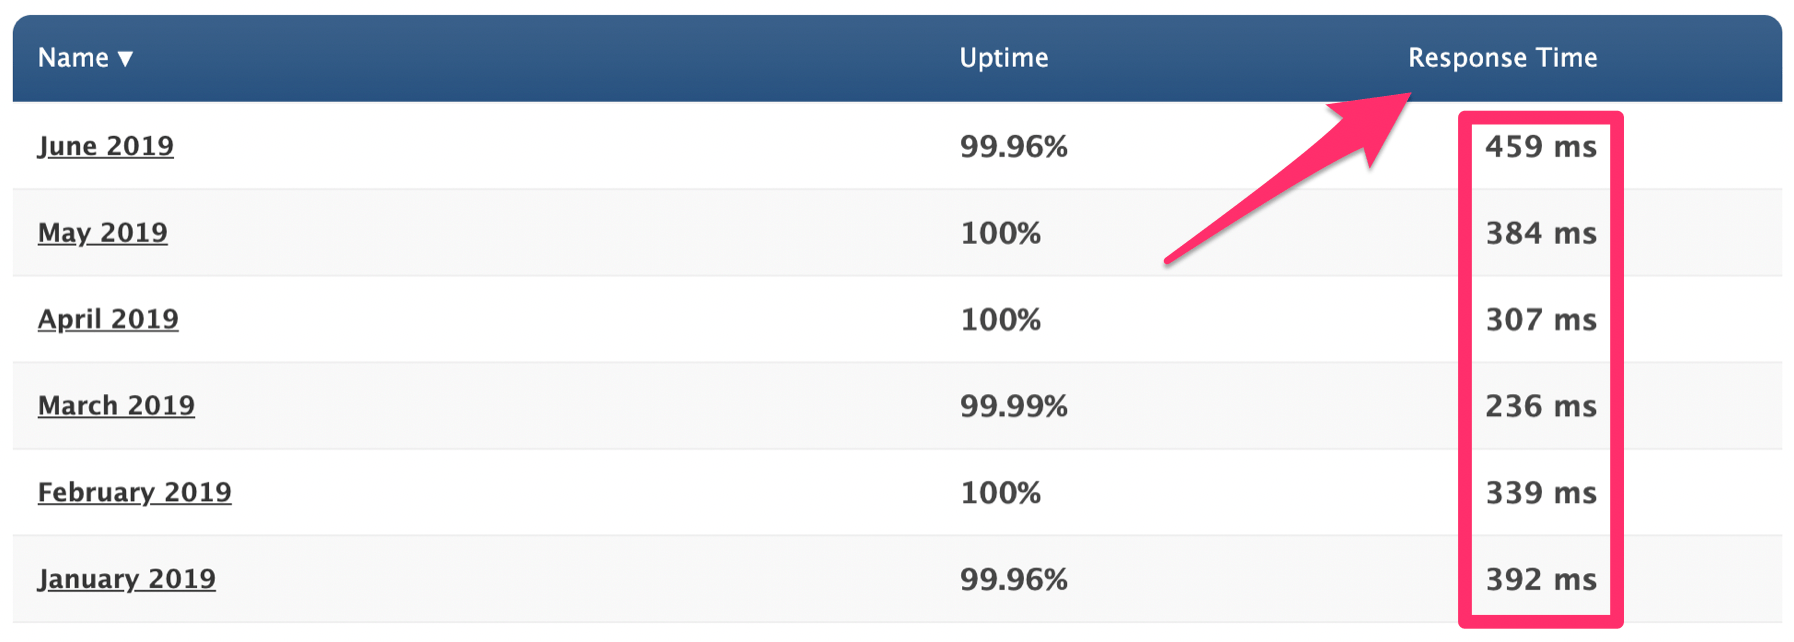
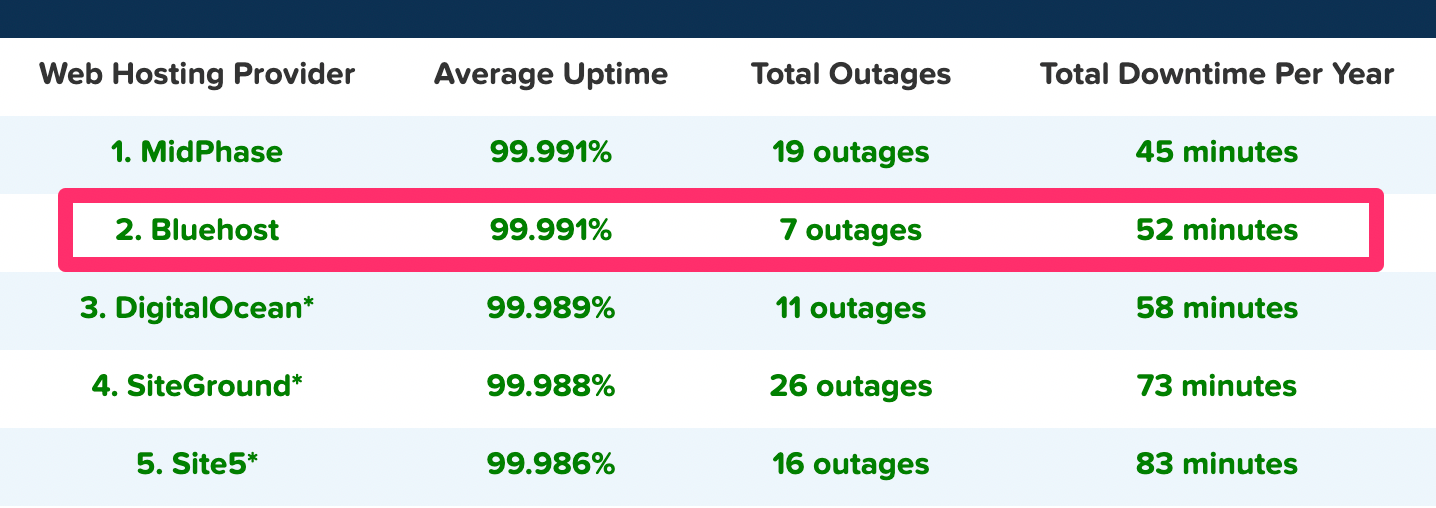
When measuring the performance of a web hosting service, uptime and page loading speeds are two of the most important metrics to consider. Let’s take a look at how a HostGator Cloud test website performed so far this year.

HostGator Uptimes

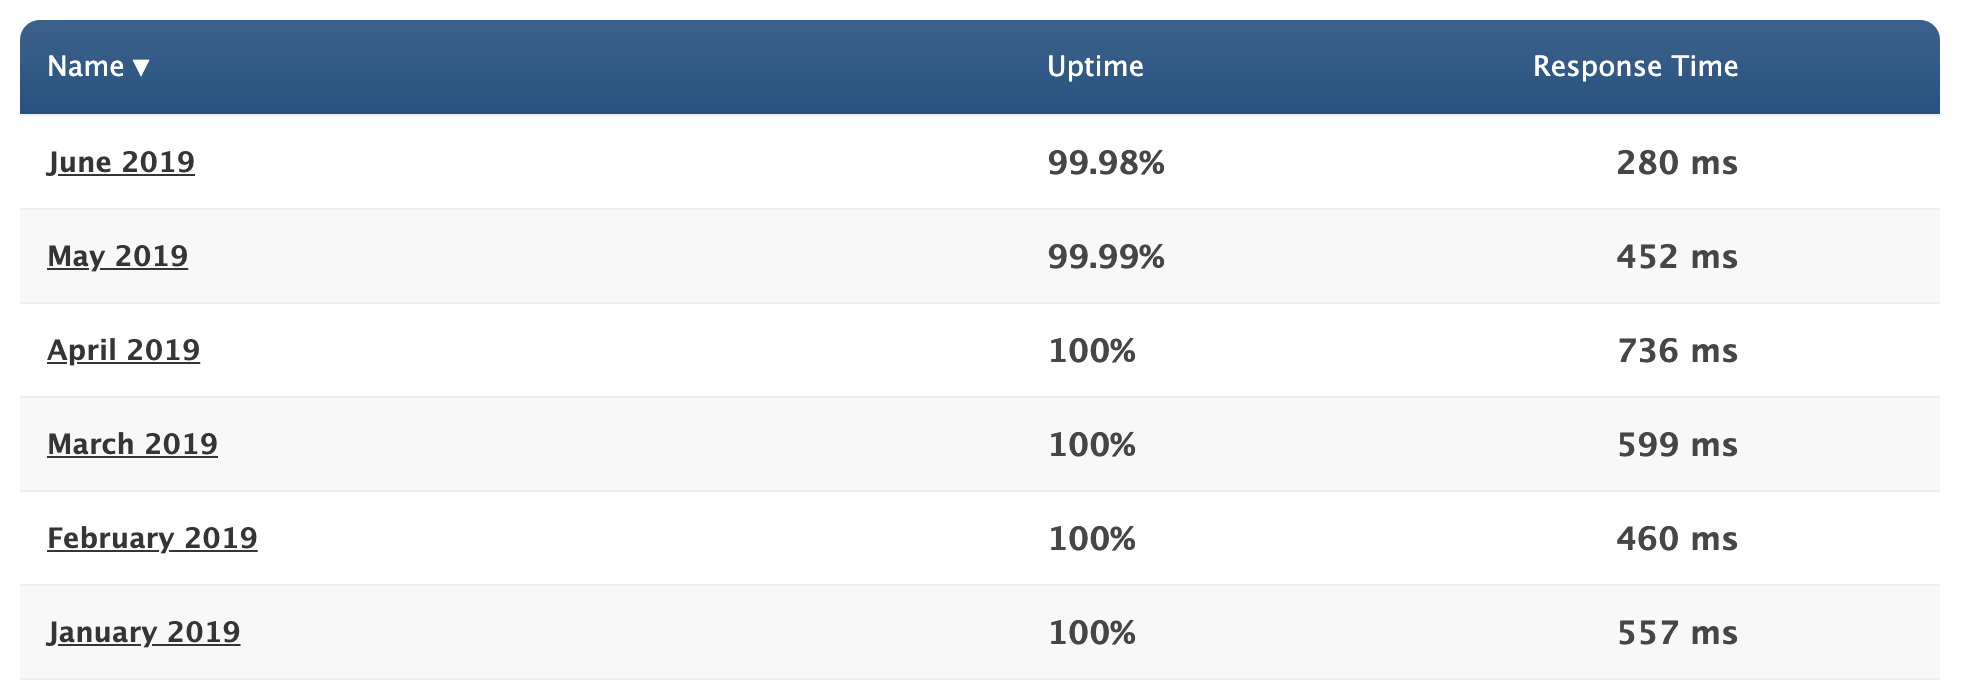
Over the past six months, HostGator Cloud had a 99.995% average uptime rate. That’s about as exceptional as it gets.

As you can see from the table above, the page loading speed fluctuates quite a bit so far this year. The fastest average monthly response time was 280 ms, while the slowest was 736 ms. But on average, the response time in 2019 is 514 ms.

Truthfully, it’s definitely not the fastest loading time we’ve seen. But with that said, it’s still very fast, and far from the slowest.

Based on these numbers, I can’t say that you’ll be disappointed with your uptimes or loading speed if you decide to go with a cloud hosting plan from HostGator.

User-friendly

HostGator Cloud is very easy to use. It’s a great option for beginners, as well as users who have more experience with web hosting.

The cloud plans make it possible for you to allocate your resources as needed whenever you’re experiencing traffic spikes. That’s not the case with their other plans, which would require you to upgrade as you reached limitations on resources.

Even if you’ve never done this before, the interface is very easy to manage.

Another reason why HostGator Cloud is so user-friendly is because you won’t have to worry about outrageous pricing. These plans don’t surprise you with monthly overage fees when you exceed your plan limits. That’s a major downside of other web hosting plans.

Lots of freebies

The reason why cloud hosting from HostGator is so fast is because it doesn’t rely on typical servers. Instead, the servers from remote data centers work in unison with a person’s web browser to limit the number of resources required to host the website.

Things like managed cloud resources, data mirroring, and integrated caching make this possible, which comes free with your cloud hosting plan.

Furthermore, you’ll get free server monitoring to alert you if there are any hardware problems.

When you sign up for HostGator cloud, you’ll have access to cPannel as well. As I said before, you’ll get a free migration if you’ve been using cPannel with your current web host.

Easy access to customer support

HostGator Cloud comes with 24/7/365 customer support, which is crucial for web hosting. My favorite part about this is their support portal.

Rather than having to pick up the phone or chat online, there’s a good chance you can find the answer to your question here.

Here’s an example of a tutorial that explains the step-by-step process of how to add resources to your cloud hosting plan.

Hostgator Update Plan

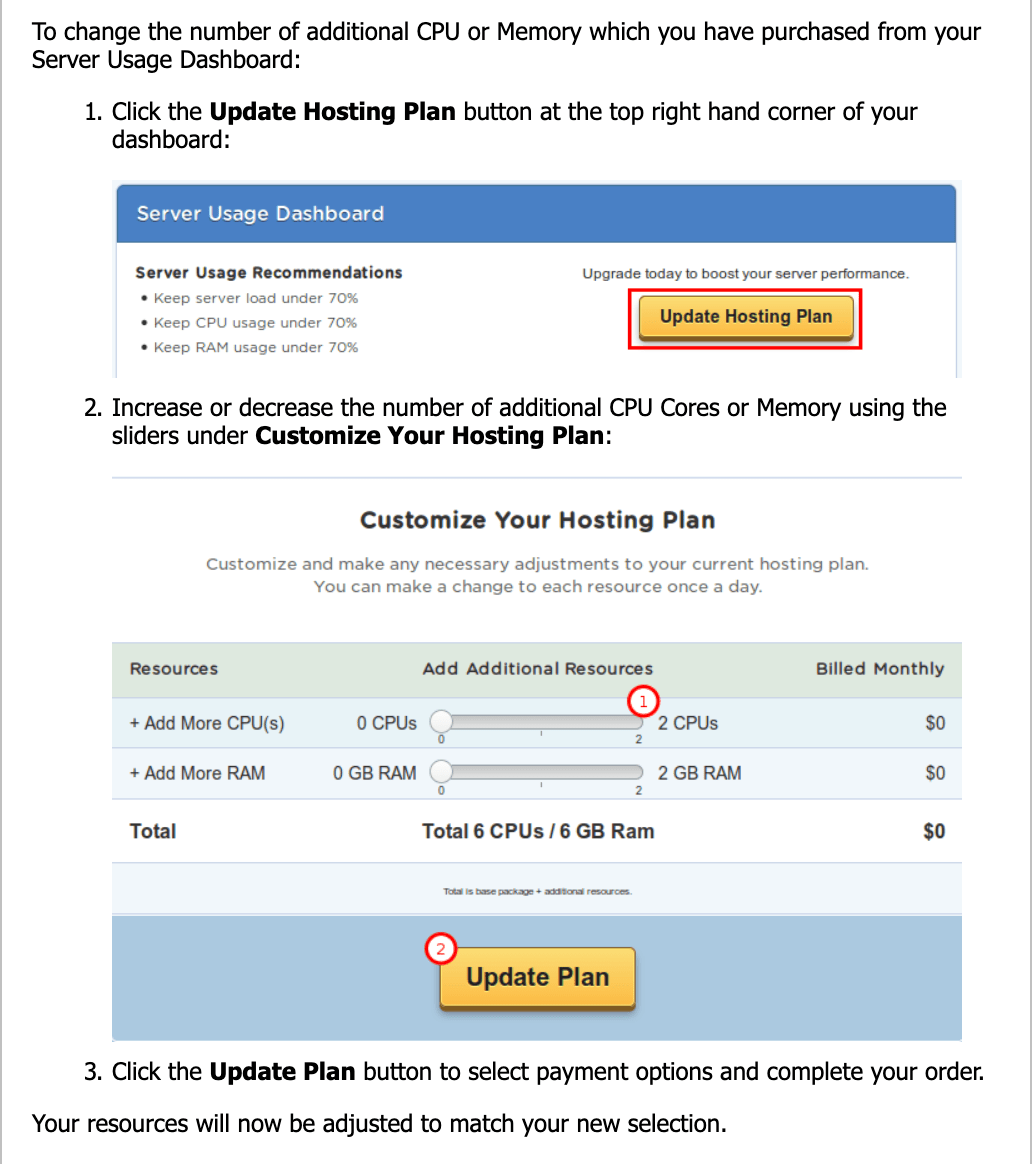
HostGator has tons of these for nearly every aspect of cloud hosting. It’s a quick way to find a solution to your problem.

With that said, phone support and live chat is always available as well. Personally, I prefer live chat as opposed to picking up the phone. But you’ll have both options depending on your personal preference.

Other considerations

Based on the benefits that we just discussed, I think we’ve established that HostGator Cloud is a top choice to consider if you want to use cloud hosting. But with that said, there are a couple of things that you need to keep in mind before you make that decision.

I briefly touched on this earlier when we discussed the cloud hosting plans, but the initial rates are just introductory offers. When your contract renews, you’ll be paying more.

Depending on your plan, you can expect prices to increase by roughly 80%.

While HostGator has its fair share of freebies, there are also some upsells along the way as well. Some of these are automatically checked off in your shopping cart, so make sure you review that page thoroughly before you commit to anything.

Conclusion

Overall, HostGator is a reputable name in the web hosting space. Their cloud hosting service is a great option for those of you who want to take advantage of cloud website hosting.

If you compare those plans to their standard shared hosting options, the cloud is the superior choice in my opinion.

However, if you don’t think cloud hosting is for you then you could always consider VPS or dedicated server hosting from HostGator as well.

For those of you who still aren’t convinced on the HostGator Cloud, you can check out my list of the best web hosting services for some other viable options.


from Quick Sprout https://ift.tt/2YnuU8B

Friday, June 28, 2019

The 11 Top WordPress Landing Page Templates in 2019

Anyone can create a website. Just because you own or manage a website, it doesn’t automatically mean that you’re a natural born designer.

But the design and layout of your website will have a huge impact on its success.

In fact, 48% of people say that the design of a website is the top factor they use when it comes to determining how credible a business is. 38% of people will stop using websites with unattractive layouts.

So if you want to create unique and beautiful landing pages without having to design them from scratch, you’re going to want to use pre-designed templates. WordPress is the best place to find these.

That’s because WordPress is the most popular CMS platform in the world, and has been for the past seven years in a row.

It controls nearly 60% of the entire CMS market across the globe. With more than 500 new sites launching on WordPress each day, it’s also the fastest growing CMS worldwide. 34% of the whole internet is run via WordPress.

So if you were on the fence about using WordPress to manage your site, hopefully now you’re convinced.

For those of you who are already using WordPress, you’re ahead of the game. Now it’s time to design the best landing pages for your WordPress site.

With so many options to choose from, I’ve narrowed down the top 11 WordPress landing page templates to make the decision much easier for you.

1. Landkit

Landkit

Landkit is extremely easy to use, yet it’s designed for high performance. The hybrid composer page builder makes it possible for you to design your website without having to write any code.

It doesn’t use many server resources, which makes it perfect for websites with high volumes of traffic. You can use the Landkit template to functionally present information in a way that’s attractive to your website visitors.

Another reason why I recommend Landkit is because the landing page templates are so versatile. They can be used for pages related to things like:

  • Lead generation
  • Ebook downloads
  • Webinar registrations
  • Online services
  • Free trial page
  • Mobile app showcase
  • Contest details
  • Crowdfunding
  • New product launch
  • Coupons

The list goes on and on. Landkit makes it easy for you to change the colors to match your website color schemes. It’s also compatible with the WooCommerce plugin, for those of you who are using WordPress for your ecommerce site.

Landkit has more than 70 page elements for complete customization. You can choose from 12 header styles, and add use the built-in WordPress mega menu. This landing page theme can be purchased for $49.

2. Landing

Landing

The Landing template from Themify is another versatile option for you to consider. It comes with a drag and drop page builder, making it easier than ever before to customize all of the page elements to your liking.

Landing has more than 25 builder layouts for you to choose from, based on the type of page that you want to create.

There are options specifically created for products, portfolios, marketers, events, ebooks, weddings, agencies, restaurants, mobile apps, personal pages, and more.

I like this template because it has a responsive design on all devices, and it’s retina ready as well. Landing has cool header options such as:

  • Default header
  • Transparent with text
  • Transparent
  • Transparent with no logo
  • No header

These choices are ideal for those of you who want to draw more attention to background images and CTAs on your landing page. Another benefit of Landing is the fact that it has MailChimp integration, so you can use this landing page to collect email addresses.

The standard Landing WordPress template costs $59. Developers can buy it for $69.

3. BeOnePage Lite

BeOnePage Lite

BeOnePage Lite is meant to portray a futuristic and interactive design. This template can be customized to be colorful as well. It comes with a full-screen layout and slider that can be used to display things like images, videos, icons, and other graphics.

Another benefit of this template is that it can support several different media files. The parallax effect of BeOnePage Lite ensures that all scrolling will be very smooth on the user’s end.

It has a responsive design, with lots of customizable options for you to consider. BeOnePage Lite is a retina ready template that can be used as a landing page for virtually any website.

So if you’re looking for a modern WordPress template that’s free to install, BeOnePage Lite should be taken into consideration.

4. Foton

Foton

Foton was developed with software and mobile app promotion in mind. So for those of you who are creating a landing page to drive mobile app downloads or sell software, this template should be at the top of your list.

You can import this template into WordPress with just one click. To customize your page settings, you can take advantage of the drag and drop page builder, which is extremely easy for anyone to use.

No coding is required to use Foton. It has WooCommerce integration, slider revolution, and excellent support. It’s also fully responsive and easy to change color themes.

Foton comes with free plugins and is optimized for SEO purposes. It has shortcodes designed for portfolios as well, such as lists, projects, sliders, galleries, masonry, and hover layouts.

Transitions from page to page are very smooth. The font sets and icons are attractive and easy to change as well. Shortcodes for videos and call-to-actions are definitely ones that you’ll want to take advantage of.

The Foton WordPress landing page template is priced at $59.

5. Jevelin

Jevelin

Jevelin is another multi-purpose WordPress landing page template. Some of the top features of this theme include:

  • WooCommerce integration
  • Mobile ready
  • Contact Form 7
  • One click installation
  • SEO friendly
  • RTL optimized
  • 40+ customizable shortcodes

There is a great video installation guide, making it possible for anyone to install Jevelin, even if you don’t have experience adding landing page templates to your WordPress site. The fact that it has built-in capabilities with one of the best WordPress form plugins is another added bonus.

Jevelin has great reviews from website owners who are using this template on their sites.

The drag and drop builder paired with mega menus, custom widgets, social sharing functionality, and ecommerce support make it a popular option. This WordPress landing page template can be bought for just $59.

6. Launchkit

Launchkit

Launchkit is definitely a one size fits all landing page template, which I’m not saying in a negative way by any stretch. I like Launchkit because it can be used for virtually any landing page for any business type.

They offer versatile headers with all different types of media in mind. You can customize headers, CTAs, and forms in a way that positions them for high conversions.

Launchkit has simple colors, so your website always looks good, regardless of the screen size or type that it’s being viewed on.

Top features of Launchkit include:

  • Three header layouts
  • Seven footer layouts
  • Custom logos
  • One click data installer
  • Multilingual support
  • Gravity Forms
  • Contact Form 7

This template comes with more than 600 Google Fonts as well. With that in mind, you should check out my guide on the best Google Fonts that go together on your website.

For the reasonable price of $59, Launchkit is definitely one of the best landing page templates you can find for your WordPress site.

7. The Gem

Gem

If you’re looking for a multi-purpose landing page that is optimized for high performance, look no further than The Gem. This template offers a creative design that’s modern and suitable for all different types of websites.

There are more than 70 built-in concepts. So you can find a landing page that fits your needs.

  • Agencies
  • Business and finance
  • Ecommerce shops
  • Portfolios
  • Blogs
  • Mobile apps
  • Cryptocurrencies
  • Real estate
  • Restaurants
  • Gyms
  • Beauty salons
  • Law firms
  • Hotels
  • Nonprofit organizations

These are just some of the many options that showcase the versatility of this WordPress landing page template. It’s fully responsive and looks great on both desktop devices and mobile screens.

The Gem is compatible with WooCommerce, making it a top choice for those of you who have an ecommerce shop.

With the visual composer, you can easily change elements on your landing pages with the drag and drop builder. The template is compatible with plugins and also comes with premium sliders.

You can buy this landing page template for $59.

8. Kallyas

Kallyas

More than 35,000 websites are using Kallyas for landing page templates. They have more than 65 live demos, with new ones coming out each month.

I always like it when landing page templates offer lots of live demos because it makes it easier to give you inspiration for designing your own website. Top benefits of Kallyas include:

  • Fast loading times
  • Quick setup
  • Video tutorials
  • Written tutorials
  • Reliable customer support
  • Visual page builder
  • Free updates for life

The one-click installation makes it easy for you to start editing your website in minutes. They have demos for things like weddings, makeup artists, bloggers, kids websites, membership sites, news, medical, sports, and dozens more.

Kallyas has more than 100 pre-built elements into the template. This gives you seemingly unlimited options when it comes to customizing your landing pages. Kallyas is priced at $69.

9. Softbox

Softbox

Softbox is perfect for those of you who want a clean and professional design for landing pages on your website. It’s easy to choose your layout and customize the elements with some of their pre-built options.

It works on all major web browsers, screens, and devices. Softbox is retina ready and fully responsive. They have templates designed specifically for home pages, blogs, and interior landing pages as well.

In a word, Softbox can be described as simple. But when it comes to your website, simple designs have higher conversion rates.

Compared to some of the other WordPress landing pages on our list, Softbox is offered at a lower price point. This template can be yours for just $39.

10. Fusion

Fusion

The Fusion WordPress template is designed with mobile app landing pages and portfolio landing pages in mind. So if you’re looking to showcase one or both of these things on your website, you should take a closer look at this option.

It’s an ideal solution for agencies and developers. The pages can be set up so that creatives can showcase their products. This holds true for both firms or individuals as well.

The typography is super clean. All of the design elements and whitespace is managed perfectly with this template, so the eyes of your website visitors are always drawn to the right spot on the page.

Fusion has a simple shortcode builder and easy customization. Everything integrates seamlessly into WordPress for you to manage.

This template has more than 1,500 retina icons, a revolution slider, and the ability to create a gallery with captions. It comes with over 500 Google Fonts, Contact Form 7, and an Ajax loading gallery as well.

Fusion costs $49 to install.

11. Leadinjection

Leadinjection

Last, but certainly not least, on our list is Leadinjection. As the name implies, this template is designed especially for generating leads.

They have pre-built layouts for things like:

  • Online courses
  • Mobile apps
  • eBooks
  • Services
  • Medical websites
  • Insurance companies
  • Landscaping businesses
  • Diets and health
  • Cryptocurrencies

As you can see, these lead generation templates are extremely versatile and can fit the needs of nearly any website.

The template comes with a Lead Modal plugin, that’s basically a popup on your site that can be used to generate leads. This can be based on timing, exit intent, or other trigger options.

Leadinjection has all different types of opt-in forms for your landing pages as well. You can fully customize your CTA, and even add a click to call button for your mobile site. If this sounds like the landing page template that you want, it can be purchased for $39.

Conclusion

If you need help designing a landing page for your WordPress website, I’m confident that you can find what you’re looking for somewhere in these options that I’ve listed above.

I tried to include something for everyone on here. Some of these templates are made for multiple purposes, while others are made specifically for things like mobile apps, ecommerce, or lead generation.

Price is another factor that you can take into consideration when making this decision. While there are some free WordPress landing page templates, the rest tend to be priced between the $39 and $69 range.

So keep this list in mind when you’re on the search for the perfect WordPress landing page template.


from Quick Sprout https://ift.tt/2RPXxZL

Thursday, June 27, 2019

Podcast 151: How Nathan Hirsch Built FreeeUp.com Into a Multi-Million Dollar Business

In today's episode, I interview Nathan Hirsh, co-founder of FreeeUp.com.   How did Nathan go from college student, to selling products on Amazon, to launching one of the top freelance marketplaces?  Listen in to hear the entire story of FreeeUp. Topics…

The post Podcast 151: How Nathan Hirsch Built FreeeUp.com Into a Multi-Million Dollar Business appeared first on Niche Pursuits.


from Niche Pursuits https://ift.tt/2J8I2Ic

Wednesday, June 26, 2019

The Beginner’s Guide to HTML

There are nearly 1.7 billion websites worldwide. This number continues to grow each day.

What do all of these sites have in common? In one way or another, they all use some form of HTML. That’s why learning basic HTML is such a useful skill.

Here’s the thing. You can definitely build a website without having to write a line of code. But with that said, once your site is live you should still know how to read and some HTML on your own.

So whether you’re creating a new website, have an existing website, or you just want to learn more about coding, this is guide will serve as the perfect introduction to HTML for you.

Let’s start with the basics. What exactly is HTML?

This acronym stands for Hypertext Markup Language. Basically, it’s the standard format used to create web pages, web applications, and documents. This computer language is a series of code that is typically written in a text file and then saved as HTML. When viewed on a web browser, this code translates to a properly formatted blend of text and other media.

HTML is behind every web page you see online, including this page that you’re reading right now.

Understanding hypertext and markup language

As I’ve already mentioned, HTML stands for hypertext markup language. But those words don’t mean much to most people, so I want to break them down even further so you can fully understand the definition.

The word hypertext dates back more than 50 years. It was invented to describe links in a document that make it possible for a viewer to jump to another place in the document or to a completely new document. This is something that we see and use every day in the modern Internet.

Here’s a visual representation of what hypertext looks like.

Hypertext

I’m sure you’re familiar with hyperlinks, which is a form of hypertext.

As you browse online, you’ll see either http:// or https:// before every web page in your web browser. This stands for hypertext transfer protocol.

Markup language refers to how documents and web pages are displayed. You see words that are bold, italic, or larger on a page. But behind the scenes, the markup language is the reason why certain components appear differently on a page.

Markups are characterized by tags and attributes. Most of the time these tags come in pairs. There are start tags and end tags, which are also known as opening tags and closing tags.

When to use HTML

HTML is the default language for all websites on the Internet. But it’s also used for various types of documents, such as ebooks.

When an HTML document gets rendered by a web browser, all of the markup language and tags are hidden. The display automatically gets changed to display a reader-friendly version of the document (what you’re seeing right now).

Do you need to learn HTML to create a website?

The short answer is no. Unless you’re planning to build pages from scratch and pursue web development, you won’t necessarily need to know every single component of HTML.

You can probably get away without knowing HTML if you’re using a CMS, website builder, or blogging platform. For example, if you’re using WordPress as your blogging CMS, the visual editor automatically translates your text to HTML.

Wordpress Editor

Working in the visual editor will display content similar to a standard email message or Microsoft Word document.

With that said, there are times when visual editors don’t always work the way you want to. You might find yourself in a situation where you want to format something a certain way and it’s not getting displayed properly.

Furthermore, your HTML also needs to be optimized for non-human readers. Search engine bots are crawling your website for indexing purposes. The way that your HTML gets read will have an impact on your SEO.

Website accessibility also needs to be taken into consideration. Computers can translate web pages into sound for people with disabilities. They rely on the structure and quality of HTML for this.

While the platforms on the market today make it possible to operate a website without knowing HTML, it’s still in your best interest to learn the basics.

Choosing your HTML editor

For those of you who are planning to create web pages using HTML, you’ll need to use an HTML editor.

These editors are the best way to organize your code and keep everything clean. Editors are great because they recognize whenever a new tag is opened. These tags are automatically closed by the software, ensuring that your code doesn’t have bugs. This also limits the number of typing and keystrokes you have to make.

The best HTML editors let you preview your HTML to see how the content will look from a web browser. There are tons of options online. But I’ve narrowed down a handful of the top HTML editors for you to consider.

You can also practice HTML with this free tool from W3Schools. That’s what I’m going to use to show you examples of HTML as we continue.

HTML basics

Before you start writing HTML, you need to understand the three main components.

  • Tags
  • Attributes
  • Elements

These can be described as the building blocks or foundation of HTML. Once you learn what these are and how they work, it will be easier for you to move forward. I’ll go into greater detail on each of these below.

Tags

In short, tags are used to distinguish HTML code from normal text. The way your document gets displayed will be based on the tag instructions.

Here’s an example. Let’s say you want to make something bold.

Bold Example

The tag for bold is <b>, which is pictured above. This compares to the text above it, which is <p>, or a standard paragraph text.

Once the code is rendered, it’s displayed how we would normally see it on a web page, as you can see from the right side of the screenshot above.

Now let’s say you wanted to make something italicized. The HTML tag would look like this:

italicized example

Pretty straightforward, right?

All I’m doing is using the tags to change the way the text appears when it’s on a web page.

Take a look at those tags closely. Do you notice a difference between the opening tag and closing tag? The closing tags have a slash, indicating that the italics, bold, or whatever other tag you’re using stops here.

If that example above didn’t have a slash in the closing tag, anything written after it would continue to be italicized.

Hyperlinks are also created with tags. Here’s what the HTML tag would look like if I wanted to hyperlink to the Quick Sprout homepage.

Link Example

This tag is a little bit more in-depth than the bold and italics examples. But the same concept still applies.

There is an opening tag and closing tag with text in between. The way these tags are written determines what the result will look like on the web page.

Every web page starts with a <!DOCTYPE html>. Then the first line of the file says <html> as well. You can see this on the three examples that I showed you above. This tells browsers how to read the code.

Elements

An HTML element consists of the opening tag, closing tag, and the content in between the two.

So when we were going through different examples of tags, each example was a new element. For example, let’s take a look at some potential lines of HTML.

Element Example

When you look on the right side of the screen at the page version of this code, you see four total sentences and two paragraphs.

Now, look at the HTML code on the left side of this split screen. You can see how the three different elements are identified.

Elements can be simple, such as the bold example above, or they can be a bit more complex.

The document above starts with an open <body> tag, and also ends with a closed </body> tag. So everything within those two tags can also be considered one element. But within that entire body, there could be dozens, hundreds, or thousands of additional elements, depending on how long and complex your content is.

Attributes

For the most part, tags are used to define how content is displayed in HTML. But with that said, there are times when additional information within an element needs to be added.

In these instances, you would use an attribute to define a specific characteristic of the element in question. Attributes consist of two things:

  • Name
  • Value

They are placed inside the start tag of an element. Here’s an example to show you what I mean.

Attribution Example

The attribute used here is align=”center” and it falls within the <p> opening tag. It means that whatever text comes before the closing </p> tag will have a specific characteristic defined by the attribution.

In this case, the attribute said to center the text.

We saw another example of this earlier when I created a hyperlink for the Quick Sprout home page.

Beginner HTML cheat sheet

There are thousands of different ways you can write content in HTML. But if you’re just starting out with, there’s no reason for you to learn all of them right away.

Instead, I’ll show you some basic HTML tags and explain what they’re used for. Then you can practice applying them in an HTML editor.

Heading tags

<head> … </head>

These tags are used to showcase specific information on pages such as title tags and meta tags. Proper use of heading tags can increase your search engine traffic.

Title tags

<title> … </title>

Your title will appear within the header of the page. It will give search engine crawlers more information about the primary content of a particular page.

Paragraph tags

<p> … </p>

You’ve seen these throughout the examples that I showed you above. They denote a new paragraph of text.

Hyperlinks

<a href=”link”> … </a>

This tag and attribute is used to display the anchor text for hyperlinks. The full link would be written in between the quotation marks.

Images

<img />

Image tags are used to present image files on the page.

Tables

<table> … </table>

This tag contains all of the information related to content in a table. It also identifies content as a table.

Footers

<footer> … </footer>

Anything in between these tags would be in the footer block of a page.

Conclusion

Every website uses HTML. So if you’re building a website or currently manage a website, it’s in your best interest to know what’s going on behind the scenes of your web pages.

I’m not suggesting that you should go out and start building pages from scratch without any experience as a developer. There’s really no reason for that.

But you should have a basic understanding of what HTML is, how it works, and where to edit it on your website.

Here’s what I suggest. Use one of the HTML editors that I showed you earlier to practice your basic coding skills. Then just go through and try to replicate some of the examples that I covered in this beginner guide.

That’s the best way to get your feet wet with HTML if you don’t have any experience with it.


from Quick Sprout https://ift.tt/2RAAmCf

Tuesday, June 25, 2019

What is the Best Keyword Research Tool For You? [Free & Premium]

answerthepublic home page

The jury is unanimous on this one: without keyword research, you're dead. Your website won't rank, your income won't rise, and you'll never accomplish what you're trying to do.   But with so many options out there, it's easy to…

The post What is the Best Keyword Research Tool For You? [Free & Premium] appeared first on Niche Pursuits.


from Niche Pursuits http://bit.ly/2WXwe0k

Monday, June 24, 2019

PayPal vs. Stripe For Ecommerce

As I’m sure you’ve figured out by now, building a website takes lots of hard work. This is even more so the case for those of you who are creating an ecommerce site.

In addition to your website design, architecture, and all of the standard website elements, you also need to figure out how you’re going to accept payments online.

If you’ve never done this before and you’re just starting some preliminary research, there’s a good chance that you’ll come across two names; PayPal and Stripe. These are both industry leaders in the online payment processing industry.

Both platforms will essentially let your customers buy products or services from your ecommerce shop, but the way that these services are provided are different from platform to platform.

So what’s the difference between PayPal and Stripe? Is PayPal or Stripe better for accepting payments online? These are questions that I hear all of the time when I’m consulting with ecommerce companies.

Truthfully, you probably can’t go wrong with either one. But with that said, I want to give you as much information as possible about each platform so you can decide which one is right for your ecommerce business.

Basics of payment gateways

Before we continue, I want to make sure you understand exactly how PayPal and Stripe work. There are two terms you need to know:

  • Payment gateway
  • Payment service provider

Payment gateways give ecommerce sites the capability to accept payments online. These gateways are like a middleman between a business payment processor and credit card network. PayPal and Stripe both have payment gateways, which you’ll need if you’re planning to authorize online payments.

A payment service provider (or PSP for short) on the other hand is a bit more involved. PayPal and Stripe are both PSPs as well. They link businesses with merchant accounts by providing the technology required to process online payments, as well as other forms of payment.

PayPal and Stripe group all of their merchants into one account, as opposed to each business having a dedicated account.

Basically, both of these platforms have everything you need to authorize payments as an ecommerce website.

PayPal for ecommerce

Paypal for Ecommerce

Even if you have no prior experience with running an ecommerce website, PayPal is definitely a name that you’ve heard before.

The company has always been known for payment processing. They have the reputation for being a safe and secure way for PayPal users to buy from merchants using a PayPal balance as well as a debit or credit account linked to their PayPal profile.

But PayPal offers much more features and services to accommodate ecommerce shops. So the days of PayPal only being suitable for things like eBay or other P2P payment situations are long behind us. Now they have a variety of plans for launching a business, whether you want to sell online, in person, or both.

You’ll be able to accept payments from credit cards, debit cards, PayPal credits, PayPal accounts, and Venmo as well.

With PayPal, you can design your own shopping cart. They have customizable solutions that are fully scalable for growing businesses.

PayPal offers three main plans for you to choose from. I’ll cover each one in greater detail below.

PayPal Checkout

Paypal Checkout

For those of you who already have an existing payment processor that you’re using to accept credit cards on your ecommerce site, PayPal Checkout might be a good option for you to consider.

Basically, you can just add the PayPal button to your current payments page with this supplemental plan. It’s easy to integrate with your existing ecommerce platform. Once the button is added, your customers will be able to use PayPal, PayPal credits, or Venmo to buy from your online store.

Conversion rates are up to 82% higher when PayPal Checkout is added to ecommerce sites. That’s because shoppers can complete the purchase in just a click or two, if they have PayPal on their phones or if they’re already logged into PayPal on their computers.

There is no setup fee or monthly fee for this plan. PayPal charges merchants 2.9% + $0.30 per transaction in the United States.

PayPal Payments Standard

The PayPal Payments Standard plan is made for merchants who don’t have an existing payment processor or want to switch providers.

In addition to the PayPal payment options, you’ll also be able to accept Visa, Mastercard, American Express, and Discover cards. Adding the button to your website is as simple as copying and pasting some code. The checkout pages will be hosted by PayPal.

This plan will cost you 2.9% + $0.30 per US transaction. There are no monthly fees or setup fees for the Payments Standard plan.

PayPal Payments Pro

Payments Pro is the top-tier plan offered by PayPal. It allows you to create a fully customizable checkout experience on your ecommerce site.

Unlike the Payments Standard plan, website visitors won’t have to leave your site to complete the checkout process. It also has a mobile-optimized checkout process and easy shopping cart integration. Payments Pro gives you a virtual terminal, which makes it possible to accept payments over the phone as well.

With the added features, this plan costs $30 per month, plus the standard 2.9% + $0.30 per transaction.

Stripe for ecommerce

Stripe for Ecommerce

Unlike PayPal, Stripe doesn’t have their services segmented into tiered plans. Stripe’s payment processing will be the same, regardless of what features you’re taking advantage of.

With that said, depending on which tools you want to use, it will cost more. But the nice part about this is that you’re only going to be charged for the features that you actually want, as opposed to paying for a plan that includes tools you don’t need.

You can easily add Stripe to your ecommerce site with just one simple integration.

Once that happens, the platform makes it easy for you to accept payments, process them, settle, and reconcile. You’ll be able to process credit cards and ACH transfers both online and via mobile app payments. In fact, big mobile app brands like Lyft are already using Stripe.

Stripe lets you build a checkout process from scratch, or select one of their pre-built templates.

The platform has features for invoicing and setting up recurring payments for subscriptions as well. Let’s take a look at some of those add-on features I was talking about earlier.

Connect

Stripe Connect is made so that marketplaces and platforms can accept money and pay it out to third parties. It supports ecommerce sites, crowdfunding, on-demand businesses, and travel or event platforms.

Take advantage of Stripe’s UI components that are pre-built, or use their tools to create and customize everything on your own.

Sigma

Sigma helps businesses analyze data from stripe using SQL. It can help improve the efficiency of business operations, finance departments, data teams, and product management.

It’s a great way for you to get to know your business better with data. Then you can make necessary adjustments based on your findings. Pricing for Stripe Sigma varies based on the volume of monthly charges.

Atlas

Stripe Atlas is made for those of you who are starting an online business from scratch. The startup toolkit guides you through the process of forming a company, establishing IP ownership, filling out the right documents, and getting a tax ID number from the IRS.

Stripe Atlas

Atlas also sets you up with a new bank account and debit card for your business.

There is a $500 one-time fee for using this service. Services like bank account maintenance, tax filing, and registered agents are not included in the setup fee. These are all billed individually at an annual rate.

Radar

Radar is Stripe’s fraud detection, prevention, and management tool. It’s designed to analyze your data and stop potential fraud cases before they are processed.

They take data from your checkout flows, payments, and financial partners to determine irregularities. Stripe’s partnership with major credit card companies and banks make it possible for them to identify fraudulent charges before you need to make a dispute.

Issuing

Stripe Issuing is made for ecommerce businesses that want to create, distribute, and manage both physical and virtual cards for in-house purposes.

You can use these cards for things like employee expense accounts. It’s supported by Google Pay and Apple Pay as well. It’s also worth noting that Stripe Issuing is a beta program that’s only being offered in the United States.

Terminal

For years, Stripe was better known for its online payment processing. But now they offer Stripe Terminal, which is a POS system for in-person payments.

This is a great option for those of you who have physical store locations in addition to your ecommerce shop. You can get everything you need both online and in-store from the same provider.

PayPal and Stripe compared

As you can see from everything that we’ve covered so far, these two payment service providers are very different from each other. But with that said, they have some things in common as well.

Deciding between PayPal and Stripe will mostly come down to personal preference and exactly what you’re looking for. Let’s take a look at some specific features to see how each platform stacks up against the other.

Price

The pricing for PayPal is very straightforward. Only the Payments Pro plan has a monthly fee, while all three plans charge 2.9% + $0.30 per transaction.

Stripe also charges 2.9% + $0.30 per transaction. But they do have custom pricing packages for things like volume discounts and multi-product discounts, which can be useful for those of you who want to take advantage of the products we looked at earlier.

According to research Value Penguin, Stripe is more expensive than PayPal.

Stripe vs Paypal cost

It can be argued that Stripe has more to offer, which might justify that higher amount. But when you compare the cost per transaction rates head to head, both services are even.

Support

Both PayPal and Stripe offer excellent customer service and technical support options. They each have their own variation of a help center, with different tools, guides, FAQ, and resources needed to troubleshoot on your own.

You can also get help using:

  • Email
  • Live chat
  • Phone
  • Social media

Based on all of this, I don’t think that I can definitively say that one platform has better support than the other, so this category is a tie.

Ease of use

Stripe and PayPal are both easy to use. But with that said, Stripe is definitely more developer-friendly, meaning it could present more of a challenge to ecommerce store owners who don’t have that type of technical knowledge.

PayPal is as simple as copying and pasting some code to get set up, which is about as straightforward as it gets. So I’d say PayPal is better for beginners, while Stripe has more customizable options for developers.

Contracts

Both PayPal and Stripe offer pay as you go contracts. So you won’t get locked into anything long term and can cancel at any time. You also won’t be charged a cancellation fee by either service if you decide to do so.

This category is another tie.

Reputation

PayPal always had a reputation for its P2P payments through third-party platforms like eBay. Although now they’re taking aim at providing more services for ecommerce sites. Stripe has always been known for ecommerce solutions, but not offers POS solutions as well.

Both of these companies have the tools, services, and resources you need to run an ecommerce shop. They both have exceptional online reviews as well.

PayPal is the most popular digital wallet in the United States and is the most popular mobile payment method in North America. There are more than 277 million PayPal users worldwide.

Based on these numbers, I’d have to give the edge to PayPal in terms of reputation. But by no means am I saying that Stripe doesn’t have an excellent reputation as well.

Conclusion

If you have an ecommerce shop and you’re trying to figure out the best payment service provider, both PayPal and Stripe are top options to consider.

At the end of the day, it’s going to come down to personal preference. Based on the information I gave you above, you can decide which plan meets your needs the most.

I can’t definitively give an edge to one platform over the other. I’d strongly recommend both options.

For those of you who still aren’t sold on PayPal or Stripe, you can review my guide on the best payment methods for your ecommerce site to find some alternative solutions.


from Quick Sprout http://bit.ly/2Ycnntc

Saturday, June 22, 2019

Serpstat Review: The SEMRush & Ahrefs Alternative You Need?

serpstat home page

Keyword research is the backbone of the modern website. Without proper keyword research, you'll spend months or years doing what will take a better-researched site weeks to achieve. But as the website landscape grows more competitive, we have to add…

The post Serpstat Review: The SEMRush & Ahrefs Alternative You Need? appeared first on Niche Pursuits.


from Niche Pursuits http://bit.ly/2ZJ7Zot

Friday, June 21, 2019

Bluehost Web Hosting Review (2019)

If you’re on the hunt for a new web hosting service, Bluehost is definitely a top option to consider. This platform powers more than 2 million sites across the globe.

All web hosting services are not created equally.

I see so many new webmasters make the mistake of just going with the cheapest web host or the web hosting site that appears first in their Google search results.

For something as important as web hosting, you can’t rush this decision. It’s crucial that you take the time to weigh your options in order to find the best web hosting plan for your needs.

That’s what inspired me to write this guide. Since so many of you will likely come across Bluehost during your search, I wanted to give you as much information about this web hosting service as possible.

I’ll explain all of their hosting plans, pricing, and discuss the best parts about using Bluehost. I’ll even tell you about a couple of cons associated with Bluehost, just to make sure you have all the facts before you sign up.

Bluehost Web Hosting Plans

Not every website has the same web hosting needs. Bluehost knows this and has three different types of web hosting options for you to choose from.

  • Shared
  • VPS (virtual private server)
  • Dedicated server

Choosing which kind of web hosting plan to go with will vary based on how much you want to pay, your expected site traffic, and the type of website you have. If these terms are foreign to you, I recommend reading my guide on everything you need to know about web hosting. This will give you a more detailed description of the differences between these hosting options.

Shared hosting

Bluehost shared hosting

If you have a new website and you’re on a tight budget, shared hosting might be your best option. Bluehost offers four different pricing plans for its shared hosting services.

  • Basic — $3.95 per month
  • Plus — $5.95 per month
  • Choice Plus — $5.95 per month
  • Pro — $13.95 per month

I know what some of you are thinking. If Plus and Choice Plus are priced the same, wouldn’t you automatically go with Choice Plus?

All Bluehost plans go up in price once you renew. The advertised prices above are just the introductory rates. It’s worth noting that Plus renews at $10.99 per month, while Choice Plus renews at $14.99 per month.

Bluehost has managed shared hosting platforms, meaning you won’t have to worry about managing servers or anything like that.

VPS hosting

Bluehost VPS hosting

VPS hosting from Bluehost is the middle-tier option of the three plans. There are three pricing options for a Bluehost virtual private server.

  • Standard — $19.99 per month
  • Enhanced — $29.99 per month
  • Ultimate — $59.99 per month

The biggest differences in these plans are the cores, SSD storage, RAM, bandwidth, and IP addresses.

With the Standard plan, you’ll get 1 core, 30 GB of SSD storage, 2 GB of RAM, 1 TB of bandwidth, and 1 IP address. Cores, SSD storage, and RAM double at each tier for the Enhanced and Ultimate packages.

Using Bluehost for a VPS gives you dedicated server resources. You’ll be able to use your RAM, CPU, and disk space, no matter what other users on the same server are doing. VPS hosting also has increased security, since you won’t be sharing an operating system with any other Bluehost users.

Dedicated hosting

Bluehost dedicated hosting

Picking a dedicated server plan from Bluehost means you’ll be taking advantage of their top of the line services. These plans are made for those of you who are tech-savvy and want complete control over your server.

  • Standard — $79.99 per month
  • Enhanced — $99.99 per month
  • Premium — $119.99 per month

As you can see, top-tier plans come at higher price points. With VPS hosting, you’re maxed out at 120 GB of SSD storage, 8 GB of RAM, 3 TB of bandwidth, and 2 IP addresses. But dedicated servers from Bluehost go all the way up to 1 TB of storage, 16 GB of RAM, 15 TB of bandwidth, and 5 IP addresses.

These plans will probably exceed the needs and uses for what most of you are looking for. But with that said, as your website grows and your traffic scales, you might want to consider a dedicated server in the future.

Benefits of Bluehost for web hosting

Now that you have a better understanding of the plans offered by Bluehost, it’s time for us to discuss what makes Bluehost a great choice for web hosting.

Low pricing options

If you have a brand new website, you don’t need to be spending thousands of dollars per year on web hosting. With Bluehost, you won’t have too.

As you’ve already seen, the introductory rates for Bluehost shared web hosting starts at just $3.95 per month. Being able to host your site for less than $50 is a great deal.

All Bluehost shared hosting plans come with a free SSL certificate and free marketing credits. When you factor in the storage and bandwidth you’re getting, that’s a fairly decent value for the price.

Overall, this is one of the lowest prices you’ll see for a legitimate web host.

Great security

Even though Bluehost has some inexpensive pricing options compared to other web hosts on the market today, it doesn’t mean that they’re inferior when it comes to crucial security features.

I’ve already mentioned that an SSL certificate comes standard, regardless of which plan you choose.

Furthermore, their plans have a feature to hide the personal information that you used when signing up for a private domain. Lots of times hackers will target this information from website owners.

Bluehost has features to prevent malware attacks, as well as tools used for automatic daily backups. You’ll also get a security tool that offers spam protection for the email address associated with your website.

Again, this is all a great value considering how much these plans go for.

Top loading speeds

Page loading speed is something that always needs to be taken into consideration when you’re shopping around for the best website host.

If your site takes too long to load, it’s going to kill your engagement metrics. People will abandon your site, and you won’t be able to drive conversions. It’s as simple as that.

So let’s take a look the response time for a Bluehost test website.

Bluehost response time

The average response time for Bluehost so far in 2019 is 352 ms. To put that into perspective, refer to my SiteGround web hosting review. SiteGround’s average response time over the same period of time was 662 ms, which is still fast.

Bluehost nearly cuts that time in half.

Easy to use

You don’t need to be a tech expert to host your website with Bluehost. Nearly anyone, regardless of their experience level, can find a beginner hosting plan from this platform.

That’s definitely not the case with all web hosting providers on the market today. There are plenty of web hosts out there that are specifically designed for advanced webmasters.

Whether you’re using WordPress or taking advantage of the Bluehost website builder, everything will be pretty straightforward and easy to follow.

Excellent support

Even though Bluehost is easy to figure out, you may still find yourself in a situation where you need some help or guidance.

In most cases, you should able to find an answer through their knowledge base page. This is essentially a support center that has how-to guides, tutorials, and articles with instructions for troubleshooting and FAQ. Simply search what you’re looking for, and there will likely be a resource to help you out.

Furthermore, Bluehost has 24/7 phone support, which is great for those of you who like to be talked through problems.

If you’re like me, you’ll probably just take advantage of their live chat agents. It’s a fast and easy way to get an answer without having to leave their website.

High uptimes

You can’t give a web hosting review without referring to uptime rates. Take a look at where Bluehost stacks up compared to other web hosting providers in this recent study.

Bluehost uptimes

Bluehost ranked second on the list with a 99.991% average uptime for the year. That percentage is identical to MidPhase, which ranked first on the list.

Furthermore, you can see that Bluehost only had seven total outages on the year, which was the lowest for all hosts in the top five, including the top-ranking provider on the list.

It really doesn’t get much better than that. So if you host your website with Bluehost, you can rest assured knowing that your site isn’t going to have much downtime throughout the year.

Money-back guarantee

Like most web hosting services, you won’t get a free trial to try them out. But with that said, Bluehost does offer a 30-day money-back promise.

So if you’re on the fence about using Bluehost, it’s comforting to know that you’ll get refunded if you’re not ultimately satisfied in the first month.

But with that said, it’s worth noting that the refund only applies to web hosting costs. So if you use Bluehost for a domain name or other add-ons, those purchases are final.

WordPress hosting

If you’re using WordPress, Bluehost is definitely a top option for you to consider. That’s because this web host is just one of the three “official” recommended choices from the WordPress website.

Bluehost WordPress hosting

DreamHost and SiteGround are the other two recommended web hosting services on this WordPress resource.

With that said, you can still use nearly any other web hosting service on the market to create your WordPress website. But it’s definitely a positive sign that Bluehost is recognized as a WordPress partner.

Other considerations

While Bluehost has its fair share of positive characteristics, it’s still not perfect. I wouldn’t be doing my job if I didn’t mention some of the shortcomings of this web host.

High renewal rates

I briefly mentioned this before when we were discussing the different plans and pricing options. Like many other web hosting services, Bluehost jacks up the prices once you renew your subscription.

Depending on your plan, the monthly rate will change as follows:

  • $3.95 to $7.99
  • $5.95 to $10.99
  • $5.95 to $14.99
  • $13.95 to $23.99
  • $19.99 to $29.99
  • $29.99 to $59.99
  • $59.99 to $119.99
  • $79.99 to $119.99
  • $99.99 to $159.99
  • $119.99 to $209.99

As you can see from this list, in some instances the price more than doubles. So it’s in your best interest to commit to a longer term plan if you want to get the best rate for the longest amount of time.

Bluehost offers plans for 12, 24, or 36 months. So if you know that you’re ready to commit to this web host, I’d recommend going with a three-year contract when you first sign up. It will save you money down the road.

Costly site migrations

It seems like the majority of web hosting services out there will migrate your current website to their service at no cost. This is a major selling point for new customers.

However, Bluehost does not offer free website migrations.

For $149.99 they’ll migrate up to five websites and 20 email accounts. This gets handled by experts at Bluehost, so you won’t have to do any heavy lifting.

But with that said, you do have to pay for it, which can be a turn-off for those of you with an existing site.

Conclusion

Simply put, I definitely recommend Bluehost as a web hosting provider. There’s a reason why it’s one of the most popular services on the market today.

Bluehost has exceptionally fast loading times as well as one of the highest uptime rates we’ve seen in the last year.

They offer different hosting types, plans, and options to meet the needs of any website. I’m sure you’ll be able to find a plan from Bluehost that is suitable for your web hosting needs.


from Quick Sprout http://bit.ly/2IXsW8w

Thursday, June 20, 2019

Podcast 150: How John Kiekbusch Went from PBNs to White Hat SEO and Has Grown a Thriving Business

In today's episode, I share an interview I did with John Kiekbusch from SEOButler.com. John and I crossed paths because he is a user of Table Labs (my Amazon Table builder SaaS application).  He had a few questions and then…

The post Podcast 150: How John Kiekbusch Went from PBNs to White Hat SEO and Has Grown a Thriving Business appeared first on Niche Pursuits.


from Niche Pursuits http://bit.ly/2Rn4Lnu

Wednesday, June 19, 2019

Link Whisper is Coming Soon! A Smarter Way to Build Internal Links in WordPress

A couple of weeks ago, I mentioned that I had “secretly” been working on building a premium WordPress Plugin. Well, I'm now happy to share that the development of that plugin, Link Whisper, is nearly complete!  I've had a couple…

The post Link Whisper is Coming Soon! A Smarter Way to Build Internal Links in WordPress appeared first on Niche Pursuits.


from Niche Pursuits http://bit.ly/2Fm2aWp