
The post Podcast 158: Niche Site Project 4 Income Report For July appeared first on Niche Pursuits.
from Niche Pursuits https://ift.tt/2L4Apof
The post Podcast 158: Niche Site Project 4 Income Report For July appeared first on Niche Pursuits.
The best platform for starting an online store is Shopify. That’s what we use for all of our ecommerce websites. Creating your online store, is just 1 of 6 critical steps, which this guide will take you through in detail.
Start your free trial with Shopify today and create your online store in just minutes.
There’s a bunch of things to think about when starting an online store:
All of these are important decisions. For now, one thing matters more than anything else to get your first sale.
What’s that one thing?
Your marketing.
That’s right, how you choose to market your store completely determines how much money you’ll make. Get the marketing right, everything else falls into place. Get it wrong or neglect it, you’ll spend years on your store without selling a single item.
Before you open your online store, you need to pick your marketing strategy. Don’t even look at templates for your storefront, or color palettes, or logo designs, or anything yet. (We’ll get to the how to setup an online store stuff soon — I promise.) First, pick your marketing strategy.
If there’s one step that will make or break the success of your online store it’s this one. It’s not a hard choice, but it is one that you need to make thoughtfully and in advance.
Most online stores use one of three marketing strategies:
Let’s go through each.
This marketing strategy is pretty simple: find keywords for products that you want to offer, then get your site to rank in Google for those keywords.
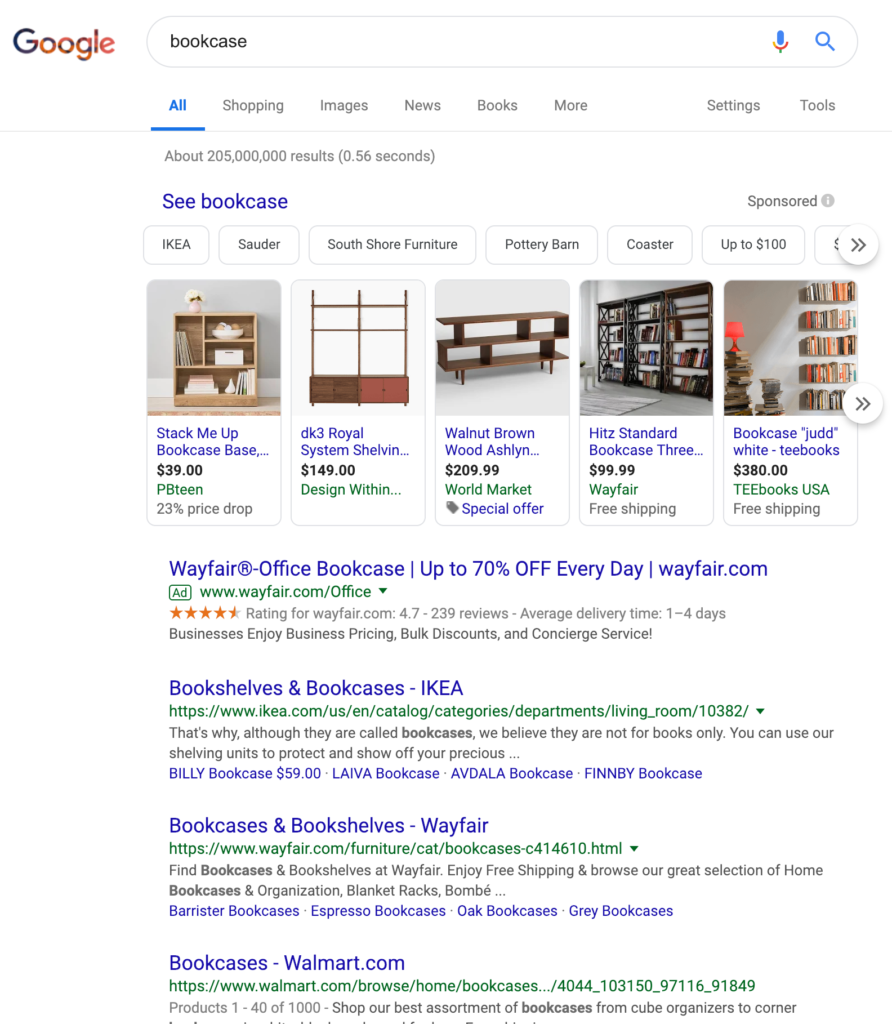
In this example, IKEA, Wayfair, and Walmart.com are winning the organic spots (the ones underneath the carousel and the ads) SEO for the search term “bookcase.” If you get this strategy to work, you can make a lot of money with your online store.
SEO has a few benefits that are ideal for a businesses:
Dependable, high volume, and profitable. It’s everything you could want.
There is one major downside: SEO takes a lot of time and effort. Even if you’re pursuing a product category without any competitors, it can still take a good 3–6 months to see your site appear on the first or second page of search results for a keyword. The traffic volume will be pretty small until you get your page into the top 1–3 rankings on a keyword. If your category is even modestly competitive, it can take years of effort to get to that point.
If you go with SEO as the marketing strategy for your online store, you’ll focus on three things:
When playing the SEO game, there are only two things that matter: content and links. So that’s where you’ll spend the bulk of your time.
Some online stores do exceptionally well with paid marketing. This includes sponsored posts on Instagram and Facebook, and paid results in Google search. Paid marketing are ad placements you buy.

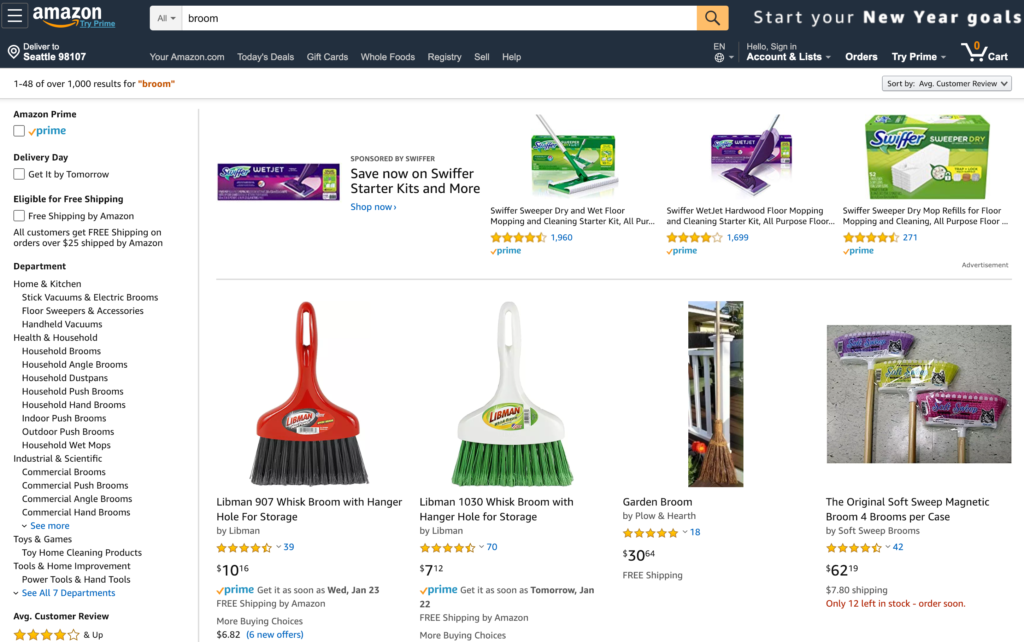
But is paid marketing right for your business? My general rule of thumb: paid marketing is a great option if your product is the type of thing that could be featured in a mall.
Why?
The biggest paid marketing channels right now are Facebook and Instagram. Instagram in particular has gotten very popular for online stores in the last few years.
But think of the frame of mind that someone has while scrolling through a Facebook or Instagram feed. They’re relaxing for a few minutes, laughing at a few photos, and leaving quick messages for a few friends. They’re enjoying themselves. It’s a lot like how people shop at a mall. Sometimes, people are looking for a particular item, but a lot of people go to the mall to enjoy themselves. Malls have known this for a long time and stores have optimized around this browsing experience.
Products that sell effectively in a mall are also likely to do well with a paid ad in Facebook or Instagram. These products typically:
If your product meets all these criteria, you should seriously consider going the paid marketing route.
Google Ads (formerly AdWords) is one exception to this. Since you’re bidding on keywords within Google, you put your ad in front of people who are already actively searching for that type of product. As long as the keyword has enough search volume and the ad bids aren’t too competitive, it’ll work very nicely.
The biggest downside to paid marketing is that you’ll have to invest a bunch of money up front before you know whether or not you can turn a profit. Many of us don’t have those thousands of dollars to invest without a reliable chance of getting it back.
Most paid campaigns don’t turn a profit initially; they usually take a lot of iteration and work before they start making a profit. Most professional paid marketers need 3–6 months before their campaigns become profitable. So be careful and make sure you don’t invest more than you can afford to lose here. If cash is too tight for you, choose one of the other marketing options.
This is a completely different direction than the two methods above.
Instead of creating your own store and using a type of marketing to acquire traffic, you’ll leverage one of the main ecommerce platforms:
It’s definitely possible to be successful at any of these three. We recommend that most folks go after Amazon. Amazon’s audience is much larger which gives you more upside and just about every product niche already exists on Amazon.
The main exception is if you’re doing a craft business of some kind, like making your own bookends to sell to people. In that case, Etsy is a better fit since the audience expects more craft-oriented products.
eBay is still great if you’re doing a bunch of buying and reselling. But if you’re producing the same types of items consistently, the potential on Amazon is much higher.
You treat whichever platform you choose as your marketing channel. First, you’ll create your store on that platform and list all your products. Second, you’ll optimize your store to the best of your ability so the platform wants to feature your products.
Optimizing your store usually involves focusing on two areas:
As you improve your search terms and reviews, more people will see your products on that platform, which will produce more sales for you.
Let’s recap what we’ve covered so far. There are three types of online stores you can open. These types are based on the marketing strategy you employ.
The three marketing channels for an online store are:
I strongly recommend that you pick one of these and build your entire business around it. That’s right, just one.
“Why can’t we do more than one? Wouldn’t we want to use multiple marketing channels for our store? More marketing means more sales right?”
I’ve made this exact mistake so many times myself. After a decade working in online marketing alongside some of the most well-respected marketers out there, I’ve noticed one overwhelming trend: folks that are good at one type of marketing are generally pretty bad at the others.
Why would this be?
A couple of reasons why it’s hard to be good at more than one kind of marketing:
If you stick with one marketing channel, you’ll get through the learning curve a lot faster. The faster you unlock your marketing channel, the sooner you’ll be making real money with your online store.
OK, step one is done. It was a long one, but it’s important that you spend time on it — it’s the very foundation of every other choice you’ll make in the process of setting up your online store.
After choosing your marketing strategy, picking your product niche is the most important decision that you’ll make. Slow down and take your time to do some genuine research here.
A huge mistake that I’ve made in the past was jumping into hobby categories. Yes, being personally interested in the category really helps with building the business. But it’s also a common trap for picking a category that won’t support a thriving business. If there isn’t much demand in my niche, it doesn’t matter how great of a job I do, I’m doomed to fail from the beginning.
There are a few things I look for in a good product category for an online store.
A common best practice in marketing is to differentiate yourself. And this is powerful advice — it’s a huge advantage when you have it.
It’s also tricky to find a genuine way to differentiate yourself that the market is willing to pay for. There are countless ways to differentiate any given product, but only 1–2 actually matter.
Does the top-rated toothbrush holder on Amazon need to do something wacky and unique? Not at all. It needs to be simple, easy to use, reliable, have a good price, and have a ton of reviews on Amazon. That’s it.
Instead of trying to differentiate yourself from every other product in your category, find a category with competitors that aren’t dominating their marketing channel. Are the Amazon reviews low for all the top products? Are the SEO results low quality? Are there no companies putting serious ad dollars behind a product? If the answer is yes, there’s an opportunity for you to out-compete them with your marketing.
Avoiding product categories with a low price makes a lot of sense. After all, if you only earn $1 in profit for each sale, you’ll have to sell 100,000 products every year to support yourself. After taxes and overhead, that’ll give you about $50–60K per year to live on.
Selling 100,000 of anything is a lot of work. No easy task.
Now let’s assume that you’re selling something for $80 and making $40 in profit on each sale. To make $100,000 per year, you’ll only need to sell 2,500 items. That’s much more manageable.
However, you also want to avoid selling something with a price that’s too high. As price goes up, so does buying behavior. Prospects demand more proof. They may even demand a completely different buying process. How many people buy cars without test driving them at a dealership? Most don’t. They want to see the car and talk to a real person before making a purchase that big. Cars require a lot of extra work and sales skill to sell effectively because of their higher price point.
We recommend finding a product that you can sell between $50 and $100 dollars. It’s high enough that sales will add up quickly for you. It’s also low enough that the buying process will be straightforward.
You can usually tell if there’s demand by doing some category research on your marketing channel. For SEO, Google Ads (formerly AdWords) has a Keyword Planner that tells you how many times something is searched in Google every month. If the keyword for your product gets less than 1,000 searches per month, it’s probably too small to build a business on.
Same thing with Amazon, if you have trouble finding products in your category with more than 100 reviews, it’s probably too small.
These days, I’d much rather pick a category that I have zero experience in but has genuine demand. That’s much better than realizing that a passion category of mine has zero demand later on.
The bad news: everyone hates this step.
Trying to find a good name that’s not already taken gets really annoying. The websites are taken, the best names have been trademarked, and you’ll feel like you’re hitting dead-end after dead-end.
Good names are tricky to find.
Whenever I look for a new name, I feel a temptation to cut corners. After several full days of brainstorming names and hitting dead-ends, all I want to do is pick a less-than-ideal name just so I can move on to the next step.
I have to tell myself that it’s worth the effort to keep looking. It’ll pay off if I keep going and it always does.
Here’s the naming checklist I use:
We have an in-depth guide on how to pick and buy a domain name here.
Once you have your name picked, grab the domain using your domain registrar. Or if you’re buying the domain from someone, get it transferred into the domain registrar that you want to use for the long term.
If you’re pursuing an SEO or paid marketing strategy, this is a super important step. The quality of your site has a huge impact on how much of your traffic will turn into buyers.
First, we strongly recommend Shopify for building your site.
There are other tools out there like Magento and Bigcommerce — none of them compare to Shopify. It’s super easy to use, has all the features that you’d ever want, and has a very reasonable price.
The one exception to this is if you’ve already built out a blog with a large audience and want to add a small online store to it in order to sell a few items. In this case, adding WooCommerce to your WordPress is a good option.
Otherwise, always go with Shopify.
We’ve put together a detailed guide on creating an ecommerce website here.
And if you’ve picked one of the platforms like Amazon, treat your company and product pages with great care. Make the copy as compelling as possible. Use every feature that they give you. Get the highest quality photos that you can. Do everything. Really make your pages stand out.
All of our stores start from scratch.
When we’re just getting started, any bit of momentum goes a long way.
That first review, that first page that ranks in Google, that first purchase using a paid ad — it’s life changing.
At this stage of the process, I never worry about systems, scalability, or trying to do things in an efficient way. I’m looking for momentum any way that I can get it, no matter how much outreach or personal work I have to do.
The goal at this stage is to put in a huge burst of personal effort and get some momentum. Even if you have to do things that you know aren’t sustainable over the long term.
Here are a few examples:
I’m looking for any marketing idea that involves my time but also allows me to quickly get my first few wins.
At this stage, do some research on your marketing channel and come up with a list of 50 ideas that you could personally do yourself. Then prioritize them and plan a 60-day Marketing Burst. Ship as many of those ideas that you can within those 60 days. Work long hours, drink too much coffee, and really push yourself during that period.
By the end of the 60-day Marketing Burst, some of your marketing ideas will have worked and you’ll have your first couple sales. You’ll also have a small but steady stream of sales coming in because you’ve focused on a single marketing channel. That steady stream is enough to start building your marketing flywheel on.
Once you have some initial momentum, it’s time to start building the marketing machine that will grow your business around the clock without you having to personally accomplish every task.
In the early days on Amazon, you’ll need to personally ask for a lot of your first product reviews. But that’s not sustainable.
Instead, look for marketing tactics that help create Amazon reviews for you without you asking for them.
Here’s an example.
A popular tactic on Amazon is to ask customers to leave a review. Some will even promise a discount code on the next purchase if a review is published.
You can automate that tactic. Have an assistant send the same templated email to every new customer, asking for a review and promising a discount code on their next order. All the platforms allow you to message customers personally through the platform. So while you can’t email blast all your customers at once, you can have an assistant send messages out one-by-one every week on your behalf. That’s a repeatable flywheel that doesn’t take up your time.
A quick side note on this review tactic: Before you try something like this, make sure to check the guidelines and policies of the platform you’re on. There are always rules about these sorts of things and every platform is slightly different. Be careful to not push things too far, putting your store in danger of getting removed entirely.
Look for as many of these repeatable marketing flywheels as you can.
Instead of creating content yourself, can you pay someone for content? If you did the keyword research, made a list of requirements that you want on each piece of content, and hired someone else to write the post itself, you could create a lot more content to help you win with an SEO marketing strategy. That’s a flywheel.
Instead of optimizing your paid ads yourself, can you delegate that? If your conversion rates are consistently improving and your cost to acquire a customer is going down, that lets you buy more customers with the same amount of capital. That accelerates your business without your personal effort. Another flywheel.
Focus on your core marketing channel and then build a marketing flywheel that will keep your online store growing without any effort from you. This is the key to opening an online store, generating sales quickly, and accelerating its growth.
I started my first blog to avoid getting a job.
I’m completely serious.
I was coming to the end of my undergraduate degree in international affairs and the thought of getting a job at the state department or in journalism sounded like a horrible idea.
So I learned how to start a blog and built one on international affairs with the hopes of eventually monetizing it and supporting myself.
That didn’t really work out as planned. Hah.
But it did lead to a career in online marketing and now I do work on blogs to avoid having a real job.
Whether you’re trying to avoid a job entirely or trying to quit your current job, starting a blog is a reliable path to supporting yourself and your family. It takes a lot of work and some time but it is a well-traveled path at this point. It’s not nearly as crazy as it was when I started.
I’m going to walk you through the 12 steps to start a blog, which are particularly useful for beginners who have never done this before.
Now, let’s dive into the step-by-step process.
The most important decision to make when starting a blog is which category you’re going to write about.
Why pick a category at all? Why not write about anything that interests you?
When it comes to building an audience, increasing traffic, and monetizing your blog, you’ll get a lot further a lot faster if you stick to a specific category.
Think of it like this: Let’s say you stumble on a blog of mine. You find an amazing post about how to turn email subscribers into fully passive income. You love it and subscribe to my email list. Then I send you an email about how to organize your closet. How would you react? Maybe you’d love it if you also really love organization. But most people would be turned off. They want more content about email lists and making passive income.
Jumping categories can be really jarring for any audience. Google also greatly prefers blogs that are focused on a single topic, which will help you with SEO a lot.
Whatever you do, pick a category and stick to it. If you want to try another category, start a new blog.
Here are a few popular categories that always do well:
My recommendation is to pick one of the categories above and niche it down one more time. Personal finance for people making over $100,000 per year is a good example. Or fitness for people over 60 is another.
Categories get tough when they’re super consumer focused and have extremely large audiences. Celebrity blogs are a great example. There’s tons of competition in this space but also very limited money compared to other blogging categories. It’s a brutal combo. All the work without any of the payoff. Recipe blogs are another example of a brutal category. World-class competition and very few ways to monetize. Try to avoid categories like these.
One of my favorite category types is B2B. This includes categories like how to do marketing, build products, HR, customer service, manage a team, or improve your sales skills. The volume in these categories is always lower than the popular categories that I listed above. But the quality of traffic is always incredible. Businesses are always willing to spend more than consumers to solve their problems; they have access to a lot more cash. The downside is that you need to have experience and skills in these areas before being able to blog about them. They’re not nearly as easy to break into.
Hobbies can also do okay, but they’re typically more difficult to monetize. That said, I’ve come across entrepreneurs who have built six and even seven figure businesses in hobby spaces like horse riding or learning the guitar. It’s doable. It’s just more difficult because people aren’t willing to spend as much on their hobbies.
Before we jump into how to find and buy the right domain, I should clarify one assumption I’m making in this post: I’m assuming you’re starting your own blog on a blog platform that you’ll own and run — your own website.
That’s not the only way to start a blog, you can use a blog site like Medium, LinkedIn, Instagram, or Facebook. If you want to make money, you need to build your own site, which I’ll cover in this post. If you’re thinking about launching your blog on a blog site, you should stop here, and go check out The Best Blogging Platforms and Blog Sites of 2019. That post explains the pros and cons of each platform. This step — choosing where to start your blog — is the “one thing gurus always get wrong about blogging” according to Gary Vaynerchuk. I’m not calling myself a guru, but I can proudly say I’m getting this right.
OK, so everyone still reading is going to set up their own blog site — let’s start with a brief discussion of how website technology works. There are a few things you’ll need to sign up for as you set up your blog, so it’s good to see how they all connect before we get too deep.
To recap, you’ll buy a domain using a domain registrar, install WordPress on your host, then start building your site. I’ll walk you through how to do each of these things step by step.
Now, how to buy a domain for your blog.
In order to buy a domain, you’ll have to find one first. This domain should be somewhat related to the category you picked and should also be available for purchase.
I highly recommend you keep searching until you find a domain that’s available. While it is possible to buy a domain from someone who already has it, that’s an advanced option and can get expensive fast.
Low quality domains will usually go for a few thousand dollars. Highly quality domains that are two words can easily go for $10,000 to $50,000. I’ve even been in discussions to purchase domains for over $100,000 and the really hot ones can break seven figures. Not to mention all the hassle that comes from finding the person who owns the domain, negotiating with them, and transferring the domain if you can get an agreement.
Your best bet is to keep going until you find a domain that you like and can purchase directly from a domain registrar for about $10.
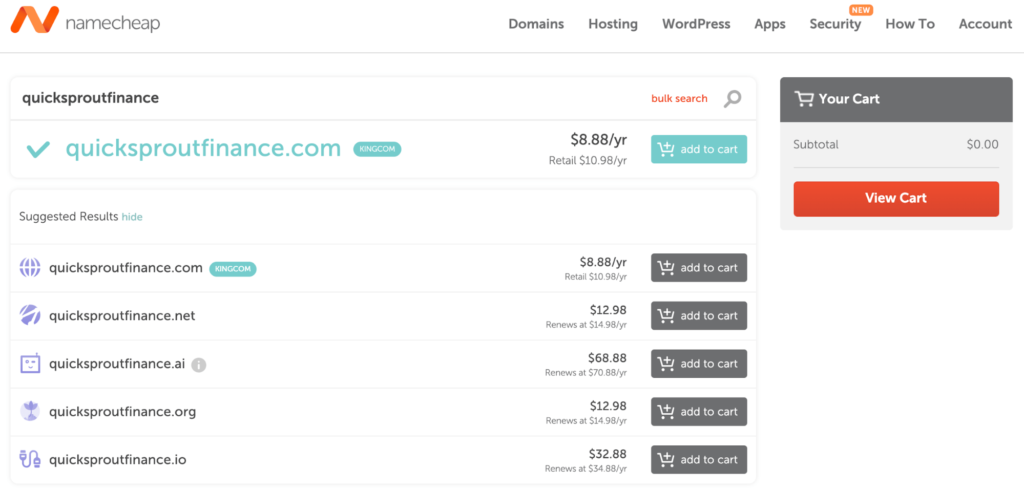
We go into lots of detail on which domain registrar to use here. The short answer: use Namecheap. It’s awesome, it’s the best, it’s what I personally use.
If this is your first blog and you’re not completely sure what you want to blog about, I recommend that you use your personal name.
The reason is that changing your domain later will mean that you have to start over from scratch. There are a lot of mistakes in blogging that can be corrected later; having the wrong domain isn’t one of them.
Let’s say you pick a domain like fitnessfordoctors.com. Then after six months, you realize you’d rather be doing personal finance blogging for doctors. You’d need to get a new domain and start over from scratch.
Personal domains are much more flexible — it’s just a name after all. So if you jump categories after a few months, it’s not a big deal. Take down any old content that’s not relevant with your new direction, start posting new content, and you’re good to go.
That said, personal domains have two major downsides:
These are pretty advanced problems to have though. So if this is your first blog, the benefits of using your name as the domain greatly outweigh the costs that only show up down the road.
Every site needs a web hosting provider. This is the company that stores your site on its servers and makes it available for anyone who visits your site.
We went through all the main hosts for WordPress sites (by far the best tool for blogging) and put together our recommendations here.
While there are a few other choices it really comes down to two options:
Best WordPress Host for Beginners = SiteGround
For your first blog, you want a host that is popular, trusted, easy to use, reliable, and reasonably priced. No need for anything fancy.
SiteGround fits this need perfectly. The best part is that its plans start at $4/month. That’s a steal considering how many positive reviews it gets.
For the vast majority of folks starting blogs, SiteGround is going to be the best bet for hosting their blog.
Best WordPress Host for Advanced Bloggers = WP Engine
In my last few jobs, I managed blogs with hundreds of thousands or millions of visitors per month. They had thousands of posts on them. We always used WP Engine for sites of that size.
WP Engine comes with a lot of extra hosting features for security and scalability. For sites of that size, you end up having to do a lot more maintenance in order to keep the site healthy. WP Engine handles all that stuff for you. Their support team is also world-class. They do a great job.
But there’s a major downside: it’s more expensive. The lowest plans start at $35/month. This is 7X the price of other hosts.
If this is your first blog, I wouldn’t go with WP Engine.
Now you have a domain and a host for your site.
The next step is to point your domain to your host so that people end up at your site when they go to the URL of your domain.
Every host has slightly different settings you’ll need to configure at your domain registrar. They definitely have a support doc on with the details on what to do.
Here are the details for our recommended hosts:
If you have any trouble with this, contact the support team for your host and they’ll walk you through the exact steps.
You’ll need a content management system (CMS) to build your site and manage your blog posts.
There’s only one option for this: WordPress.
Seriously, it’s not even a decision. Use WordPress.
Years ago, there were a few competitors to WordPress like Joomla, Typepad, or Blogger.
No one uses those anymore.
This is going to sound kind of bad but whenever I hear of someone using one of those old WordPress competitors, I just laugh. It’s hard to take them seriously.
WordPress powers 30% of ALL websites. That’s how popular it is.
Use WordPress for your blog, end of story.
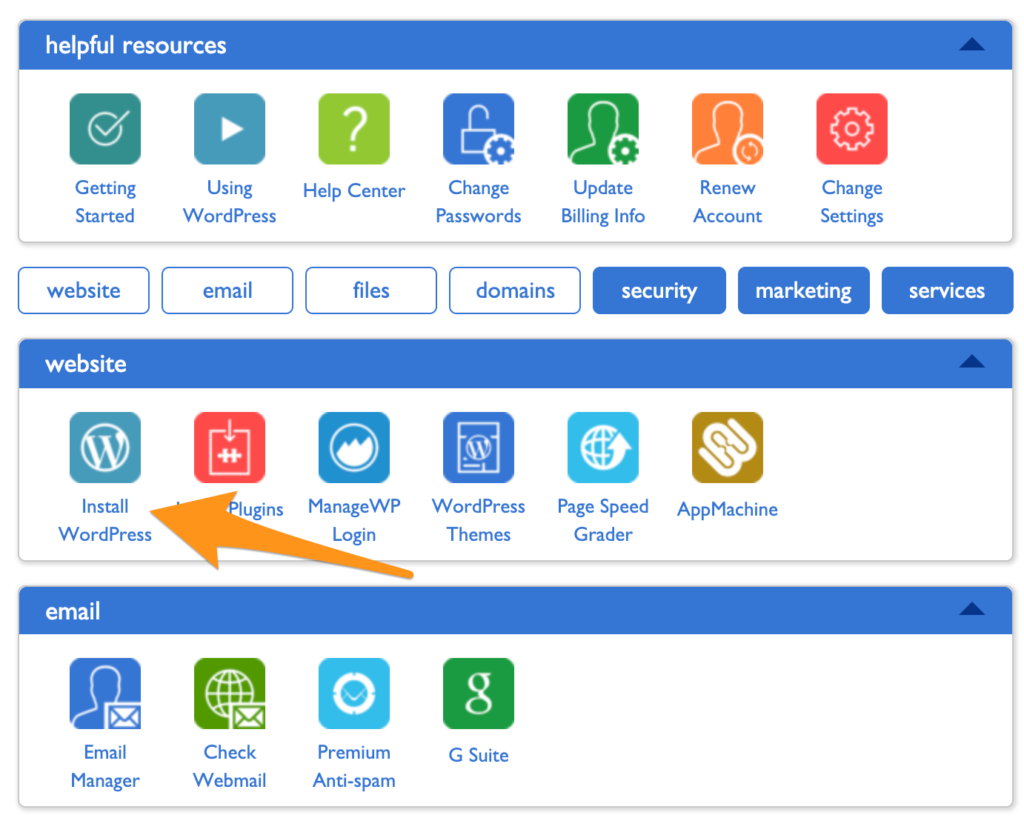
Because of how popular WordPress is, most web hosts offer a one-click install for WordPress. It’s super easy. Log into your web host, find the install WordPress opton, click it, then follow the instructions. This is what you’ll need to do if you signed up for SiteGround.
And if you’ve decided to go with WP Engine, it comes pre-installed since WP Engine is a hosting company for WordPress specifically.
WordPress is the foundation of your site. There’s an easy way to change how WordPress looks without having to code anything yourself.
WordPress uses “themes,” little packages of code that can be swapped in and out. Whenever you change your theme, your site will also change. The best part is that your blog post content won’t change. This makes it very easy to evolve your site over time without having to rebuild your entire site from scratch.
For now, you’ll need to pick your first WordPress theme.
The number of themes out there make me dizzy. There are… a lot.
When picking a theme for any of my blogs, I go straight to StudioPress. The themes are a bit more expensive at $130. (Most themes go for $20–50.) In my opinion, the higher price is well worth it. StudioPress was purchased by WP Engine and WP Engine now includes all the StudioPress themes as part of its hosting package. It’s a nice freebie if you are already planning on hosting your site with WP Engine.
If you want a wider selection of WordPress themes at standard prices, Themeforest is the most popular WordPress theme marketplace. You’ll find just about anything you want in its selection.
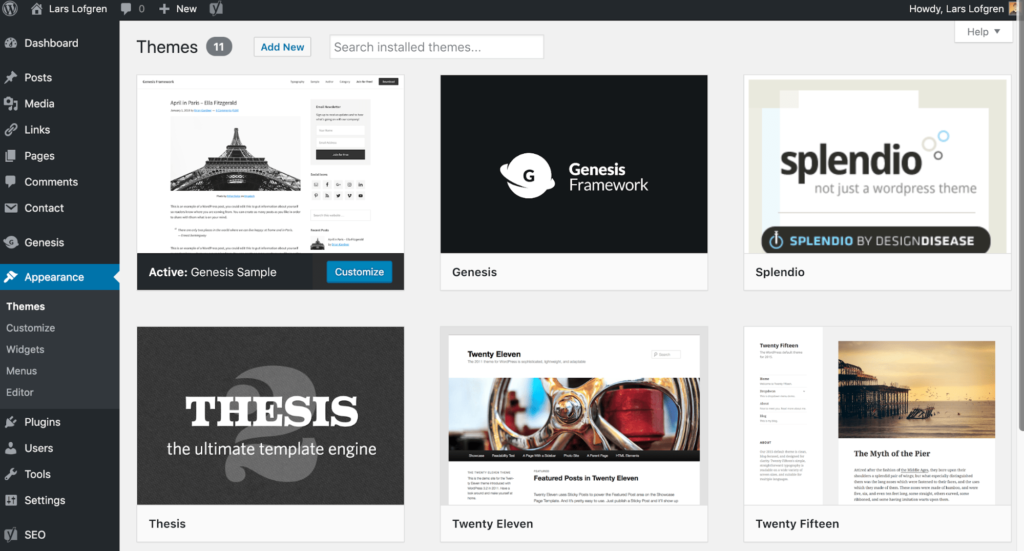
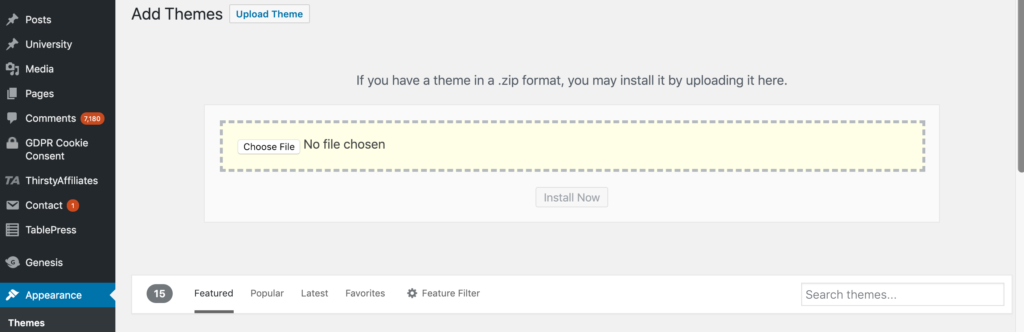
After you purchase your theme, log into your WordPress blog, go to the Theme section which is under Appearance in the WordPress sidebar menu. Then follow the instructions for adding the theme. You’ll have to upload the theme files to WordPress and activate the theme from within WordPress. You can find the upload option by going to Themes > Add New, a button towards the top. Then you’ll see this option to upload:
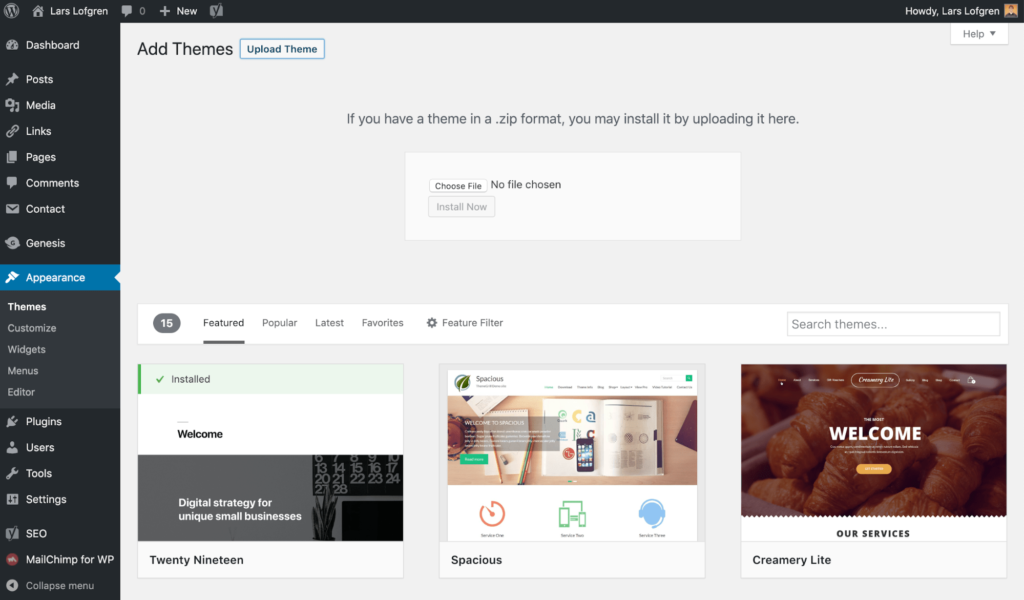
You’ll be able to manage any themes you’ve uploaded to your WordPress blog from your Themes section:
Once of the best parts about WordPress is that it’s infinitely customizable. Since it’s open-source, you can change it to do whatever you want.
WordPress plugins are little batches of software you can install within WordPress to get extra functionality. This is how you’ll add a bunch of extra features to your site without having to code anything yourself.
Be careful here and try not to go overboard.
Some bloggers will install dozens or even hundreds of plugins on their blog. That can cause a bunch of problems later on. Not only can plugins cause unexpected conflicts with each other, they become a security liability since it’s unlikely that every plugin owner will maintain the plugin over time. They also become a huge headache to manage. When you have that many plugins, you’re never sure which plugin is causing a particular problem.
I like to keep my plugins limited to 5–10 amazing plugins. Here are a few of my favorites:
There is a plugin for just about anything you could want to do with your WordPress site. Use the plugin page within your WordPress blog to search for anything that you need.
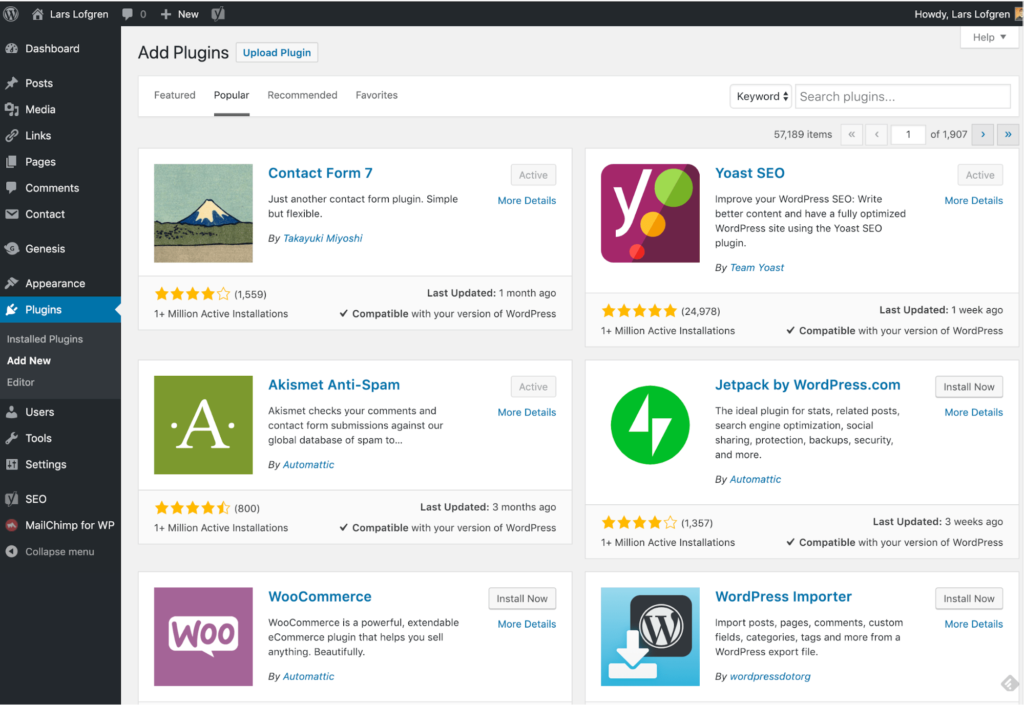
When you’ve found a plugin you want, install and activate it from within WordPress.
Google analytics is a free website analytics tool from Google. Even though it’s free, it’s still the best analytics tool out there.
Analytics is just a fancy word for website data.
Yes, analytics can get pretty complicated and overwhelming.
Which is why we’re going to ignore the majority of what’s in Google Analytics for now.
All you need to do is create a Google Analytics account and install it on your blog. There are two reasons for this.
First, Google Analytics stores your data over time. When you’re ready to dive in later, you’ll be thankful that you’ve been collecting data since the beginning.
Second, it’s exhilarating to watch people visit your site in the beginning. I remember the first time Google Analytics recorded a visitor on my first blog. I thought it was a mistake. “Someone visited my site? Really? Why would they do that? Who are they? Did they like it?”
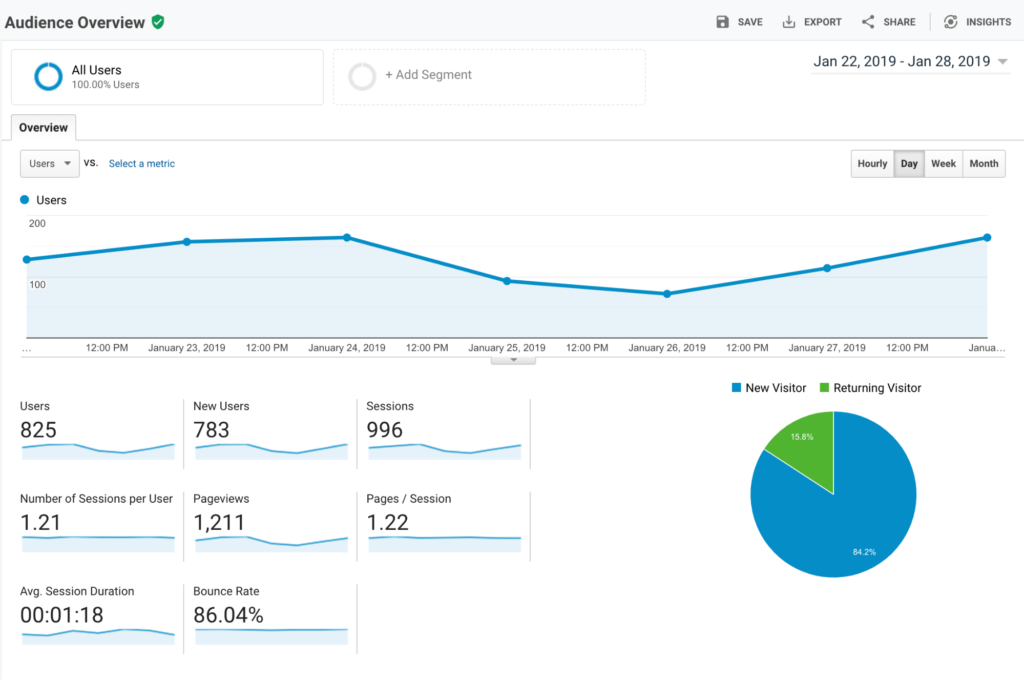
Seeing those first visitors come in will give you a huge motivation boost. Even if you only check Google Analytics to see your total traffic, it’s well worth the time it takes to set up.
It’s also pretty easy to set up.
Go to Google Analytics and set up your account. Once your account is created, you’ll have a unique JavaScript tracking code for your site. When you copy and paste that snippet of code into your site, Google Analytics will start collecting data for you.
Sooner or later, you’ll hear a stat like this:
“Email marketing has 22X the ROI of any other marketing channel!”
Technically, this is true.
The response from email will always dominate any other channel that you try pushing a campaign to. But you have to acquire those emails in the first — they’ve already been filtered for the most receptive people. In other words, email by its nature is more responsive, so the comparison ROI stats are kind of dumb. They’re stating the obvious.
It’s kind of like going to a strawberry field, picking the best strawberries in the entire field, putting them in a gift basket, then declaring the the gift basket strawberries are 12 times as delicious as normal strawberries. Of course they’re more delicious — you picked the best ones already!
That’s how email lists work. They’re a gift basket of the best strawberries.
Every marketing engine I’ve built for companies has relied on emails at its core.
Think of your email list as a giant laser ray you can focus on any offer you want. Selling consulting? Pitch your list. Publishing a new blog post? Pitch your list. A podcast just interviewed you? Pitch your list.
Of all the marketing channels that have come and gone over the years, nothing compares to the power of a high quality email list.
Even if you’re not sure what to send your email subscribers, that’s okay!
Using MailChimp, you can start collecting emails on your blog so that the list is ready for you as soon as you need. It takes time to build a decent size list so your future self will be extremely grateful if you set it up now.
You only need two things:
MailChimp has a free account for up to 2,000 email subscribers, which will cover your blog for awhile.
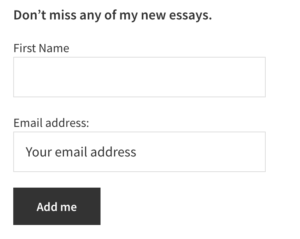
There’s also a super easy WordPress plugin for MailChimp. Once you install it on your WordPress blog, it’ll connect to your MailChimp account and give you an easy way to add an email signup form to your blog sidebar.
Even a super basic opt-in in your blog sidebar like this is enough to get you started:
Don’t even worry about sending any emails yet unless you want to. The main thing is that you’re collecting email subscribers from the beginning. Email lists can be a gold mine once you have a few thousand subscribers, and the money really rolls in once you have 10,000 subscribers and above.
Writing blog posts isn’t a sprint, it’s a marathon. More like a multi-day backpacking trip.
The best bloggers settle into a consistent writing pace they can maintain for a few years. That’s right, years.
Here are a few posting frequency rules of thumb:
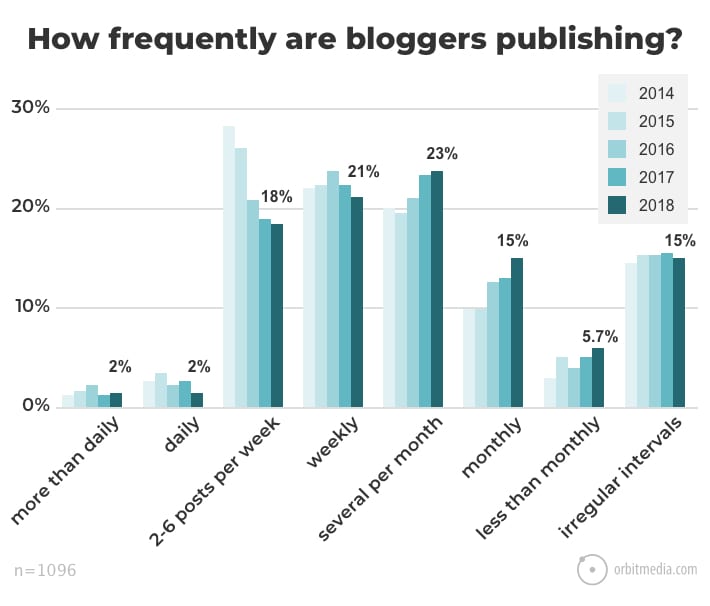
When I look at this chart of blog posting frequency from Orbit Media’s survey of more than 1,000 bloggers, I’m not surprised that 21% of bloggers are infrequent or less than monthly. (Let’s get real, less than monthly is not regular enough for most readers to know when you’ll be posting a new blog.) If you post weekly, you’re already posting more regularly than 57% of other blogs — this gives you a huge advantage.
I know writing isn’t easy. After writing blog posts full time for three months, I always want to throw my MacBook out the window. It’s a grind for all of us. This is why I recommend one post per week. That still gives you the majority of the week to focus on other aspects of your site while also giving you a break from writing blog posts all the time.
A really great post should take you two days to complete. The first day is for research and outlining, along with as much writing as you can complete. The second day is for finishing the writing, proofreading, and publishing the post in WordPress.
Also, push quality as hard as you can. The key to building a site and traffic over time is to write posts that are more valuable than what other people have already published in your category.
There’s a super famous article in blogging circles: 1,000 True Fans.
Basically, getting 1,000 true fans means you can fully support yourself. You can quit your job, work from wherever you like, and be in complete control of your life. All from hitting a very reasonable goal of 1,000 true fans.
With blogging, you’ll build your audience of 1,000 true fans slowly and consistently.
As long as you keep it at, you will get there. Typically, it takes a few years.
Here’s what to focus on in order to get there faster:
As your blog audience matures you will want to change your traffic strategies as you grow.
There are really only two ways to monetize a serious blog.
Yup, only two.
Bloggers try a ton of different ideas, maybe about a dozen.
Out of those dozen, only two work at scale.
So what are they?
Affiliates and infoproducts.
Check out this list of of 21 bloggers making money.
Out of the entire list, all but three or four of them make the majority of their revenue from infoproducts, affiliates, or a combination of the two.
I could write a book on this. For now, we’ll keep it simple. Here’s the model:
Now this sounds too good to be true. While there are a few catches, it’s mostly true. What are the catches?
First, you’ll need to get extremely good at direct-response copy.
Second, it helps to be in the right category. People want money, status, and relationships.
It’s pretty simple: You go about creating as large of an audience as possible. Then, throughout the your content, you recommend products that are helpful to that audience. When your audience clicks through the link of that recommendation, they get a special tracking code. If they end up purchasing, you get a cut of the sale.
The main downside is that only a small percentage of people will ever click through and an even smaller percentage of people will purchase. So it really helps to have a massive amount of traffic in order to make enough money from your blog.
Those are really only the two options? Is there anything else for beginners?
Yes, there is.
While infoproducts and affiliates are the main ways to make serious money, you also need serious traffic in order to make them work. At least if you want them to work well enough to make six figures per year…
And to get that much traffic, you’ll need a lot of time on your blog. As much as I love blogging, getting a new blog off the ground doesn’t rain dollar bills right away.
There is one way to make a lot of money fast. It also will change your life.
Instead of trying to turn your blog into a completely passive money-making machine, go the other direction. Ditch passive and get active.
Start freelancing and consulting.
To make money quickly, this is by far your best option. It’s also the easiest to do.
When I worked at I Will Teach You To Be Rich, our freelancing programs taught thousands of people how to get started freelancing. What always blew me away was how life-changing those first few freelancing gigs are.
I went through that exact change myself. Years ago, I started my personal blog larslofgren.com and got a few freelancing clients doing it. I’ll never forget that first $100 payment sent via PayPal. The amount sounds so small now, but the real impact was knowing that I personally produced that income myself.
Guess how much traffic that personal blog of mine has? Only a few thousand visitors per month, spread across about 20 blog posts.
Anyone can create a blog that size and use it for freelancing lead generation. It’s enough to build a client base that pays you $3,000 to $5,000 per month. That’s enough to quit your job. That’s life-changing.
And it’s a much easier goal to hit than a full-ramped affiliates or infoproducts marketing machine. You always have the option to build that stuff later anyway.
Most of them are a waste of time. The impact on revenue is marginal, it’s a complete distraction. A few are worth doing for marketing and branding. The rest should be ignored entirely. Here’s the list that bloggers always try at some point:
We’ve been writing about blogging and how to make money blogging on Quick Sprout for years. Check out Everything About Blogging for an annotated list of what you should read next.
Creating a website used to be a massive project.
And expensive too.
Everything had to be built by hand and businesses needed to work with an online marketing agency that would charge them tens of thousands of dollars to build the site. If you wanted a professional-looking site, that was your only option.
Things have gotten a lot cheaper over the years.
Now it’s possible to get a polished site for less than $100. About $10 to buy the domain, $30–60 for a good template, and $5–10/month to host it. It’ll look so good that people won’t even realize that you built it yourself. It’ll look like some high-flying marketing agency built it for you.
Not only has it gotten cheaper, it’s also gotten a lot easier.
I’ve broken down the 9 simple steps to create your website from scratch. You’ll easily be able to run through these steps over the next 120 minutes.
These are not two separate steps, unfortunately.
I really wish I could sit down, pick any name that I want for my business, and be able to create the site that I want around that name. Now that the internet is a couple of decades old, we all have to face the reality that most of the good domains have been taken.
Here’s how a naming session always seems to go for me:
Websites have also become so embedded in our day-to-day lives that it’s better to change the name of the business to match an available domain than it is to pick a poor quality domain. Through this process, I almost always end up with a completely different name than I originally intended.
This is why I consider the “naming my business” and “buying the domain” steps for creating a business to be the same step. I try to only lock myself into a name once I have the domain.
We put together an in-depth guide on buying domains here.
The good news is that the rest of these steps are a breeze once you have your domain purchased. It’s the first and hardest step to create your website.
Real quick, let’s sort out the difference between a domain registrar and a web host.
A domain registrar is a company that specializes in buying (registering) domains.
A web host, on the other hand, specializes in running servers that host websites.
Every web host will desperately try to get you to also registrar a domain through them. The reason is that it’s a great upsell for them. They’ve spent most of their resources building out a hosting service, then they offer domain registration as a convenience, increase the price a bit, and collect a nice chunk of extra profit from you.
My philosophy is to buy things from businesses that specialize in that exact thing. Prices will be better and so will quality. That’s why I also use a domain registrar for buying domains and a web host for hosting. I never mix up the two.
The best domain registrar is NameCheap. That’s where I have all of my domain names.
We put together a detailed review of domain registrars here.
Most guides on creating a website will push you into using WordPress. It’s the most popular and flexible website builder. And that’s usually a good recommendation.
But there are a few situations where I recommend different options.
Many businesses need a simple website that tells people a few things:
This kind of site gives the basic info for the business, nothing more. If this is what you need, Squarespace is your best option for creating your website. It’s incredibly simple to use and will give you a professional site at a very low price. It’s perfect for small businesses.
Squarespace will try to convince you that they can handle everything. That’s not true.
They’ve created the simplest and easiest website builder out there. Truly, it’s a joy to use.
However, they completely lack all the advanced features that an online business needs. The ecommerce functionality is extremely limited, and I don’t know any serious online marketer that uses Squarespace for a content site. If your business an online business, Squarespace isn’t a legitimate option. You’ll hit the limits of its features too fast.
If you know that you want an ecommerce store from the beginning, start on Shopify and skip Squarespace. And if you know you want a blog or are planning on doing lots of content, start on WordPress. The majority of this guide is around building a wordpress website.
Squarespace makes the most sense when you just need a clean, professional-looking site that gives some basic info on your business. It’s perfect for small businesses, freelancers, and artists.
Here’s another way to think about it: If you’re building a business that doesn’t live and die on its website, it just needs a website in case anyone looks for it, like a digital business card, then go with Squarespace. But if you’re website is your business, use one of the more tailored platforms.
If you’re planning on building an ecommerce store for your site, don’t use WordPress. We have an entire post here on when to use WordPress for ecommerce and when not to. The short story: it rarely makes sense to use WordPress for ecommerce.
The best option, by far, is Shopify. There used to be more competition in the ecommerce tool space but Shopify got too far ahead. Now they’re really the only option and they have an incredible reputation. You won’t regret using them for an ecommerce site.
If you’re going this route, we have a 9-step guide on how to create an ecommerce website. We also have a guide on how to start a store that drives real sales. Both of those guides will get you pointed in the right direction.
If you want to create a blog with a bunch of content, you need to use WordPress. We have a detailed guide on starting blogs here. Most websites are really just blogs. Some of the biggest, and most well known websites on the Internet are blogs.
WordPress powers over 30% of the entire internet. So it’s the only real option for starting a blog these days.
What about Joomla or Drupal? Or Typepad?
WordPress left all those other platforms in the dust about a decade ago. They’re not even legitimate options at this point. Pick WordPress — there isn’t a single situation where you’ll regret it.
When I originally started with this online thing, Drupal sites were still pretty common. I partnered up with an engineer friend of mine and we did a lot of freelance work migrating sites from Drupal to WordPress. Even back then, WordPress was a clear winner.
Now when I come across a site on any of these other tools, it’s kind of exciting. It’s like finding an ancient artifact. “This still exists!? How fascinating!”
Don’t use any of these other tools, stick to WordPress.
If you’re not sure or have another vision for your site outside the categories above, use WordPress. It’s the most flexible platform out there. It will do ecommerce, it’ll do simple portfolios, it’ll do massive content sites, it’ll do Fortune 500 marketing sites, it’ll do it all.
You might have to customize it more than other platforms in some situations but you can make WordPress do whatever you want it to. And just about anyone in online marketing knows their way around WordPress so you’ll be able to find plenty of people to help you when the time comes.
Whether you want to build your site by hand or you have an online marketing agency to do it for you, you should still build on top of WordPress. It’ll shortcut a lot of the programming work and give you the ability to edit basic items on your site without having to edit any code. I’ve managed marketing sites of venture-backed tech startups that employed dozens of engineers — we still had our marketing site built on top of WordPress. It’s the standard choice.
For the rest of this guide, I’m going to assume that you’ve picked WordPress to create your site. If you want an ecommerce site, skip the rest of this guide and follow our guide on creating an ecommerce site.
WordPress is the tool that you’ll use to build your website. But you also need a host that will store your site and make it available to anyone who visits.
The best place to go for most people is Siteground.
We have an entire guide here that goes through all the best web hosts.
Hosting plans usually start around $5/month.
Just about every website host has a 1-click install of WordPress. Siteground, the hosting provider I recommend the most has this feature. It’s usually under a section called Tools, Website, Software, or Content Management Systems (CMS). It’ll look something like this:
If you have trouble finding it, contact support at your host and they’ll be able to walk you through it.
Let’s do a quick recap.
Now you’re going to connect all that stuff together by pointing your domain to your host. Then when people go to your domain, they’ll end up on your website.
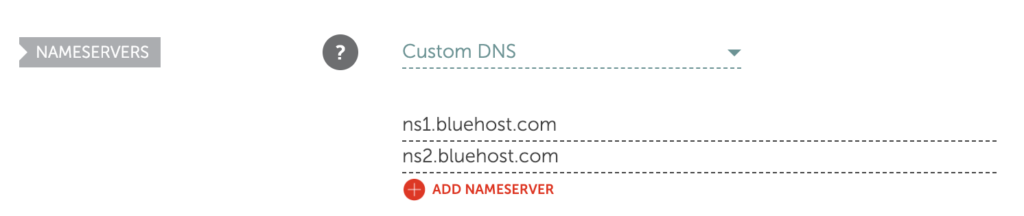
There are a few technical settings you need to apply. This involves configuring a few nameserver settings on your domain registrar for your domain. Your host will give you the correct settings; you’re looking for their nameserver settings.
If you get stuck, contact your host and they’ll give you all the info you need.
Once you have the nameserver info from your host, go into your domain registrar and configure those settings for the domain that you want to point at your site. Once you’re done, it’ll look something like this:
Think of WordPress as the guts of your site, it’s all the pumping that makes your site work.
WordPress uses themes to determine how your website looks. This makes it really easy to change how your site looks without having to rebuild your site from scratch. Swap out your old theme for a new one and ta-da! Your design will look completely different.
These days, I purchase all my themes from StudioPress.
Heads up, WP Engine bought StudioPress and now includes all the StudioPress themes in its hosting plans. WP Engine is more expensive but it’s perfect for serious bloggers. It’s a great way to save money on your theme if you are planning on building a large site to begin with. WP Engine is another one of our recommended hosts if you’re looking for the best. The downside is that WP Engine tends to be more expensive than other hosts. It’s probably overkill if you are just starting out, or creating your first website.
Back to themes, are there other options?
You betcha. ThemeForest has a marketplace of WordPress themes. There are literally tens of thousands of themes to pick from. They’re usually in the $30–60 price range. When looking for theme, I rank them by the most popular or the highest rating. Then I pick one I personally like.
After you’ve purchased a theme, go to the WordPress Theme settings and upload your theme. The Theme settings are under Appearance in the WordPress sidebar menu. You’ll have to click through “Add new” and “Upload Theme” in order to see this option to upload:
Go ahead and upload the .zip file you received when you purchased your theme.
After it’s uploaded, you’ll also have to click “activate” on the theme in WordPress to make it go live.
Now the fun part — it’s time to create the individual pages of your site.
You’ll do this within WordPress.
WordPress has two types of content: pages and posts.
Think of posts as blog posts that are published under a “blog” section of a site. If you’re not planning on having a blog, then you can skip posts entirely.
Pages are the more permanent pages on your website. Like your About or Contact Us pages. When you’re first creating your website, you want to get a batch of pages live so your site feels real.
Every website has a few standard pages you should create:
This list will get you started. You can always add more later.
At this point, you have a fully functioning site that looks great.
I’m not going to lie, there’s a lot of extra configuration you can do to your site: you can add WordPress plugins that upgrade your site, build out a blog, add an email list, grow traffic, the list is endless.
You don’t have to do any of this extra stuff — it’s all optional. It depends on your priorities and goals.
A website is an ever evolving thing. The way it looks after you first create it, won’t be how it looks a couple months later. At least that is the case if you are actively working and growing your website.
When you’re ready, these guides will walk you through the extra stuff that’s worth considering:
The post AMZ Image Review: A Better Way To Use Amazon’s Images as an Amazon Associate? appeared first on Niche Pursuits.
The post 6 Simple & Fast Ways Improve User Metrics For Your Website: A Complete How To Guide appeared first on Niche Pursuits.
The post How To Start A Book Publishing Company (Selling Low or No Content Books) appeared first on Niche Pursuits.
The post Podcast 157: How Matthew Woodward Went From Delivering Newspapers To $1.2 Million In Profit Online appeared first on Niche Pursuits.

The post How To Improve SEO & Rock At Ranking On Google appeared first on Niche Pursuits.

The post WP Astra Theme Review: The Theme To End All Themes? appeared first on Niche Pursuits.
The post Podcast 156: How Miles Beckler Went From Affiliate Products On MySpace To 100,000+ Subscribers On Youtube appeared first on Niche Pursuits.
SiteGround has one of the top reputations in the web hosting industry. Over 2 million domains are hosted on the platform.
That’s one of the many reasons why SiteGround made my list of the top web hosting services on the market today.
For those of you who are new to hosting your website with SiteGround, you might be wondering how to navigate your dashboard. Fortunately, if you read any SiteGround web hosting reviews, you’ll quickly learn that the platform is very user-friendly.
SiteGround uses cPanel, which is a highly responsive web-based control panel that’s used for managing your settings and account.
cPanel runs on Linux and is extremely versatile. It’s where you’ll customize your site and web hosting needs. SiteGround cPanel is well designed so anyone can use it, regardless of their technical skill level.
With cPanel, you’ll be able to do things like:
As you can see from this list, the web-based control panel from SiteGround is very flexible.
I’ll show how to perform certain tasks with cPanel, to optimize your experience using SiteGround for web hosting.
If you want to know how much web hosting resources you’re using, you’ll need to navigate to the “statistics” section of your cPanel menu.
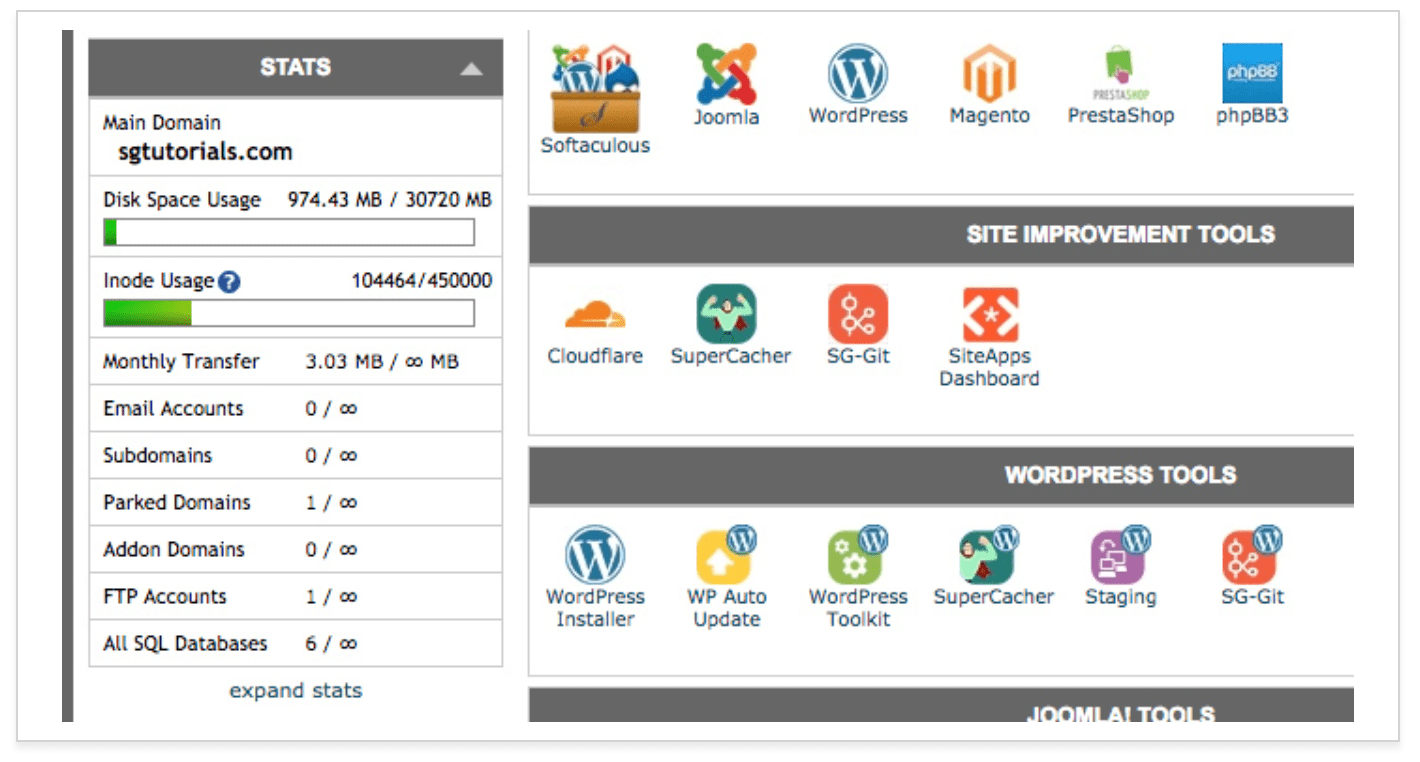
On this page, you’ll be able to see if you’re coming close to exceeding your plan limits.
In the screenshot above, you can see that disk space and inode usage are nowhere near capacity, so the plan is suitable from those standpoints. But if those bars were full, you’d want to upgrade to a higher plan to ensure that your site performance isn’t compromised.
This is just a quick overview. But if you want to see even more information, click on “expand stats” at the bottom left side of the page.
Now you’ll be able to see CPU time usage over the last two hours and 24 hours, as well as account executions over those same periods of time. The detailed stats will also show you all of the processes that are currently running on your account.
You can even view detailed graphs about your account executions and scripts.
Seeing this information on a chart is a great visual tool for analyzing your data. You can view the information for the day or for the week to gauge when you’re using the most resources.
This page will also show the top executed scripts, as well as the top IP addresses that access your site. You can use this data to protect against brute force attacks.
The cPanel visitor statistics has three main sections related to who is navigating to your website.
Here’s a look at an example of the raw access log.
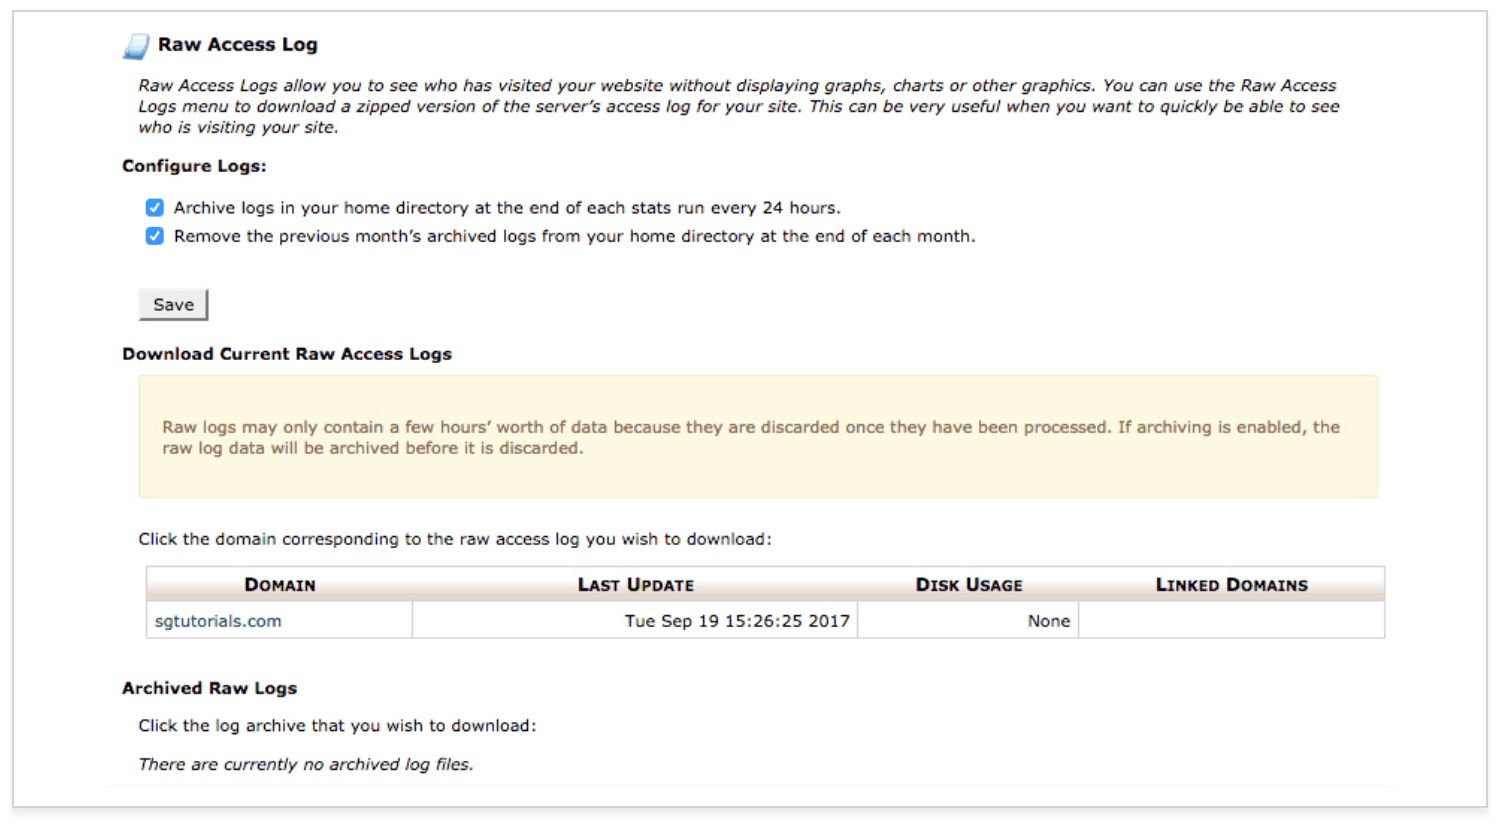
If you want a quick way to see who has been visiting your website, the access log is the best place to find that information.
This tool shows you who visits your site, but without displaying any visuals or graphics. You have the ability to download a zip file of your access log as well.
As a webmaster, you always want to make sure that your site is running as smooth as possible.
Any problems with your website will impact the user experience, which is why the error log is located in the visitor logs area.
Your error log will show you any recent errors on your website, such as broken links or issues with files. I’d recommend checking this log often, so you can identify and address any errors as soon as possible.
The Awstats menu gives you an in-depth analysis of your website visitors. Some of the top statistics included here are:
You’ll also have access to a quick summary of this information on a table. SiteGround cPanel will let you know the last time this information was updated. You can always click “update now” to view the data in real-time.
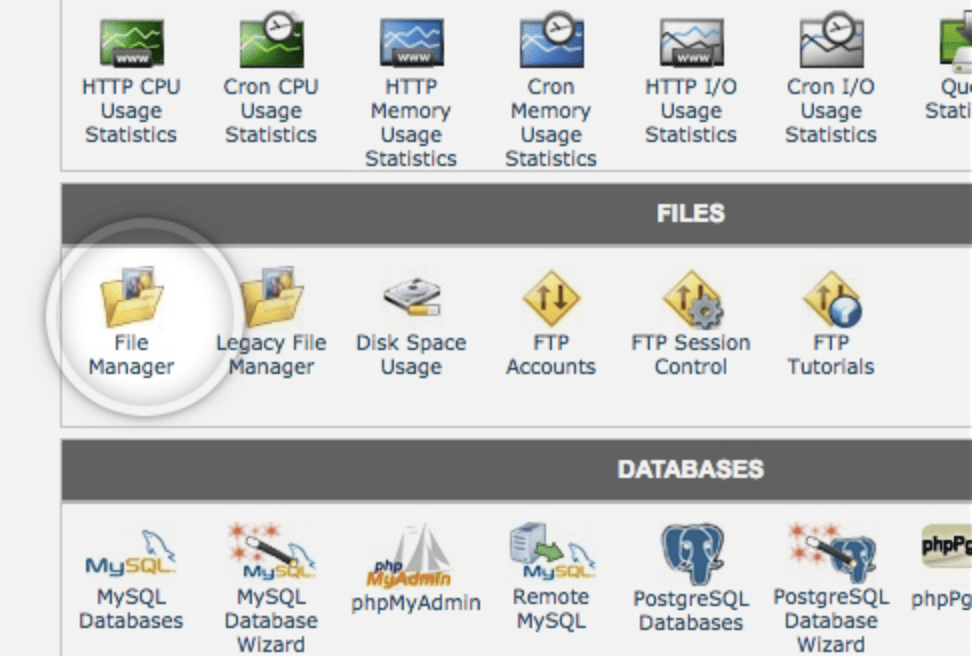
With the cPanel file manager, you can manage your website using HTTP as opposed to a third-party app or FTP tools. The file manager isn’t advanced as other tools, but it’s perfect for managing basic functions.
You can access the file manager by navigating to the files menu of cPanel.
The best way to keep your files organized is by adding new folders. Keeping your folders neat will make it easier for you to perform site maintenance down the road.
Adding new files to folders is as simple as clicking the “upload” button at the top of the page. All you have to do is choose the file location of your upload, and edit any permissions for the file.
If you’d rather create a file directly on cPanel, as opposed to your computer, just click on the “new file” button. Although I’d only recommend this for smaller file sizes.
Once files have been uploaded, you may want to edit them in the future. That’s no problem.
Just find the file name and click on the “edit” button on the main toolbar. This will let you make changes to your site without being forced to upload an updated version of that file. However, this is not recommended for big changes.
The file manager also allows you to extract files, compress files, and move files to another location.
SiteGround has automatic daily backups for things files, folders, and email accounts. You can also create manual backups on your own.
If something happens and you need to perform a file restoration, you can do this from the cPanel backups manager. Just click on the “backup tool” button.
From here, you’ll have access to a calendar showing all of your backups. If you click on one of the dates marked with a circle, you’ll see potential backups that you can use for restoration.
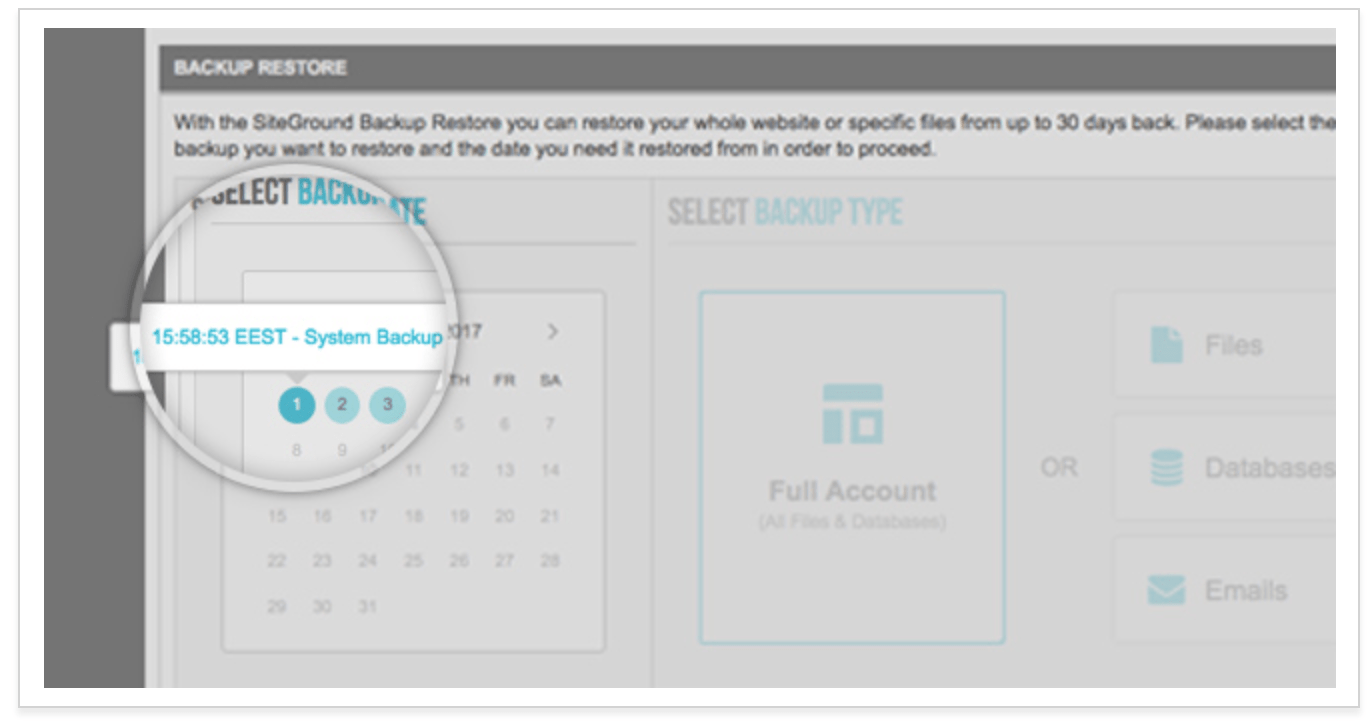
Once you click on that date, you can decide what files need to be restored. These are your options:
For files, you’ll be able to manually choose which folders need to be restored. Just scroll through and check off any boxes that were compromised and then click on the “restore” button.
SiteGround gives you the option to restore your files without replacing the ones that are currently being used.
Both databases and emails can be restored in the same way as other files. You simply navigate to the calendar, choose the date, and select the files that need to be restored.
Additionally, you can restore your entire account with SiteGround cPanel. This is the best option for those of you who aren’t sure exactly what files need to be restored. Choosing this function does not restore emails. So you’d still need to do the emails separately.
It’s also worth noting that the full account restoration impacts all domains on your hosting plan.
So for those of you who have more than one website, they’ll all be restored to the date of your selected backup.
Website security needs to be a priority for all sites. SiteGround makes this easier for its customers by supporting Let’s Encrypt. All SiteGround plans come with a free SSL certificate.
If you navigate to the security section of cPanel, you’ll see an icon for Let’s Encrypt.
After you click on that icon, you’ll see an active list of your SSL certificates.
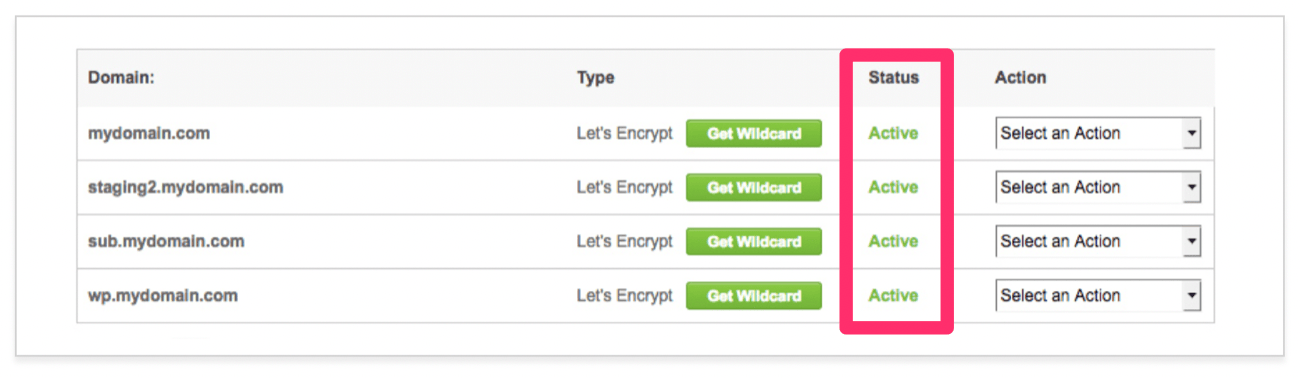
You can manually install any SSL certificates that aren’t active. Just click on the domain choose the type of certificate that you want to install.
Once that’s complete, you’ll see this pop-up verifying that the installation was a success.
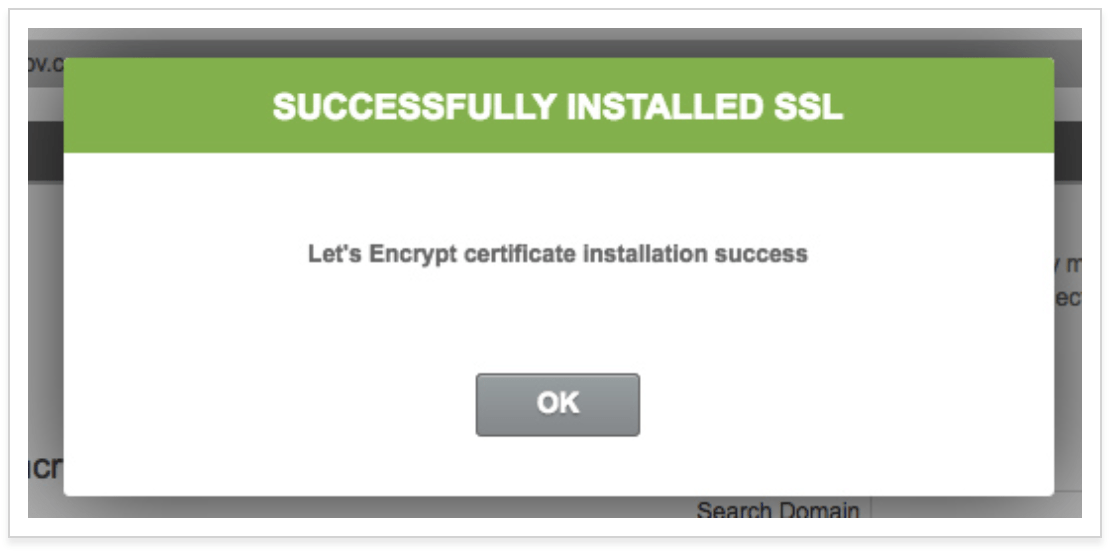
After the certificate has been issued, it still needs to be configured on your site. Otherwise, your domain could have duplicate content running simultaneously over HTTP and HTTPS.
You might have to rewrite links so that mixed content warnings and errors don’t appear.
To configure your certificate, just choose “HTTPS settings” from the action menu. Then turn on HTTPS enforce, which will force your site to work on HTTPS.
All HTTP redirects will be performed at the server level. This is a great shortcut, so you won’t have to do hire a developer to do it for you.
In order for your SSL certificate to work, it needs to meet the following prerequisites:
It’s also worth noting that any parked domains not pointed to your cPanel IP address would cause the SSL installation to fail. To work around this, just temporarily unpark them or point them to the cPanel account until the installation is complete.
You can also manage some more advanced options with SiteGround cPanel. “Chron Jobs” is something that you might want to consider setting up in the advanced menu.
This will let you run specific commands based on times set by the cron job. For example, you can set this up to delete temporary files each week so that you don’t waste disk space.
cPanel will email you every time a command is run with a cron job.
To add a new cron job, just adjust the settings for a specific command. Here’s an example of what that menu will look like in cPanel.
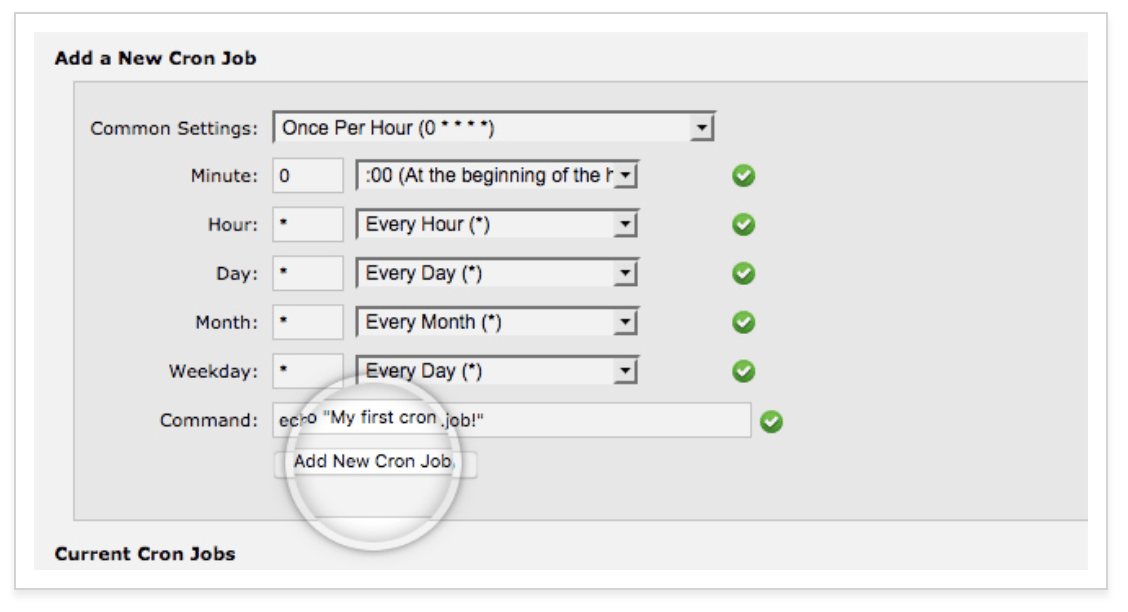
If you don’t need a cron job anymore, just click on the “delete” button to remove it.
Changing the PHP version is another advanced cPanel task that you might want to use. The PHP version manager icon can be found in the “1H Software” section of your cPanel dashboard.
Click on the folders and choose the directory that you want to change. Keep in mind, any subdirectory will be changed as well.
You’ll also be able to change the entire website. Just choose your new PHP version from the list of options and save your changes.
I’d suggest running your site on the “managed PHP version.” This will automatically run your site on the recommended PHP whenever it becomes available. So you won’t have to do anything manually, and your site will always be running a stable and secure PHP.
There’s a reason why SiteGround is so popular. cPanel makes it easy for its web hosting clients to manage all of their hosting and website settings in one place.
As you can see from what I’ve covered in this guide, the options are extremely versatile.
So if you’re new to SiteGround and don’t know how to navigate the cPanel, use this tutorial as a reference.
For those of you who are considering SiteGround for web hosting, but haven’t signed up yet, this information should make your decision that much easier.
If you review my resource on the best web hosting for small business, you’ll see that I named SiteGround as the choice for the best technology. cPanel was a big factor in that decision.