Thursday, January 31, 2019

When to Use WordPress for Ecommerce and When to Avoid It

If you’re building a site that’s 100% focused on content or 100% focused on ecommerce, the best choice on how to build your site is very clear.

What WordPress does best = Content

WordPress Dashboard

WordPress is now a decade old and is still the reigning champ for managing sites with a ton of content. If you plan on pursuing an SEO or content marketing strategy for your business, WordPress is the only legitimate choice for your site. Nothing else comes close to giving you all the features that you need to manage so much content along with all the extra functionality for SEO and other traffic sources. It’s the default content management platform for a reason.

What Shopify does best = Ecommerce

Shopify Dashboard

If you want to sell stuff with an ecommerce store, Shopify is by far your best choice. There really aren’t any legitimate contenders anymore. The functionality, the ease of use, and the price are unmatched. Even more impressive, Shopify will scale with your business no matter how large it gets — they’ve pushed into the enterprise segment in the last few years and are now considered ”best-in-class” at all tiers of ecommerce. From trying to sell your first product to selling one million products, Shopify is the default choice.

The problem is knowing what to do when you have a content and an ecommerce site?

This is when things get a bit trickier and more nuanced.

Why You Should (Almost) Always Use Shopify for Your Ecommerce Site

As much as I personally love WordPress, it just doesn’t compare to Shopify when it comes to ecommerce, even if you add an ecommerce plugin to WordPress.

There are a bunch of unique features that any ecommerce site needs:

  • Shopping carts
  • Check-out and payment flows
  • Integrations with payment providers
  • Fulfillment options and integrations
  • Integrations with shipping providers
  • Easy ways to manage all your product pages
  • Revenue reporting
  • Refund and return management
  • Integrations with ecommerce platforms like Amazon

Shopify was built from the ground up around all of these features. WordPress wasn’t.

With Shopify, you get every ecommerce feature you could ever need right out of the box. A bit of easy configuration and your site is ready to go. Of course, Shopify also has the ability to deeply customize anything you could want. With how popular Shopify has been, there’s now a large community of developers and marketers that can use the more advanced features of Shopify to tailor it to your exact situation.

Shopify also has Shopify Lite. It’s a super streamlined version of Shopify, perfect for adding a couple of buy buttons to your WordPress site or your Facebook page. So even if you want to run a few small tests to see if you can sell items on your site, it’s still worth starting with Shopify.

We really can’t over-hype the benefits of using Shopify — they’ve done an amazing job at building a tool to solve the needs of any ecommerce business owner.

The benefits of Shopify are so large that it’s not worth trying to contort WordPress into an ecommerce site itself.

The only real weakness to Shopify is it’s blogging functionality. Yes, you can technically publish a blog on Shopify, using that for your content. But you won’t want to.

The blogging features in Shopify are so bare-bones that they’re only fit for the occasional company updates every few months. But if you’re only posting a few times a year, you might as well skip the blog entirely.

In other words, the only companies that would get value out of the Shopify blog feature shouldn’t have a blog in the first place.

What to do?

Let’s say that you have your core ecommerce store on Shopify. It’s going great. But you also want to start a high-caliber blog that could generate some serious traffic and help increase sales.

Your best best bet will be to use Shopify for your store and WordPress for your blog. You’ll be on both platforms.

Using multiple platforms on the same site is very common. Lots of sites do it.

The Easiest Way to Use Shopify and WordPress at the Same Time

Put one of them on a subdomain and the other on your main domain, like this:

  • WordPress installed at company.com
  • Shopify installed at store.company.com

This is easy enough that you’ll be able to get this set up with your WordPress host, domain registrar, and Shopify account on your own. There’s no need to hire a developer to do anything fancy. Simply set up WordPress on your main domain like normal while setting Shopify up on a subdomain.

Should Shopify or WordPress go on the subdomain?

In the example above, I put Shopify on the subdomain at store.company.com. The reverse also works by putting WordPress on a subdomain while Shopify is on the main domain, like this:

  • WordPress installed at blog.company.com
  • Shopify installed at company.com

Which one should you do? Which goes on the subdomain?

I would make this decision based on your marketing strategy.

If you’re pursuing an SEO strategy for your online store, your goal will be to get product pages to rank for keywords. In other words, your main SEO priority is the product pages within your store. In this case, you’d want Shopify to be on your main domain.

Why?

In SEO, the main domain will always carry a bit more weight than a subdomain. It’ll have an easier time ranking for any given keyword. So if your main goal is to get your product pages to rank for search terms in Google, install Shopify on your main domain so it gets as much help as possible.

Now let’s switch it up. What if you have a large blog and you’re using content to obtain the vast majority of your traffic? In this case, install WordPress on your main domain and put Shopify on a subdomain.

To recap, decide whether it’s a bigger priority for you to rank your WordPress content or your Shopify product pages for SEO. Once you’ve made a decision, put your first choice on your main domain and the other one on a subdomain.

What if you’re not pursuing SEO?

Then it doesn’t really matter. If you’re focusing on paid marketing or some other strategy for your ecommerce site then it’s completely up to you. In this situation, I’d use a subdomain for whichever tool hasn’t been installed yet since the main domain will already be taken.

The One Reason to Use WordPress for Ecommerce

It does make sense to turn your WordPress site into an ecommerce store if you meet these conditions:

  • You already have a large WordPress site built with lots of content.
  • You have a small store that you want to build out, in the range of 10–20 products.
  • You don’t plan on putting a ton of energy behind the store; you view it as a “one-and-done” project.

In this situation, you’re already on WordPress so you’ll want to keep that. You also have enough products to warrant a store section in your site, you’ll need more than just a few buy buttons. But it doesn’t make sense to get an entire ecommerce platform set up on your site since you don’t plan on making it a major priority.

The best bet is to keep everything on WordPress and use an ecommerce WordPress plugin to add a store to your site. The most well-respected ecommerce plugin is WooCommerce. It gets plenty of great reviews.

Or if you really love WordPress and hate the thought of adding another tool to your site, WooCommerce is still a legitimate option. Feel free to use it if you’d prefer to spend as much of your time as possible within WordPress.


from Quick Sprout http://bit.ly/2TvWqy0

Wednesday, January 30, 2019

How to Create an Ecommerce Website in 9 Easy Steps

We’ve covered the high-level strategy of building an online store that makes real money here.

But how do we create the ecommerce website itself?

Below, you’ll find the 9 steps you need to take to create an ecommerce site.

In this guide, we cover:

  1. The one and only ecommerce tool that we use to build our sites
  2. The payment setting that can accidentally reduce your revenue by increasing refunds and chargebacks
  3. The biggest myth of pricing and how real ecommerce website owners set their prices
  4. What to put on your homepage to convert more customers
  5. What an SSL certificate is and why you need one (also how to get one for free)

Quick note, I’m going to assume that you’re creating your ecommerce website from scratch. If you already have an ecommerce store and want to transfer that store to Shopify, we have a detailed guide for that here.

Step 1: Search for Your Domain

Before going any further, make sure your company name has a good domain you can grab.

I’ve started several stores in the past, had a company name picked out, and then had a terrible time trying to find my domain. Eventually, I went with a completely different name so I had to backtrack and change a bunch of settings, or even recreate my store from scratch.

The whole process goes much smoother if you make sure the domain you want is available from the beginning. Then you won’t have to redo anything.

My go-to resource for checking which domains are available is Namecheap, which also happens to be our recommended domain registrar. A domain registrar is just a fancy name for a company that registers domains on your behalf.

Not only is Namecheap our favorite domain registrar, they also have a wicked fast domain search. Even when I’m not planning on buying a domain, I always use them to search for available domains.

Ecommerce Site - Namecheap Domain Search

I recommend holding off on buying your domain for now.

Why? Shopify has the option of buying your domain for you. If you use Shopify to buy your domain, they also configure the entire domain too. There’s nothing you need to configure or set up, it’s super easy.

We use Namecheap as our domain registrar and to manage all our domains. We believe it’s the best out there. We do this is because we have a ton of sites and domains that we manage. Once you’re managing dozens of domains, keeping them all in one location helps a lot. It’s easier to keep them from expiring, update their settings, and sell them if you want.

But if you only plan on having a couple of domains for your ecommerce site, buying them through Shopify is the easiest option. So hold off on buying for now and just make sure your domain isn’t taken.

Step 2: Start Your Shopify Free Trial

Now that you’ve made sure that you won’t have any trouble grabbing the domain for your company, head over to Shopify and start your 14-day free trial.

Why Shopify? Aren’t there other ecommerce site builders?

Yes, there are other tools for building your ecommerce site. To be honest, none of them compare to Shopify, it’s not even close. Years ago, ecommerce sites used to be fairly difficult to manage and build. Then Shopify entered the category and completely changed the game. And in the last few years, they’ve added lots of advanced functionality so they’ll easily scale with you no matter how big your site gets.

Shopify completely outshines the competition in ease of use, feature depth, ability to scale, and price.

Whenever I build an ecommerce site these days, I immediately go to Shopify. I don’t give a second thought to any of the other options out there.

There’s no credit card required so you can get a good feel for how Shopify works without any risk on your end. The 14 days are also perfect for getting your site built. I recommend setting a goal to get your store live by the end of the trial period. Then you’ll be making money as soon as you start paying for Shopify.

The trial will ask you a few questions about your company name, your address, and other standard details.

Step 3: Get Your Domain

With your Shopify store created, it’s time to grab that domain you spotted earlier. The easiest option is to buy your domain within Shopify.

In Shopify, you’ll find a domains section that allows you to search for a domain.

Ecommerce Site - Shopify Buy Domain

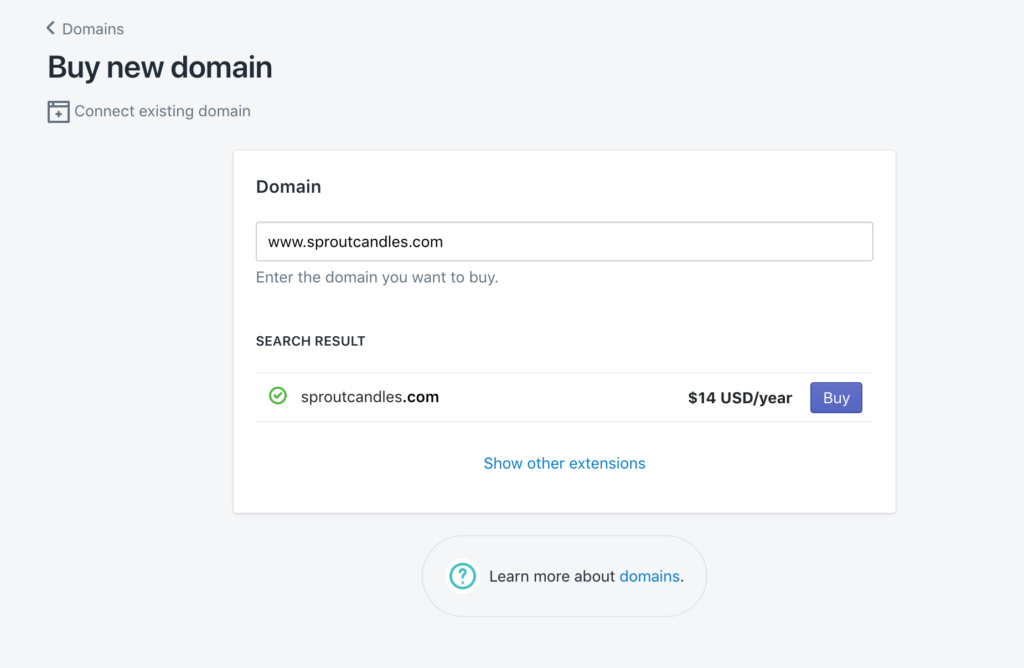
Shopify sells .com domains for $14 per year. This is slightly higher than average. Most domain registrars will sell an available domain for $10 per year. If you’re creating your store from scratch and haven’t purchased your domain yet, I wouldn’t worry about trying to save $4 per year. Purchasing your domain directly from Shopify will save you the several extra steps you’d have to take to point your domain from your registrar to Shopify.

I also recommend that you purchase the .org and .net versions of your company name. So you should have three domains in total:

  1. company.com
  2. company.net
  3. company.org

What if you want to manage your domains outside of Shopify? In that case, choose a domain registrar like Namecheap and buy the domain there.

Once you have your domain, you’ll need to configure a few domain settings to point the domain to Shopify. You’ll find detailed instructions on how to do this here.

If you’re pointing your domain to Shopify, do this as soon as possible. It can take a few hours for domain settings to go into effect so you’ll want to make the changes and confirm everything is working before you’re ready to launch your store.

Step 4: Choose Your Theme

Your Shopify theme determines how your store will look. It’s also how ecommerce stores are able to brand themselves using their site. You can also change the look and feel of your site without having to transfer off Shopify itself, simply by changing the theme.

There are three ways to get your theme in place.

Free Shopify Theme

Shopify has plenty of great-looking themes that are also completely free. They’ve gotten so good over the years that it’s often difficult to tell what’s a free theme and what’s paid.

Paid Shopify Theme

Shopify also has plenty of paid themes in its marketplace. Most of them sell for $180. They offer a more polished site and extra features than the free themes.

Custom Shopify Theme

Yes, it is possible to get a theme built from scratch. If you go this route, an ecommerce marketing agency can build your site however you want. It can be completely customized to match your brand.

The costs for a custom theme will vary widely. It depends a lot on how big of a business you have and your requirements. Pricing will range anywhere from a few thousand dollars to over a hundred thousand dollars for an enterprise ecommerce site.

Our Theme Recommendation

Unless you already have a thriving business, it’s best to use one of the standard Shopify themes. This gives you the ability to get started without having to spend much money. Then once your business has taken off and you have a good idea for how to evolve your site and brand, you can consider a customer Shopify theme.

When we look for themes, we go to the Shopify theme store and rank all themes by popularity.

Then we start at the top and scroll down until we find a few that could work.

Ideally, you’ll find one that has a good “feel” for the type of customers your store will target. If you’re targeting men that spend time outdoors, a more rugged feel is ideal. If you’re selling luxury products, a polished and refined feel would be better. Don’t worry about getting this perfect — you only need a theme that’s “good enough” at this stage.

We typically don’t worry about the free versus paid Shopify themes. We’re more focused on finding the theme that’s a good fit. If it happens to be free, even better. If it costs us $180, we consider that a small cost and don’t hesitate to purchase the theme. If you’re watching every dollar and would prefer to stick to a free theme, you’ll still find plenty to choose from.

Once you’ve found the theme you want, get it installed on your Shopify store. That’ll make the next few steps a lot easier.

Step 5: Create Your Product Pages

This is where you’ll want to spend the most time.

Product pages have a huge impact on how many of your website visitors end up converting to customers. And it’s one of the key parts of the business that you control. You can’t always control traffic. You can’t always control your suppliers. But you can control how much effort you put into making your product pages really high quality.

Let’s go through the key parts of a product page and how to make them amazing.

Product Name

Great product names have a huge impact on product sales. Just think of the legendary infomercial products like the Shamwow, Thighmaster, or OxiClean. Legendary product names are distinctive, instantly communicate the product benefit, and are easy to remember.

I’ve named my share of products and all I have to say is that this is a lot harder than it looks.

When I tried to name my first few products, it was really easy to fall into the trap of making the name too cute. There’s a fine line between a legendary name that resonates with your market and a cute name that everyone ignores.

This is why it’s generally better to focus on names that are clear instead of trying to be too creative. Until you have a lot of naming experience, it’s really easy to pick a name that falls flat.

A clear and boring name for a great product will still generate tons of revenue. A cute name will destroy it. So focus on clear names that your market will instantly understand.

Product Description

This is your one to two paragraph pitch for the product. Really spend time on this copy.

Here’s a good structure to use in a standard product description:

  1. One or two sentences describing the problem that your product solves
  2. One or two sentences painting the dream of what it will be like when the product is solved
  3. Two to three sentences explaining how your product achieves that dream and the specific features that help accomplish that goal

This is a very common copywriting script that’s used for a lot of products, particularly any product that solves a distinct problem.

That said, not all products solve problems. Apparel is a great example. If I buy a trendy shirt, what problem am I trying to solve? None really. Instead, my purchase is aspirational. I’m aspiring to feel more confident, refine my identity, and change my look. In this case, it’s less about the product description itself and more about how the shirt looks and makes me feel. The product photos end up carrying more weight than the product description itself.

In other words, if the product description template above doesn’t work for your product because it doesn’t solve a distinct problem, don’t try to force it. Instead, use the photos to paint the dream your customers have the best you can.

Product Photos

Photography standards have gotten super high these days. Everyone has an amazing camera on their smartphone and great photography has become super prevalent with Instagram, so ecommerce websites have to take their product photos really seriously.

Don’t skimp here.

Set up a small area to take high quality photos for your products and use the highest quality camera that you can get your hands on. Also make sure to take photos from multiple angles. If possible, you should also take a few photos of the product in action. If you’re selling bed sheets, take a photo of the sheets on a real bed. If you’re selling hiking shoes, take a photo of somewhere wearing them on a hiking trail.

Use your photos to paint the dream as best you can.

Product Price

The biggest myth about pricing is how businesses set prices.

As consumers, we always assume that a business figures out how much something costs, adds a fair percentage to make some profit, and that’s how we get the final price.

In reality, it never works like that.

Consumers are willing to pay certain prices and if that price has a good margin, there’s a business. If there isn’t a good margin, the business model changes or there aren’t any good businesses in that category.

Mobile apps are the best example of this. Regardless of what it costs to develop an app, people are only willing to pay about $5 for it. The app could do incredible things and literally change lives but it doesn’t matter, the ceiling is about $5.

So how do consumers figure out what they’re willing to pay?

Price comparisons. As consumers, we only understand relative pricing. When we try to evaluate if a price is fair, we find the nearest comparison and judge based on that.

Why is it possible to only charge $5 for a mobile app? All the other apps are about $5.

Why is it okay to charge $5 for a latte? Starbucks charges about $5.

If you try to sell me a t-shirt, I’ll instantly compare your price to the standards I’ve come to know. Cheap, plain t-shirts are about $5, nicer t-shirts about $20, and luxury fashion brand t-shirts $70–100. Depending on what kind of apparel company you have, I’ll compare to those benchmarks.

The bottom line is that every business needs to factor in the comparative pricing. Yes, you can stretch it a bit if you’re delivering more value. For example, some mobile apps charge $10 and make it work. But there are limits.

Find the best comparison price to your product, nudge the price up or down depending on your value, then set your price.

And as a ecommerce website owner, it’ll be up to you to decide if your business works at that price.

Step 6: Create Your Company Pages

After your product pages are done, there are a few more pages you’ll need to create.

Homepage

The simplest and most effective way to approach your homepage on an ecommerce website is to feature your most popular products.

Take your most popular product of all time and include a giant photo of it along with a call to action to its product page above the fold. Then include the next 3–5 most popular products on the rest of the homepage. This ensures that new site visitors are exposed to your best products immediately, increasing the percentage of people who purchase.

Every six months or so, check your product popularity and rotate products as necessary.

Large ecommerce websites rotate their featured products at a much faster pace. As they should! They have a lot more customers and a product catalog that’s constantly changing. As you get larger yourself, you’ll also want to increase the pace that you change your homepage. Start doing quarterly changes, then monthly, then weekly, and so on.

About Page

A lot of visitors will go to your about page to figure out who you are and what you’re doing. This is a perfect opportunity to tell your story and inspire your customers to join you on your mission.

Here are some questions and topics that you’ll want to cover on your about page:

  1. If there was a particular moment that changed your life and set you on your path to create this business, tell that story.
  2. Include any values or principles you use to build or select your products.
  3. If there’s a goal or milestone that you’re trying to achieve, share it.
  4. If you’re committed to living a certain lifestyle, paint that dream.
  5. Clearly define the type of person you’re offering products for.

Be authentic and write your copy as clearly as possible. The more that you can make this page resonate with your target market, the better.
Contact Page

This page is nice and easy. Keep it simple: include your phone number, address, and a contact form for people to reach out.

The most important thing is to make sure that the contact form goes to an email address that’s actively being monitored. If you’re the only person working on your website, have it go to your email at that domain. For example, if I had a site called Sprout Candles, I’d create an email for lars@sproutcandles.com and have my contact form send messages there. That way I can respond to any customer requests really fast.

Once you gain traction, one of the first areas of the business that you’ll want help on will be customer support. Lots of ecommerce websites hire folks part-time or for a few hours each day to go through all the customer messages for the day. At that point, send your contact form to a generic support email that can easily be managed by anyone on your team. If I reached that point with my hypothetical business, I’d change the email to support@sproutcandles.com.

An easy and low-cost way to get a phone set up for your business is Grasshopper. They give you a public phone number that can route to any phone number of your choosing. In the early days, you’ll have it redirect straight to your cell phone. That lets you respond to any phone calls directly without having to post your personal phone number publicly.

Step 7: Set Up Your Payments

One of the best parts of building your site on Shopify is how easy it is to set up payments. Shopify does just about everything for you — all you need to do is configure a few settings and tell Shopify when to send your money. It’s really that easy.

Those payment settings are under the Settings section in your Shopify account.

Go ahead and set up Shopify Payments:

Ecommcer Website - Payment Providers

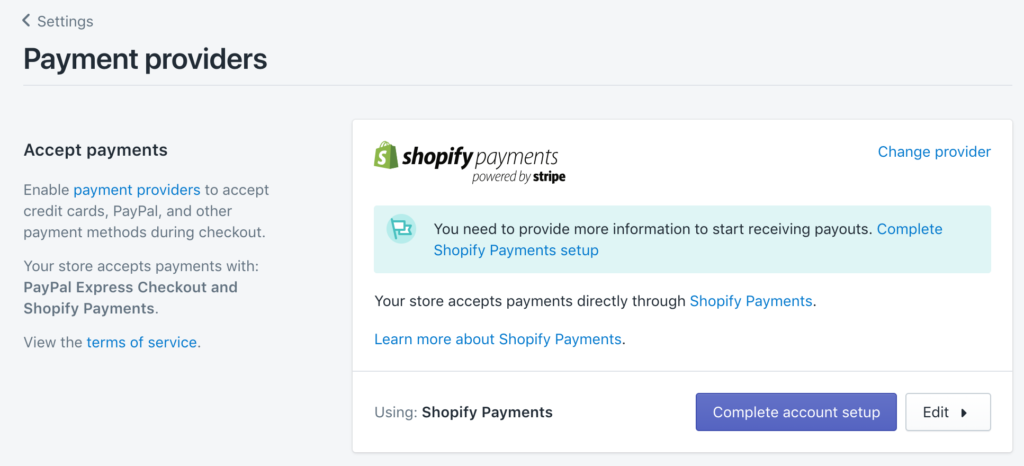
Most of the info that’s required is pretty standard. It includes basic business info, some personal info, and your bank account so Shopify can transfer money to you.

There is one setting that you should pay close attention to for your payments: your customer billing statement.

Ecommerce Site - Billing Statement

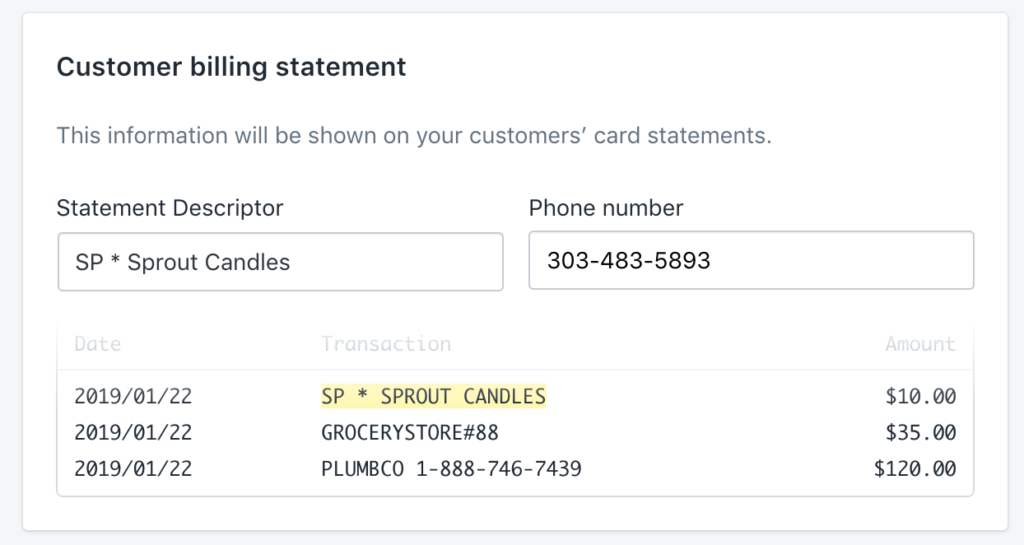
Have you ever looked through your credit card statement, seen a charge, and thought to yourself, “What was that for? Did I get charged for something I didn’t buy?”

It happens to us all. With the number of online purchases we make these days, it’s easy to forget what we bought.

As an ecommerce store owner, the last thing you want is for your customers to get confused when they see your billing info on their card statements. If there’s any doubt or confusion, your refund and chargebacks will go up. The best way to avoid this is to make it as clear as possible which store the charge came from. Use the primary name your customers will recognize from your site. This will save you money and frustration later.

Also, we do recommend setting up PayPal on your site as well. Some customers prefer using PayPal since they don’t have to enter their credit card info all the time. Especially on mobile, it’s a lot easier to pay.

If you don’t have a PayPal account for your business already, they’re super easy to create. The only charge is the small percentage of each sale that PayPal will keep, which is standard across the industry. Go through the PayPal settings in Shopify and get it connected to your store and a PayPal option will appear in your checkout.

Step 8: Get Your SSL Certificate

SSL Certificates allow you to say that your site is extra secure. They’ve been around awhile and have become standard for any site that handles private information like email addresses and payment information.

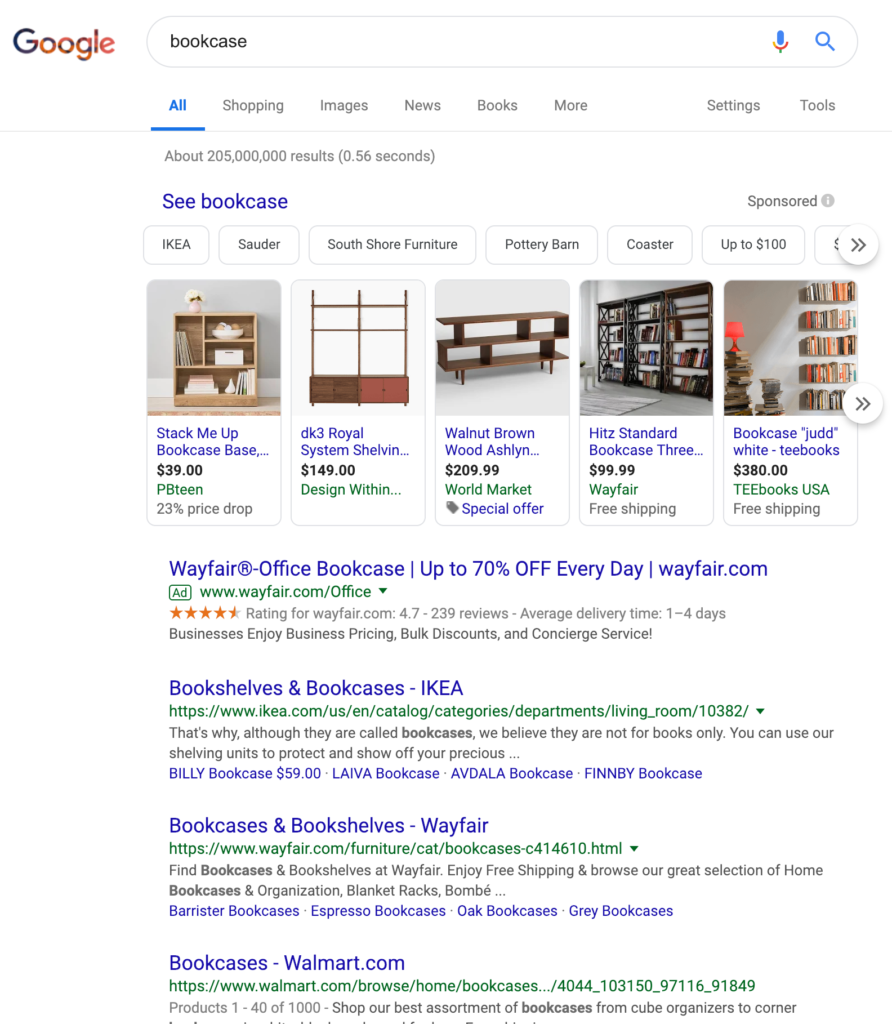
In the last few years, Google has made SSL certificates more prominent in its Chrome Browser. Here’s what a site looks like with an SSL certificate:

HTTPS URL

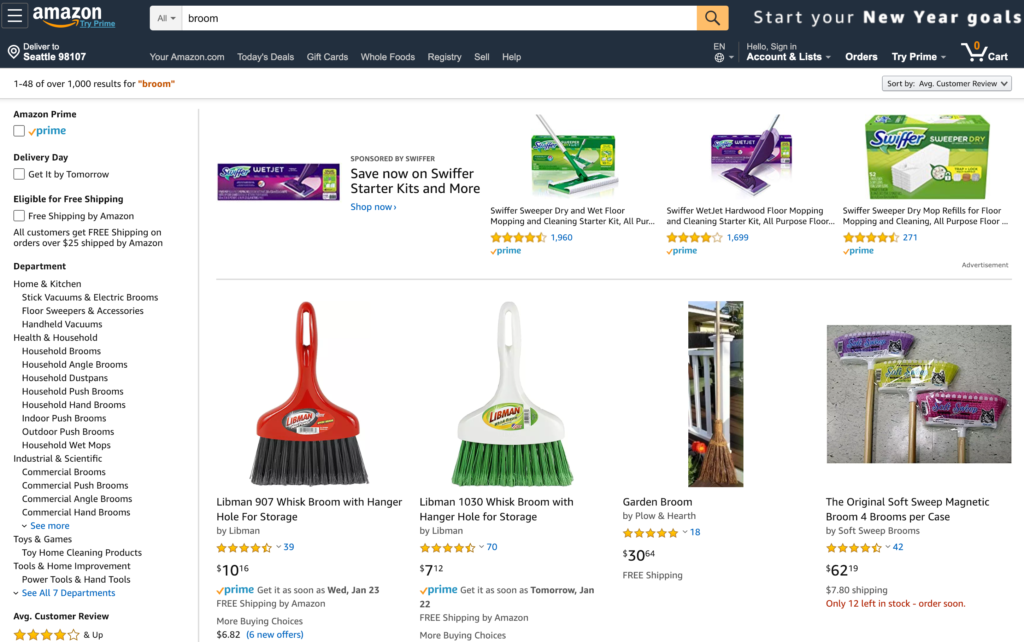
Here’s what one looks like without it:

HTTP URL

There’s a very clear trend that sites with SSL certificates are being highlighted while sites without them are getting subtle warnings. While SSL certificates used to a “nice-to-have” feature, these days they’re considered a requirement for any ecommerce site.

The last thing any ecommerce site owner wants is to make a customer hesitate because there isn’t an SSL certificate on the site.

We strongly recommend that you set up your SSL certificate when you create your site.

The best part?

Shopify gives you a free SSL certificate for your store. That’s right, it’s 100% included with your store.

Something to keep in mind for later on: there are different levels and types of SSL certificates. When getting a free SSL certificate, you’ll only get the basic options. More advanced SSL certificates come with extra monitoring, insurance, and extra security. Prices range from $150 to $2,000 per year depending on the exact package.

The only folks that should worry about the more advanced SSL certificate options are those that handle credit cards themselves (you’re not; Shopify is doing it for you) or run very large enterprise sites.

In other words, the free SSL certificate from Shopify is more than enough right now. If your ecommerce site gets super large, you can look at the other SSL certificate options later.

After you get your domain purchased or connected in Shopify, you’ll find an option to add an SSL certificate in your Domains area.

Step 9: Launch Your Store

The big day has arrived!

Everything is in place and now it’s time to launch your store.

Shopify stores are password protected by default, so no one has been able to see your store until now. If anyone tried to visit your store until this point, this is what they saw:

Ecommerce Website - Shopify Password Page

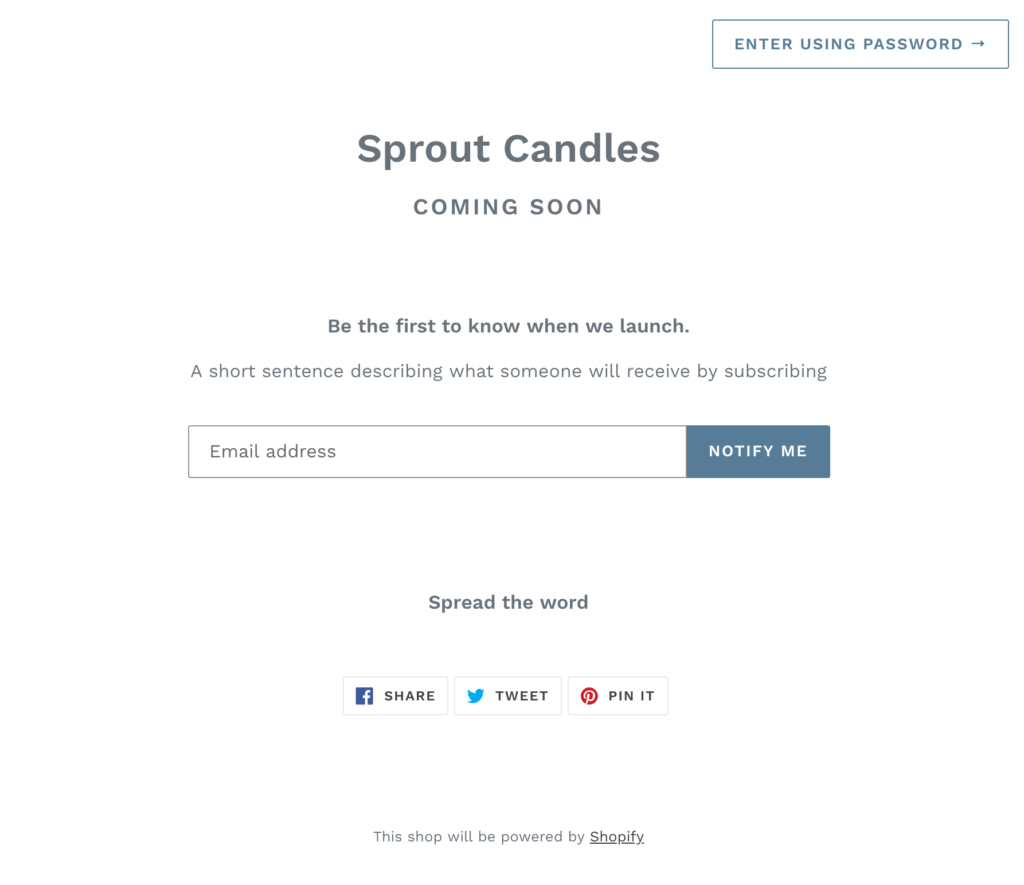
As soon as you remove the password protection, people will go straight to your real store without needing to enter a password.

Before Shopify will let you launch your store, they require you start one of its paid plans. You’ll still get full credit for your trial; the billing period won’t begin until after the trial ends. But you do need to get your paid account set up before you can open your store.

If you haven’t picked a paid plan yet, go ahead and do that now.

Then go into your store settings and look for the password section:

Ecommerce Website - Shopify Password

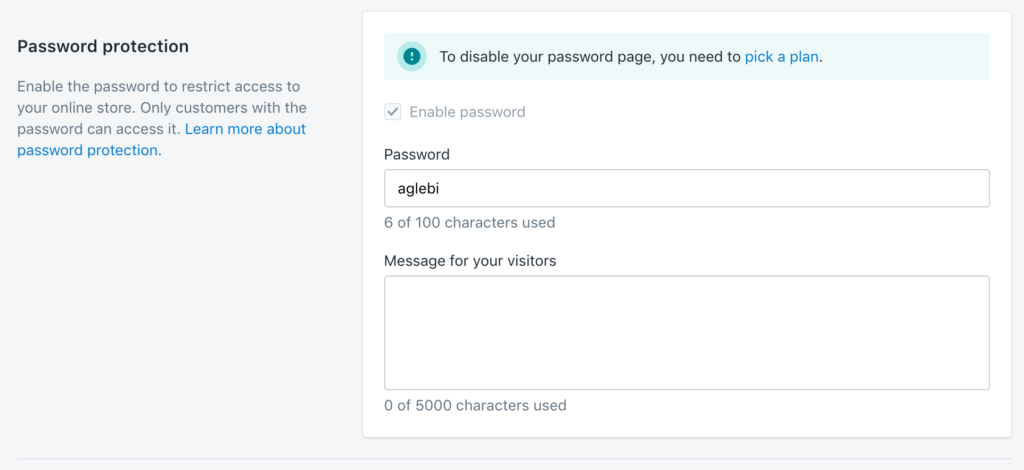
All you have to do is uncheck the “Enable password” box, save the settings, and your store will launch.

Congrats!

From here, it’s all about growing traffic to your ecommerce website, improving your products, and finding new products to offer. The better you get, the larger that your business will become.


from Quick Sprout http://bit.ly/2Tu9Nic

Tuesday, January 29, 2019

How to Start an Online Store That Drives Sales in 2019

There’s a bunch of steps that go into starting an online store.

What tool do you build your store with?

What do you name your company and how do you get a domain?

Do you dropship or not?

How do you deal with taxes?

All of these are important decisions. For now, one thing matters more than anything else to get your first sale.

What’s that one thing?

Your marketing.

That’s right, how you choose to market your store completely determines how much money you’ll make. Get the marketing right, everything else falls into place. Get it wrong or neglect it, you’ll spend years on your store without selling a single item.

Before you open your online store, you want to pick your marketing strategy.

Most online stores use one of three strategies:

  • SEO
  • Paid marketing
  • Platform marketing

Let’s go through each.

SEO for Online Stores

Google Search Marketing - Bookcase

This marketing strategy is pretty simple: find keywords for products that you want to offer, then get your site to rank in Google for those keywords.

If you get this to work, you can make a lot of money with your online store. SEO has a few benefits that are ideal for a businesses:

  • The traffic streams are very dependable, which means dependable revenue for your business.
  • Search traffic usually has the highest volume of traffic of any traffic source.
  • Even at scale, search traffic can be enormously profitable.

Dependable, high volume, and profitable. It’s everything you could want.

There is one major downside: SEO takes a lot of time and effort. Even if you’re pursuing a product category without any competitors, it can still take a good 3–6 months to see your site appear on the first or second page of search results for a keyword. The traffic volume will be pretty small until you get your page into the top 1–3 rankings on a keyword. If your category is even modestly competitive, it can take years of effort to get to that point.

If you go this route, you’ll focus on three things:

  1. Optimizing your product pages for product keywords.
  2. Building useful and engaging content for non-product keywords that are also in your category. This helps your product pages rank.
  3. Making your content so good that people will link to at as a resource.

When playing the SEO game, there are only two things that matter: content and links. So that’s where you’ll spend the bulk of your time.

Paid Marketing for Online Stores

Instragram Paid Ecommerce Ad

Some online stores do exceptionally well with paid marketing.

My general rule of thumb: paid marketing is a great option if your product is the type of thing that could be featured in a mall.

Why?

The biggest paid marketing channels right now are Facebook and Instagram. Instagram in particular has gotten very popular for online stores in the last few years.

But think of the frame of mind that someone has while scrolling through a Facebook or Instagram feed. They’re relaxing for a few minutes, laughing at a few photos, and leaving quick messages for a few friends. They’re enjoying themselves. It’s a lot like how people shop at a mall. Sometimes, people are looking for a particular item, but a lot of people go to the mall to enjoy themselves. Malls have known this for a long time and stores have optimized around this browsing experience.

So products that sell effectively in a mall are also likely to do well with a paid ad in Facebook or Instagram. They’re typically:

  • Consumer products. Business products have a much harder time in these channels.
  • Highly visual and eye-catching. This is why apparel companies do so well in malls and why apparel companies have been really aggressive on Instagram the last few years.
  • Simple to understand — the offer needs to be understood within 3 seconds. If you have a more complicated sales process that requires more explanation, people will have scrolled past your ad long before you have a chance to make the sale.
  • A price point that works with an impulse purchase. If the price is too high that people need to carefully think through the decision, they’ll skip your ad and quickly forget it.

If your product meets all these criteria, you should seriously consider going the paid marketing route.

Google Ads (formerly AdWords) is one exception to this. Since you’re bidding on keywords within Google, you put your ad in front of people who are already actively searching for that type of product. As long as the keyword has enough search volume and the ad bids aren’t too competitive, it’ll work very nicely.

The biggest downside to paid marketing is that you’ll have to invest a bunch of money up front before you know whether or not you can turn a profit. Many of us don’t have those thousands of dollars to invest without a reliable chance of getting it back.

Most paid campaigns don’t turn a profit initially; they usually take a lot of iteration and work before they start making a profit. Most professional paid marketers need 3–6 months before their campaigns become profitable. So be careful and make sure you don’t invest more than you can afford to lose here. If cash is too tight for you, choose one of the other marketing options.

Platform Marketing for Online Stores

Amazon Platform Marketing - Broom

This is a completely different direction than the two methods above. Instead of creating your own store and using a type of marketing to acquire traffic, you’ll leverage one of the main ecommerce platforms:

  • Amazon
  • Etsy
  • eBay

It’s definitely possible to be successful at any of these three. We recommend that most folks go after Amazon. Amazon’s audience is much larger which gives you more upside and just about every product niche already exists on Amazon.

The main exception is if you’re doing a craft business of some kind, like making your own bookends to sell to people. In that case, Etsy is a better fit since the audience expects more craft-oriented products.

eBay is still great if you’re doing a bunch of buying and reselling. But if you’re producing the same types of items consistently, the potential on Amazon is much higher.

You treat whichever platform you choose as your marketing channel. First you’ll create your store on that platform and list all your products. Second, you’ll optimize your store to the best of your ability so the platform wants to feature your products. This usually involves focusing on two areas:

  • Targeting your product pages to specific terms searched for within the platform
  • Getting as many 5-star reviews on your products as possible

As you improve your search terms and reviews, more people will see your products on that platform, which will produce more sales for you.

How to Choose the Best Type of Online Store for You

Again, there are three types of online stores you can open:

  • SEO
  • Paid marketing
  • Existing platforms like Amazon, Etsy, and eBay

I strongly recommend that you pick ONE of these and build your entire business around it. That’s right, just one.

“Why can’t we do more than one? Wouldn’t we want to use multiple marketing channels for our store? More marketing means more sales right?”

I’ve made this exact mistake so many times myself. After a decade working in online marketing alongside some of the most well-respected marketers out there, I’ve noticed one overwhelming trend: folks that are good at one type of marketing are generally pretty bad at the others.

Why would this be?

A couple of reasons:

  • Every marketing channel is completely unique. While some marketing principles apply across all channels, you’ll have to learn all the tactics from the ground up. Constantly trying to learn new channels really slows you down.
  • Online marketing channels constantly change. What works right now won’t work in 12 months. Even though I’ve spent a decade doing SEO, I still feel like I’m relearning it every year. If you’re focused on a single marketing channel, you’ll have a much easier time keeping up.
  • Online marketing channels are power laws. That means the majority of the profits go to a few big players — everyone else fights for scraps. If you’re not one of the winners, you won’t be making much.

If you stick with one marketing channel, you’ll get through the learning curve a lot faster. The faster you unlock your marketing channel, the sooner you’ll be making real money with your online store.

Step 1: Find the Right Product Niche

After choosing your marketing strategy, picking your product niche is the most important decision that you’ll make. Slow down and take your time to do some genuine research here.

A huge mistake that I’ve made in the past was jumping into hobby categories. Yes, being personally interested in the category really helps with building the business. But it’s also a common trap for picking a category that won’t support a thriving business. If there isn’t much demand in my niche, it doesn’t matter how great of a job I do, I’m doomed to fail from the beginning.

There are a few things I look for in a good product category for an online store.

First, avoid picking a category that’s too unique.

A common best practice in marketing is to differentiate yourself. And this is powerful advice — it’s a huge advantage when you have it.

It’s also tricky to find a genuine way to differentiate yourself that the market is willing to pay for. There are countless ways to differentiate any given product, but only 1–2 actually matter.

Does the top-rated toothbrush holder on Amazon need to do something wacky and unique? Not at all. It needs to be simple, easy to use, reliable, have a good price, and have a ton of reviews on Amazon. That’s it.

Instead of trying to differentiate yourself from every other product in your category, find a category with competitors that aren’t dominating their marketing channel. Are the Amazon reviews low for all the top products? Are the SEO results low quality? Are there no companies putting serious ad dollars behind a product? If the answer is yes, there’s an opportunity for you to out-compete them with your marketing.

A moderate price is also key.

Avoiding product categories with a low price makes a lot of sense. After all, if you only earn $1 in profit for each sale, you’ll have to sell 100,000 products every year to support yourself. After taxes and overhead, that’ll give you about $50–60K per year to live on.

Selling 100,000 of anything is a lot of work. No easy task.

Now let’s assume that you’re selling something for $80 and making $40 in profit on each sale. To make $100,000 per year, you’ll only need to sell 2,500 items. That’s much more manageable.

However, you also want to avoid selling something with a price that’s too high. As price goes up, so does buying behavior. Prospects demand more proof. They may even demand a completely different buying process. How many people buy cars without test driving them at a dealership? Most don’t. They want to see the car and talk to a real person before making a purchase that big. Cars require a lot of extra work and sales skill to sell effectively because of their higher price point.

We recommend finding a product that you can sell between $50 and $100 dollars. It’s high enough that sales will add up quickly for you. It’s also low enough that the buying process will be straightforward.

Lastly, make sure there’s demand.

You can usually tell if there’s demand by doing some category research on your marketing channel. For SEO, Google Ads (formerly AdWords) has a Keyword Planner that tells you how many times something is searched in Google every month. If the keyword for your product gets less than 1,000 searches per month, it’s probably too small to build a business on.

Same thing with Amazon, if you have trouble finding products in your category with more than 100 reviews, it’s probably too small.

These days, I’d much rather pick a category that I have zero experience in but has genuine demand. That’s much better than realizing that a passion category of mine has zero demand later on.

Step 2: Pick a Name for Your Brand

The bad news: everyone hates this step.

Trying to find a good name that’s not already taken gets really annoying. The websites are taken, the best names have been trademarked, and you’ll feel like you’re hitting dead-end after dead-end.

Good names are tricky to find.

Whenever I look for a new name, I feel a temptation to cut corners. After several full days of brainstorming names and hitting dead-ends, all I want to do is pick a less-than-ideal name just so I can move on to the next step.

I have to tell myself that it’s worth the effort to keep looking. It’ll pay off if I keep going and it always does.

Here’s the naming checklist I use:

  • Easy to spell. I never want any friction when people are trying to find my site.
  • 3 words or fewer. I like to keep it at short as possible so it’s easier to remember. 1 or 2 words is ideal, 3 is still good.
  • Pass the Bar Test. I should be able to say the name in a noisy bar without repeating it. That’s a great sign that it’s easy to understand. This is huge for word-of-mouth marketing later.
  • Can get the .com domain. Every online story needs a .com. It’s become too much of a standard. Some folks use weird domains like company.online or company.io. In my opinion, this causes problems later because whoever owns company.com will know how valuable it is once you try to buy it. I either buy the domain early or find one that’s instantly available.
  • Relevance to your category. Make sure the name relates to your product category in some way.
  • No trademark conflicts. Any corporate law firm can do a quick check for you on this. Since legal time is expensive, find 3–5 name options that check all the above items. Then have an attorney check for the trademarks all at the same time. It’s rare to not have at least one of them work.

We have an in-depth guide on how to pick and buy a domain name here.

Once you have your name picked, grab the domain using your domain registrar. Or if you’re buying the domain from someone, get it transferred into the domain registrar that you want to use for the long term.

Step 3: Open Your Online Store

If you’re pursuing an SEO or paid marketing strategy, this is a super important step. The quality of your site has a huge impact on how much of your traffic will turn into buyers.

First, we strongly recommend Shopify for building your site.

There are other tools out there like Magento and Bigcommerce — none of them compare to Shopify. It’s super easy to use, has all the features that you’d ever want, and has a very reasonable price.

The one exception to this is if you’ve already built out a blog with a large audience and want to add a small online store to it in order to sell a few items. In this case, adding WooCommerce to your WordPress is a good option.

Otherwise, always go with Shopify.

We’ve put together a detailed guide on creating an ecommerce website here.

And if you’ve picked one of the platforms like Amazon, treat your company and product pages with great care. Make the copy as compelling as possible. Use every feature that they give you. Get the highest quality photos that you can. Do everything. Really make your pages stand out.

Step 4: Do a 60-day Marketing Burst

All of our stores start from scratch.

When we’re just getting started, any bit of momentum goes a long way.

That first review, that first page that ranks in Google, that first purchase using a paid ad — it’s life changing.

At this stage of the process, I never worry about systems, scalability, or trying to do things in an efficient way. I’m looking for momentum any way that I can get it, no matter how much outreach or personal work I have to do.

The goal at this stage is to put in a huge burst of personal effort and get some momentum. Even if you have to do things that you know aren’t sustainable over the long term.

Here are a few examples:

  • I might tap my personal network to see if anyone is willing to do an interview with me and publish it on their own site. This will help me get a few initial links to my site.
  • I could ask personal friends and relatives to leave the first couple Amazon reviews.
  • I’d try spending some of my own cash on paid ads to test if the offer produces revenue at all.

I’m looking for any marketing idea that involves my time but also allows me to quickly get my first few wins.

At this stage, do some research on your marketing channel and come up with a list of 50 ideas that you could personally do yourself. Then prioritize them and plan a 60-day Marketing Burst. Ship as many of those ideas that you can within those 60 days. Work long hours, drink too much coffee, and really push yourself during that period.

By the end of the 60-day Marketing Burst, some of your marketing ideas will have worked and you’ll have your first couple sales. You’ll also have a small but steady stream of sales coming in because you’ve focused on a single marketing channel. That steady stream is enough to start building your marketing flywheel on.

Step 5: Build Your Marketing Flywheel

Once you have some initial momentum, it’s time to start building the marketing machine that will grow your business around the clock without you having to personally accomplish every task.

In the early days on Amazon, you’ll need to personally ask for a lot of your first product reviews. But that’s not sustainable.

Instead, look for marketing tactics that help create Amazon reviews for you without you asking for them.

Here’s an example.

A popular tactic on Amazon is to ask customers to leave a review. Some will even promise a discount code on the next purchase if a review is published.

You can automate that tactic. Have an assistant send the same templated email to every new customer, asking for a review and promising a discount code on their next order. All the platforms allow you to message customers personally through the platform. So while you can’t email blast all your customers at once, you can have an assistant send messages out one-by-one every week on your behalf. That’s a repeatable flywheel that doesn’t take up your time.

A quick side note on this review tactic: Before you try something like this, make sure to check the guidelines and policies of the platform you’re on. There are always rules about these sorts of things and every platform is slightly different. Be careful to not push things too far, putting your store in danger of getting removed entirely.

Look for as many of these repeatable marketing flywheels as you can.

Instead of creating content yourself, can you pay someone for content? If you did the keyword research, made a list of requirements that you want on each piece of content, and hired someone else to write the post itself, you could create a lot more content to help you win with an SEO marketing strategy. That’s a flywheel.

Instead of optimizing your paid ads yourself, can you delegate that? If your conversion rates are consistently improving and your cost to acquire a customer is going down, that lets you buy more customers with the same amount of capital. That accelerates your business without your personal effort. Another flywheel.

Focus on your core marketing channel and then build a marketing flywheel that will keep your online store growing without effort from you. This is the key to opening an online store, generating sales quickly, and accelerating its growth.


from Quick Sprout http://bit.ly/2HCLlK9

Monday, January 28, 2019

The Best SEO Plugins for WordPress (Review Updated for Winter of 2019)

In 2019, websites can no longer afford to ignore search engine optimization.

Nearly all internet activity starts with search: 93% of all Internet experiences start with a search engine and 39% of ecommerce traffic across the world comes from search. Most businesses have recognized this and adapted accordingly — 61% of companies named SEO as their biggest priority last year.

Sure, you can generate leads with PPC campaigns and pay to be a top result. But 80% of people say they ignore the advertisements in search results.

Take a moment to analyze your own habits. When you want to do something online, where do you start? If you’re anything like me and the majority of internet users, you start with a search engine. You type in some keywords or phrases and probably don’t scroll past the first few results before clicking on a site. Sounds about right then, that the first five SERPs receive 67.6% of all clicks.

In short, you need to be prioritizing SEO and be a top result if you want to have any chance of driving organic traffic to your website. But if you aren’t an SEO expert, where do you begin?

Fortunately, there are plenty of great SEO tools available. If you have a WordPress site, there are a number plugins you can install that will really help you out. Which ones? That’s exactly why I developed this list of the best SEO plugins for WordPress. It details my top 8 plugins and how they’ll help you improve your SEO.

1. Yoast SEO

Yoast SEO Plugin

The Yoast SEO WordPress plugin has been around for more than a decade. Over five million websites have installed it, making it one of the most popular options.

One of the best parts of Yoast SEO is the ability to create and manage your XML sitemaps. This is much easier than having to code your sitemap on your own, especially if you don’t have much of a technical background.

Yoast SEO helps you identify and avoid duplicate content, so you won’t have to worry about being penalized by Google, and it offers templates for titles and meta-descriptions, which will make your pages more appealing in SERPs.

You can install the Yoast SEO plugin for free to access all of these features and benefits. But there is also a premium version for $89 annually that gives you upgrades like:

  • Page previews on different platforms
  • Suggestions for internal linking
  • Redirect management options
  • 24/7 support
  • No advertisements

At the very least, I recommend trying the free Yoast SEO plugin for WordPress.

2. The SEO Framework

The SEO Framework plugin is another great option for you to consider. I like this WordPress plugin so much because it’s built for smaller enterprises as opposed to massive corporations.

Its interface blends naturally when integrated with WordPress, so it feels as though it’s supposed to be there, as opposed to appearing obtrusive.

Here’s a look at one of my favorite features on this plugin.

SEO Framework Plugin

The plugin offers a colored scale, showing you exactly how to optimize each post for search engines. All you need to do is hover your cursor over the bars in the SEO column to reveal notes for how to specifically improve certain pages. As you can see from the screenshot above, this note explains how the title can be improved for SEO purposes.

The SEO Framework plugin is free and doesn’t have any ads or upsells to pester you while you’re working. Overall, I’m happy with the way this lightweight plugin performs.

3. SEO Squirrly

SEO Squirrly is designed specifically for people who aren’t experts in SEO.

Other plugins have different ways to access and implement SEO suggestions, but SEO Squirrly brings this to the next level. Take a look at its live SEO assistant feature.

SEO Squirrly Plugin

Here’s how it works. You just have to input the desired keyword that you’re trying to rank for with the article you’re writing. As you write, green lights and popup suggestions will appear in real time explaining how you can work that keyword into your content. Imagine having an SEO expert standing over your shoulder while you’re writing — that’s what you get with SEO Squirrly.

The content reports are another great feature that’s ideal if you’re outsourcing writers or using multiple writers across your company to produce content. These reports give writers additional insight about SEO based on what they wrote.

SEO Squirrly also has a tool to analyze your competitors’ content, so you can find ways to outrank their pages. You’ll also be able to track your progress on a weekly basis.

4. Broken Link Checker

Broken Link Checker Plugin

Google algorithms will penalize you for broken links, so the Broken Link Checker WordPress plugin is extremely valuable for your website.

If you’re like me, you have tons of internal and outbound links in your blog content. You can control the pages on your own site, but the status of pages on other websites is out of your hands.

Here’s an example. Say you used a quote, image, or statistic from another website in one of your blog posts. But for one reason or another, that other site got rid of that page or merged it with another piece of content without including a redirect. Now you have a broken link on your site.

The Broken Link Checker plugin will identify any broken link on your site and make it easy for you to remove, edit, or dismiss the problem with just a couple of clicks.

Not only is this great for SEO, but it’s also important in terms of user experience. You don’t want your website visitors to click a link to a broken page.

5. All In One Schema Rich Snippets

All In One Schema Rich Snippets Plugin

All In One Schema Rich Snippets will improve the way your pages appear in search engine results with rich snippets, which are a brief and more interactive summary of your page. They contain things like pricing, photos, star ratings, or reviews.

This popular schema markup plugin can help you add things such as:

  • Videos
  • Articles
  • Recipes
  • Events
  • People
  • Products
  • Articles

Rich snippets benefit all websites, but they are especially important for ecommerce sites. Users won’t have to go through as many steps to read a review of your products. They can see the star-rating from the search engine results page. Adding rich snippets will tell search engines exactly what information to include in the search results.

6. Rank Math

Rank Math allows you to manage all of your on-page SEO needs for every type of content on your website. This WordPress plugin is so effective because it’s integrated with Google Search Console, so you’ll see all of the important information directly from your administrative dashboard in WordPress.

Rank Math Plugin

Rank Math also lets you manage meta tags for things like:

  • noindex
  • nofollow
  • noarchive

This WordPress plugin will tell you which keywords you’re ranking for, and also show you how many impressions you’re getting for various searches. Rank Math also identifies any errors that Google sees on your site. All of this information is easy to access, read, and digest.

Furthermore, Rank Math has features for:

  • XML sitemaps
  • Rich snippets
  • Internal linking recommendations
  • 404 monitoring
  • Redirects
  • Local SEO
  • Image SEO

Rank Brain is definitely one of the best SEO plugins for WordPress. It’s great for those looking for a one-stop-shop for all of these features.

7. SEMrush SEO Writing Assistant

SEMrush Writing Assistant Plugin

The SEMrush SEO Writing Assistant plugin for WordPress isn’t as widely used as some of the other plugins we’ve looked at so far, but it’s still a top choice to consider.

SEMrush has one of the best online toolkits available for SEO. The brand is a big name in the SEO industry, so I definitely wanted to include its plugin on this list.

In order for this plugin to work, you need to have an account with SEMrush, which you can register for free if you don’t have one. The free account will give you access to just one template, so you’ll probably want to upgrade to the premium plan to use this plugin.

The plugin analyzes your content and gives you scores based on how SEO-friendly the writing is. You’ll see text suggestions that will explain how to improve your content for SEO purposes.

With the writing assistant, you can also add your target keywords. The plugin will offer recommendations for you based on those keywords.

For a great SEO WordPress plugin other websites aren’t really taking advantage of, definitely consider the SEO Writing Assistant by SEMrush.

8. All in One SEO Pack

The All in One SEO Pack is well-known and popular. It has more than two million active installations on WordPress. As the name implies, it’s another “all in one” plugin for your SEO needs. One of the reasons why it’s so popular is it’s clean and easy-to-navigate dashboard.

All In One SEO Plugin

The essential features of All in One SEO Pack are free, but you can upgrade to a premium version for $57 per year. If you own multiple websites, you may want to consider a business license, which lets you use this plugin on up to 10 sites for $97 annually. You can even purchase an agency license for $419 per year to use the plugin on an unlimited number of sites.

With that said, if you have a basic blog or startup, the free version will likely meet your needs. It’s great for beginners, but I know plenty of advanced WordPress users who use this plugin as well. It’s probably the most similar to Yoast SEO, which we talked about earlier. The biggest difference between the two plugins is the interface and pricing options for organizations of different sizes.

Conclusion

Your website needs to prioritize SEO. I simply can’t stress that enough.

I recommend reviewing my guide on SEO tactics that you need to retire, so you can stop wasting time on strategies that aren’t working.

Look, I get it; I’m not expecting you to become an SEO expert overnight. But you should at least be taking advantage of some of the SEO tools available online.

If you have a WordPress website, there are countless plugins at your disposal. However, I think it’s best to focus on the top eight that I’ve covered above. There’s something for everyone on this list. Some of these plugins are for specific SEO features, while others encompass a wider range of SEO elements.

Either way, I’m confident that you’ll find this guide is a useful reference for adding SEO plugins to your WordPress site.

Which WordPress plugins are you using to improve your SEO strategy?


from Quick Sprout http://bit.ly/2DFiQaY

Friday, January 25, 2019

Buying Websites For Sale: What You Need To Know How I Make $3K/Mo

Hey guys, Spencer here. I’ve had a lot of people reach out to me that are interested in buying a business. It seems as though more people are starting to realize how possible it is to purchase a pre-existing business…

The post Buying Websites For Sale: What You Need To Know How I Make $3K/Mo appeared first on Niche Pursuits.


from Niche Pursuits http://bit.ly/2Uo1WTN

Everything You Need To Know About Web Hosting

In order for your website to be live on the Internet, it needs to be hosted.

If you’re creating a website for the first time, move “set up hosting” to the top of your to do list, if it’s not already there.

Already own and operate a website? Did you rush into a plan without understanding how everything worked first? Maybe you feel like you’re fine with the host you picked at random. Makes sense — until you run into a problem with your website, you might not even think twice about your hosting plan. However, you don’t want to wait until that happens. It’s better to educate yourself on web hosting now so you can find the best option before anything goes awry. This will make your life much easier down the road.

Regardless of your situation, you’ve come to the right place. This beginner’s guide on web hosting will help you feel confident picking the host that’s right for you and your goals.

What is web hosting?

Let’s start with the basics. What exactly is web hosting? How does web hosting work?

Websites are hosted on servers. In simple terms, a server is a very powerful computer that does only one or two simple services, hence the name server. The type of server we’re interested in stores websites and delivers them to people over the internet. Your web host provides the server space and the technology for your website to be accessed on the Internet. It’s the process that allows someone to search for your site or enter your URL into their web browser to see your page online.

Everything that your website contains is stored and accessed through the web host. I’m referring to things like images, videos, files, text — everything.

Web hosting and data centers are often confused with one another. While the two are similar and work together, they are not quite the same. Web hosting refers to the servers that host websites or the hosting companies that provide you with server space. Data centers are the physical facilities where those servers are located.

Web hosting types

There is no one-size-fits-all plan for web hosting. It’s like buying a car. You don’t just walk into a dealership and say, “I’ll have a car please.”

What kind do you want? You need to decide if you want a sports car, sedan, coupe, hybrid, SUV, electric, diesel, automatic transmission, manual transmission, etc.

Fortunately with web hosting, you don’t have that many options to choose from. There are four main types of hosting.

  1. Shared
  2. VPS
  3. Dedicated
  4. Cloud

I’ll explain how each one of these works and what type of website would need that level of hosting, so you can decide which option is best for you.

Shared hosting

First, shared hosting. With this method, your website shares server space with other websites. Here’s a diagram that shows how shared web hosting works compared to the other web hosting types:

Shared Hosting

Since you’re sharing a server with other websites, this will be the most cost-effective method. Think of it like taking the bus to work instead of driving your own car. The bus will be less expensive, but you’ll be making some stops along the way to your destination in order accommodate other people.

While I don’t necessarily have a problem with shared hosting, you could potentially run into problems down the road as your website grows and gets more traffic. High spikes in traffic can impact loading time and even lead to error messages for people trying to access your site. The performance of your website can be affected by traffic to other sites on the same shared server. So, just like when you’re on the bus, there may be a ton of other people requesting stops, slowing down your commute. Or, it might be just you and the driver. You’re saving money, but you have less control of the quality of the experience.

Who is shared hosting best for?

Shared hosting is a common option for beginners and entry-level websites. It’s affordable and doesn’t require much technical knowledge. If this sounds like your situation, you’re probably a good candidate for shared hosting. (You can also upgrade later on, when your website traffic grows.)

VPS hosting (Virtual Private Server)

VPS hosting is the next step up from shared hosting. With this option, one server is basically split into multiple virtual servers. The main server is shared with other websites, but each site is given its own virtual server. Since fewer websites share the main server, page load times will be much faster with VPS hosting. Since fewer websites share the main server, page load times will be much faster with VPS hosting.

Page Load Speed Test Chart

It’s definitely important for you to understand the principles that boost your website loading time since this will ultimately have an impact on your conversions.

It’s not quite as good as dedicated hosting, but it’s better than shared hosting and gives you, the website owner, more control. If you go with this option, you’ll have complete root access and more control at the server level. But if you’re expecting high volumes of traffic, VPS hosting can still be limiting.

I’d compare it to using a car-sharing service: it’s faster than taking the bus, but you’re still limited in some ways.

Who is VPS hosting best for?

Even small websites with lower volumes of traffic can benefit form VPS hosting. If your site has lots of visual elements like images and videos that could potentially slow down the loading time, you’ll be better off with VPS hosting than a shared host.

Dedicated server hosting

Dedicated servers are yours and only yours. They are more expensive than the other options we’ve looked at so far, but the premium pricing comes with added benefits. It’s like owning your own car, as opposed to taking public transportation. You are in control of everything.

Since you’re the only website on this server, you have complete technical control. This allows you to implement a greater range of software on your website. Downtimes should be minimal since you don’t have to worry about traffic from other sites impacting your site. And, your load time is only impacted by your site — not any other sites.

Depending on your hosting plan, you might be able to upgrade from a shared server to a dedicated server when your website grows without having to start over from scratch. I recommend looking for this room to grow when you sign up for a plan. Migrating isn’t any fun, and neither is capping your site’s success.

Who is dedicated server hosting for?

Dedicated servers are for sites with higher volumes of traffic. If you have an ecommerce platform and want to make changes to the server based on your ecommerce software, you should consider going with a dedicated server.

Cloud hosting

According to Statista, the cloud computing and hosting market has been growing for the last decade or so.

Cloud Hosting Growth Chart

With this method, multiple servers will work together to host your website, as well as other sites. But unlike traditional shared hosting, cloud hosting accounts for traffic spikes, so high levels of traffic to your site or other sites on the same cloud shouldn’t impact anyone’s loading speed.

However, you won’t have root access for a cloud server, which means you can’t change any of the server settings or install specific software. But for those of you who have a simple website and don’t need those tech options, cloud hosting might be a good option to consider.

Who is cloud hosting for?

Cloud hosting is for websites that fall somewhere between shared hosting and a VPS.

If your site doesn’t need access to the technical side of a VPS, but want you’re anticipating high volumes of traffic and don’t want loading time to be an issue, cloud hosting is viable option.

Web hosting features

Now that you understand the four basic types of web hosting, it’s time to know what features to look for before you buy a hosting plan. These features will vary depending on the web hosting type, the hosting company, and the plan you select. Understanding these web hosting features will help you figure out how to choose a web hosting provider.

Bandwidth

Bandwidth refers to the speed of your network connection, as opposed to the transfer speed. Higher bandwidth allows more visitors to access your site at the same time while maintaining a fluid user experience.

Lower bandwidth connections will cause slow loading times, delays, and even errors.

So, take a look at the bandwidth options offered by your hosting provider. If you’re a new website, you probably don’t need the highest bandwidth right away. Find one that can meet your traffic needs and website content.

For example, if users are going to be watching videos, looking at photos, and buying items on your ecommerce shop, you’ll definitely want higher bandwidth. But if you’re just starting with a blog and don’t expect heavy traffic, you can go with a lesser plan.

Data storage and disc space

You might see some web hosting companies offering unlimited data. However, make sure you look at all the details before falling for something that sounds too good to be true. Sometimes there are hidden charges for exceeding average site usage.

Unlimited storage isn’t always the best option. I recommend picking a plan that clearly states the storage you get based on the amount of disc space that you actually need.

Customer support

Most site owners don’t think of this, but customer support should be one of the top considerations when looking for a web hosting company. Roughly 20% of web hosting clients named support as the most important feature when choosing a hosting plan — I think that number should be much higher.

Customer Support Survey

Why?

Hopefully, you don’t have any problems. But in the event you need some help or have time-sensitive questions that need to be addressed, you want to know that your web host is available and at your service.

Read reviews online from their existing clients to see how well they handle customer service communication and response time before you proceed with a plan. It’s also helpful when web hosting companies offer other resources, such as video tutorials or extensive guides and FAQ sections on their website.

Domains

The majority of the best web hosting businesses will let you create multiple domain names under the same account. So if you’re planning to host several websites through the same hosting service, this is definitely something you’ll want to look into before you get started.

It’s easier to manage everything this way. Having to set up a new account for each domain can be a pain.

For those of you that still need to buy a domain name, you can consider using a web host that allows you to purchase domains through their platform, but I recommend keeping these two things separate in case you have to switch hosts later on, your domain won’t be tied to your old host.

SSL certification

SSL stands for “secure socket layer.” Basically, this certification adds encryption to your website to protect your personal information, as well as personal information of your site’s visitors.

There are different types of SSL certificates. Some are for businesses, while others are made for individuals. Major website hosting services will offer an SSL certificate, but they can also be provided by third-party security companies.

If a website hosting company doesn’t offer SSL certificates or doesn’t have a strong SSL certificate, you may want to consider an alternative option. It’s also worth noting that transport layer security (TLS) is an alternative to SSL. This gives you more security, but it’s not as popular or readily available as SSL certificates.

Email

You may not need more than just a couple of company email addresses right now. However, as your website grows, you may want more. That’s why I think it’s important to look for web hosting services that offer multiple email addresses with your domain name. You could always get these email features through a third-party, but it’s much easier to handle everything in the same place.

Ecommerce software

If you’re going to be selling products through your website, proper ecommerce software needs to be a priority when you’re looking for the best web hosting option. You need to be sure that your plan either supports the software that you plan to use, or comes with ecommerce software that you can implement on your site.

It’s worth noting that ecommerce software is not considered a standard feature, so shop around and make sure your web host has what you need to operate your ecommerce platform accordingly.

Uptime

For the most part, you’ll see the majority of web hosting companies offering 99.9% uptime. However, don’t assume anything.

Usually, those services don’t include scheduled downtimes in the percentages they advertise. So again, it’s best to read reviews and see if their clients are experiencing lots of downtime.

If visitors can’t access your site, it’s going to be a big problem for your business. The best websites have a high uptime percentage.

Upload Chart for Top eCommerce Sites

The cost of downtime can add up quickly. If users are experiencing problems on your website and can’t access content, they will leave and may not come back.

Backups

I do not recommend web hosting services that don’t offer backups. This is one of the most important web hosting features, but it’s often overlooked.

All of your website and company files should be backed up appropriately on the hosting server. You should be backing them up on your own as well, but it’s nice to know that you have this data secured by the hosting company.

Advertising credits

Some web hosts offer advertising credits as an incentive for buying a plan. Here’s an example from Bluehost.

Depending on the company you use for hosting, they’ll let you apply those credits to platforms like Google AdWords. I highly recommend taking advantage of any advertising credits you’re given.

Web hosting costs

So how much is all of this going to cost you? I’m sure this is your next logical question.

I know it’s not the answer you’re looking for, but the real answer is: It depends. Refer back to the car analogy that I gave you earlier. You could buy a new car for a few thousand dollars, or a hundred thousand dollars depending on the brand, type, and features. Well, the same goes for your web hosting service. The price can range anywhere from less than $10 per month to hundreds of dollars per month.

If you’re going to get a shared server with low bandwidth, poor support, and no added software, it’s going to be pretty inexpensive. Even the best shared hosts with great support will run you less than $10 per month; under $5 per month for the initial contract. But if you want a dedicated server, ecommerce software, unlimited email addresses, backups, and multiple domains, you can expect to pay a premium price.

The majority of us fall somewhere in between these two extremes. Just be aware that cheaper isn’t always the best option. You need to understand the hidden costs of website hosting and how these costs will change as your website grows.

Conclusion

Your website needs to be hosted to be online. There is simply no way around it.

But that doesn’t mean you should rush into a web hosting plan without doing your research first.

First, decide which type of web hosting type is best for your situation. Then, determine the web hosting features you want. Once you know the answer to these questions, look for a reputable web hosting service that meets the requirements you’re looking for.

Don’t be intimidated by web hosting. Use this beginner web hosting guide as a reference, and let me know if you have any additional questions.

What type of web hosting server are you planning to use for your website?


from Quick Sprout http://bit.ly/2DxNBy9