I'm happy to publish a guest post today by Tung Tran from CloudLiving.com. Tung has been a long time reader of Niche Pursuits and now does quite well with his own niche sites. In today's post he shares some excellent white hat link building tactics in GREAT depth. I really do think these strategies will help you rank your site higher if you follow these steps. Here's Tung...
Looking for white hat link building tactics that’ll take your website to the next level?
If so, I got some good news and bad news for you.
Bad news: White hat SEO is a ton of work. And it takes a lot of time (don’t all good things?).
Good news: It works SUPER well.
So, if you can invest the time and exercise the right amount of patience, you’ll win. And all your dreams and aspirations will come true. OK maybe not all, but at least your traffic problems will be solved.
Sounds good?
Great
It’s time I pull back the curtains and share with you my 5 favorite white hat link building tactics for Amazon affiliate websites.
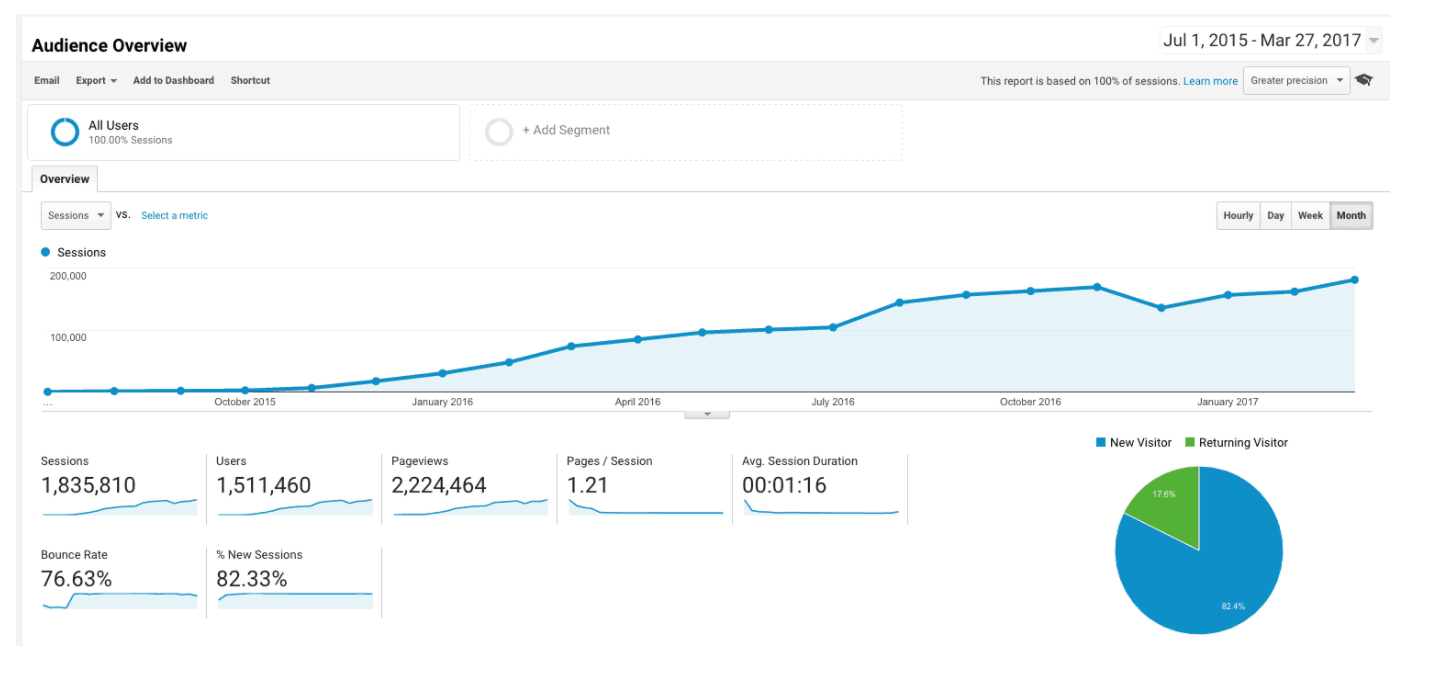
These are the exact tactics I used to grow my site from 0 to 100,000+ monthly visitors:
And I also helped many AMZ Affiliate Bootcamp’s students achieve success using the same process as well.
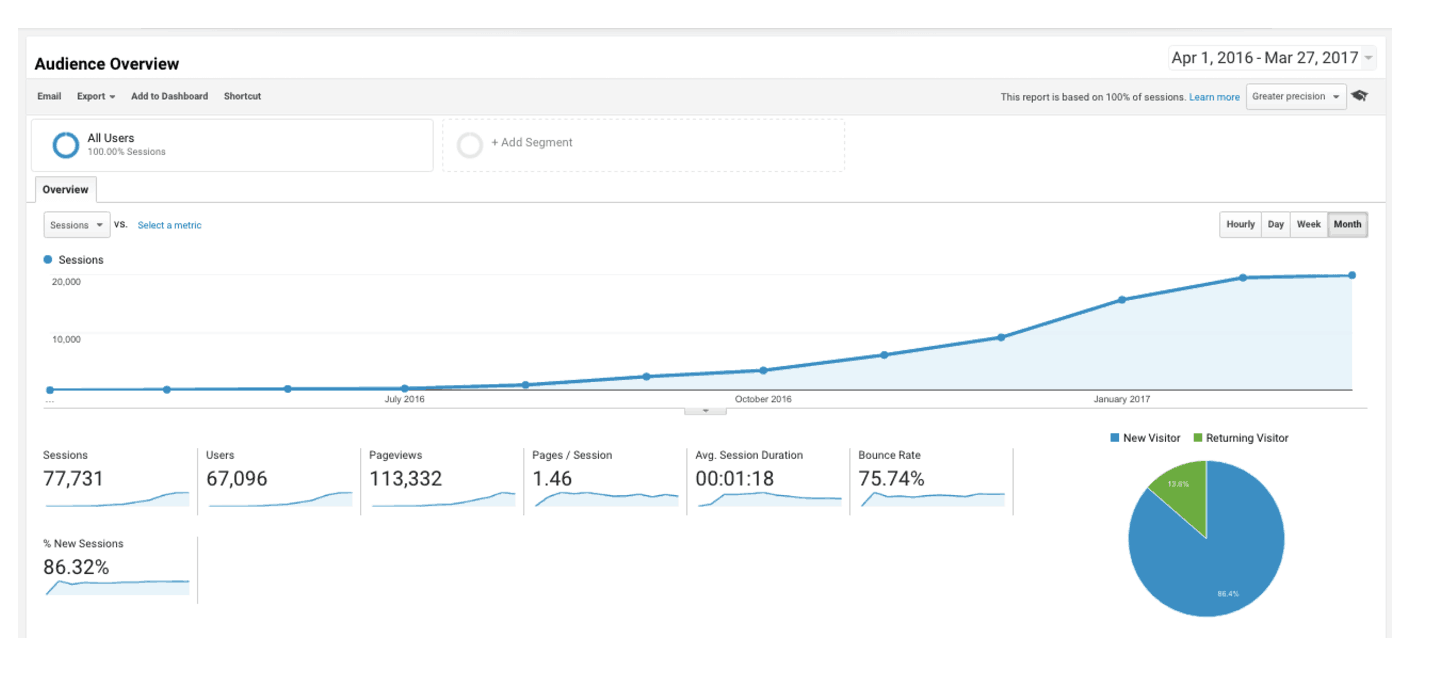
Here’s one student who grew his site from 0 to 20,000 visits per month:
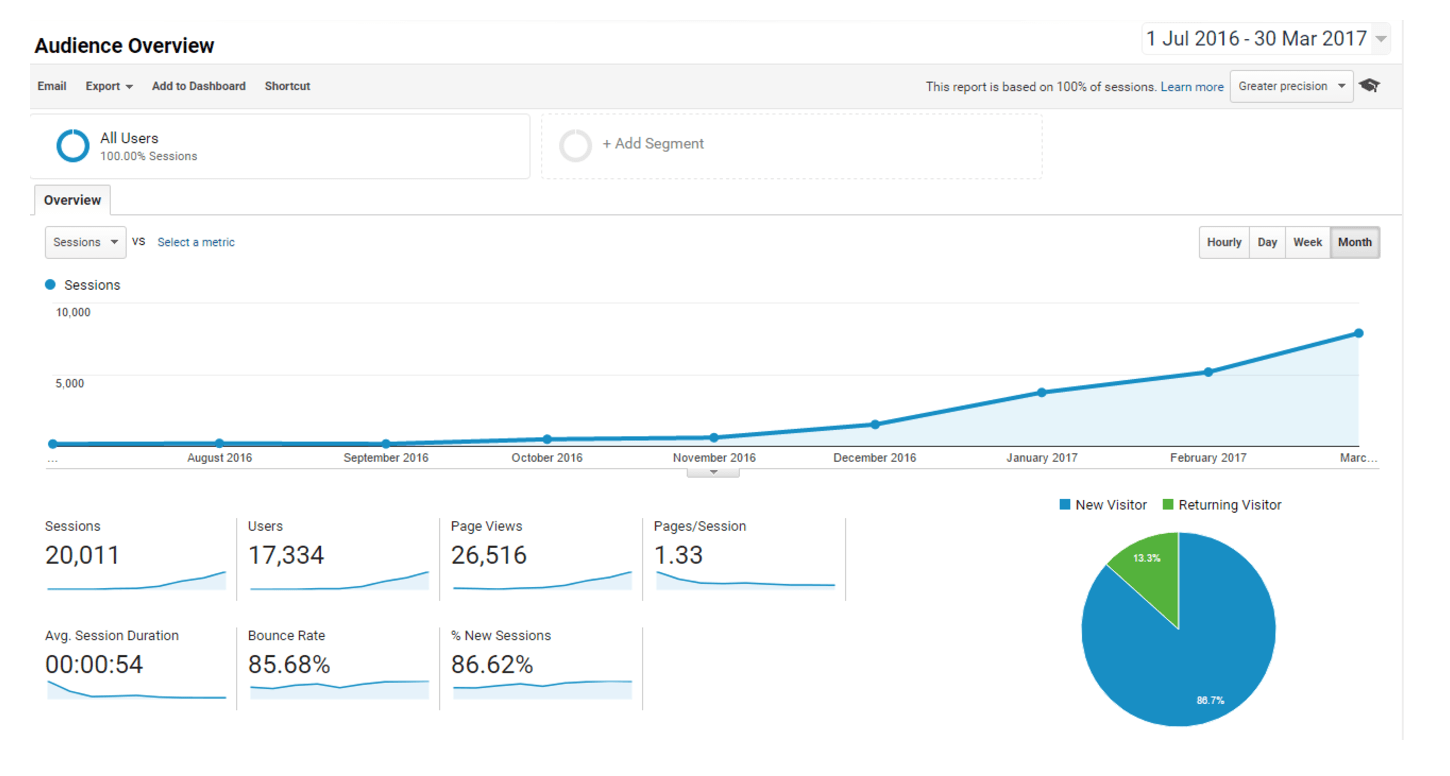
And here’s another student experiencing some good early traction with his site:
Do these results excite you?
Strap up, it’s going to be a crazy (fun) ride!
Bonus: To help you execute these 5 white hat link building tactics, I have prepared for you a quick and easy cheat sheet which outlines the step-by-step process you can follow (it also includes the exact templates you can swipe and use in your business). Once you’re done reading this article, you can access the cheat sheet here.
1. Top Experts

Tapping into the power of top experts is one of the most efficient and effective tactics out there. And I’ve personally used this strategy countless times to get high quality links for my affiliate websites.
Good news: You can too!In fact, it works for pretty much any niche. And it has the power of driving natural shares and traffic from social media, making it the perfect link building tactic for your new Amazon affiliate website.
So what exactly is top experts (and how can you use it to kick start your new website?)
Here’s the idea in a nutshell:
- Create a list post featuring the top influencers and bloggers in your niche
- Notify the people you featured and hopefully they link to your content
Simple, right?
Thought so
Now you may be thinking...
Writing a long and exhaustive post with a list of top influencers seems like a lot of work - does this tactic even work?
More good news: DEFINITELY!
It works super well.
Here’s why:
People love being appreciated and acknowledged for their hard work (something they rarely receive). And so, they’re a lot more inclined to link to your content, or to respond favorably to a guest post request in return.
Here are a few examples of top expert posts:
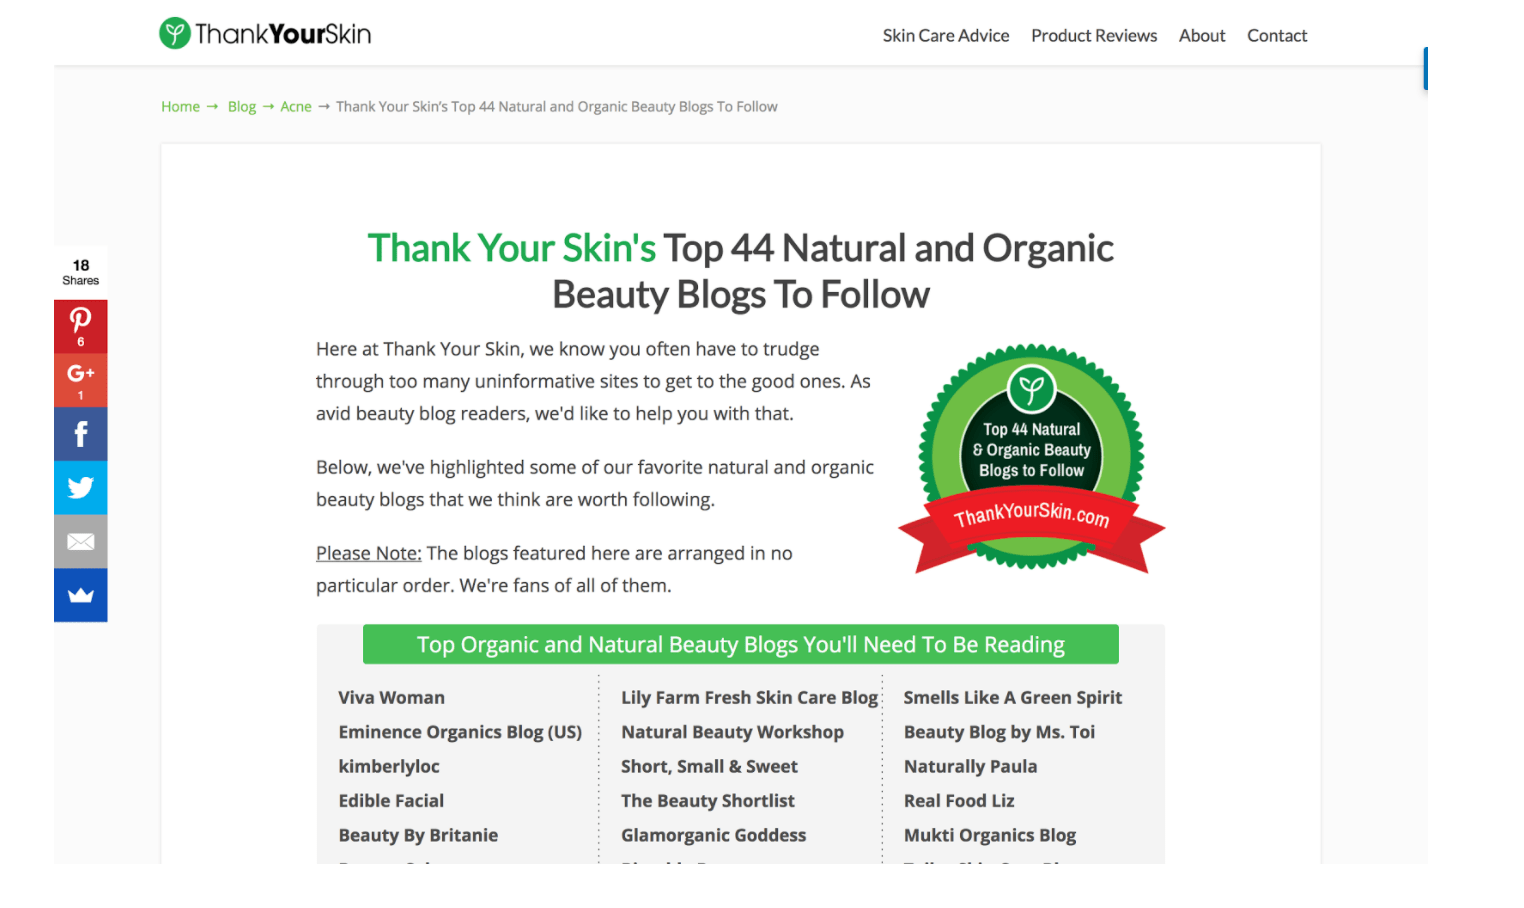
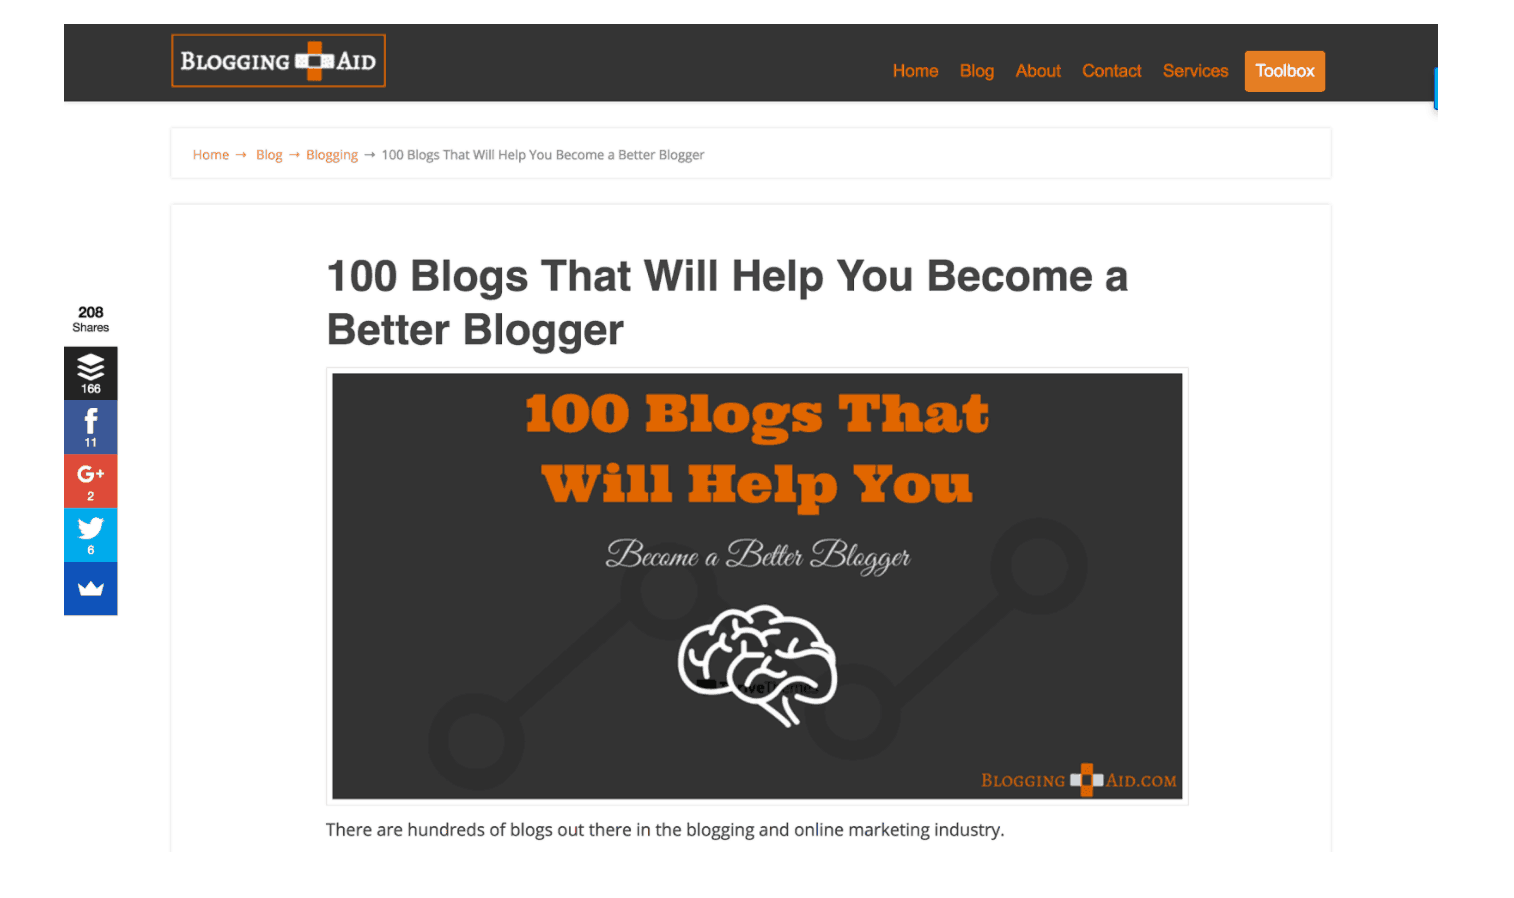
As you can see from the above examples, leveraging the influence of top experts is a great way to generate links (notice the shares).
So how exactly does this process work?
Is it really as simple as writing up a list post and sending it out to the top influencers in your niche - or is there more to it?
Well, we’ve broken things down into 5 simple steps:
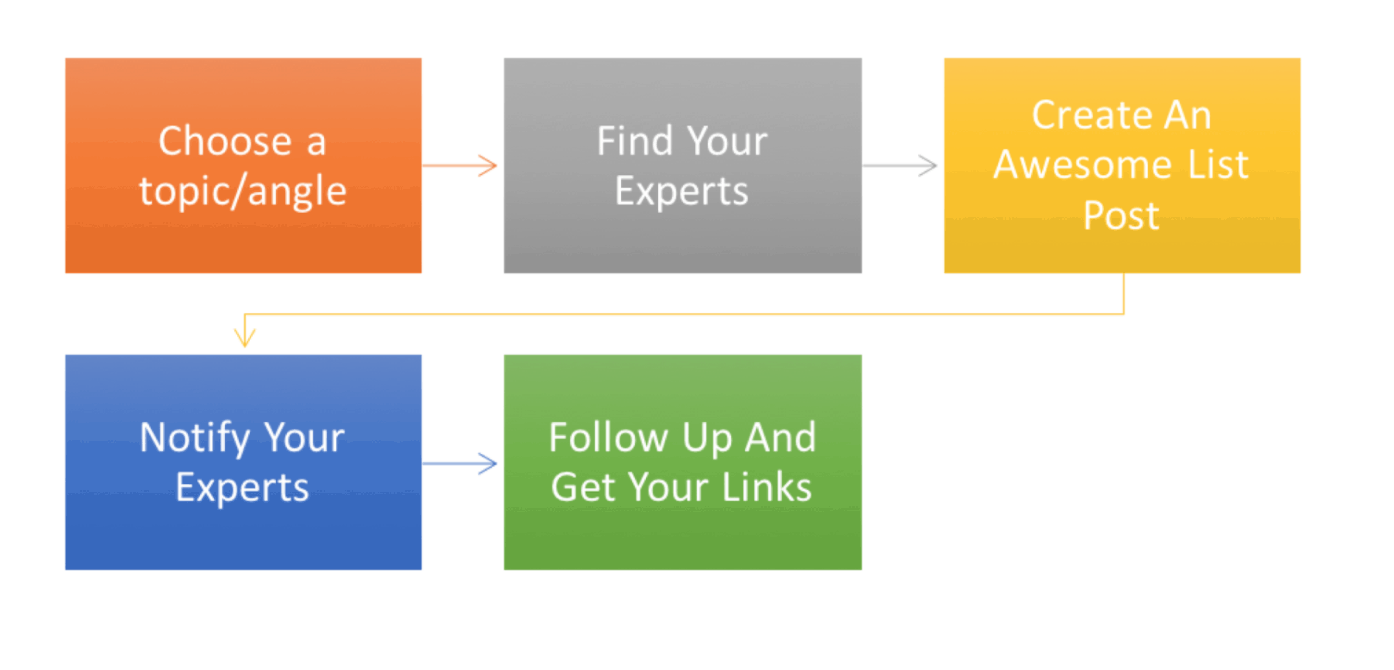
Let’s take a deeper dive into the specifics and illustrate how you can execute this idea (and attract a lot of high quality links in the process).
1. Choose a topic or angle
It all starts with choosing an informative and valuable topic. Get this wrong and nothing else matters. Get this right and everything else becomes easier.
So how do you choose the best topic or angle for your list post?
Well it starts with research!
Spend some time digging around, figuring out the best topic or angle for your top experts post.
Here are two quick and easy topic generating formulas we use to come up with compelling angles:
- X websites to visit if you want to be a better [fill in the blank]
- Top X blogs that will help you [insert a promise here]
Keep in mind, when deciding on a topic or angle, it’s important to focus on good topics.
How can you decide?
Here’s how:
- Be specific but don’t choose topics that are too small or you won’t find enough sites to feature
- A good topic is one that you can find at least 50 sites to include because it’s a numbers game (The more sites you feature, the more links you could possibly get. Let’s assume your average success rate with this tactic if 10%, if you feature 50 sites, you can get 5 links, feature 1000 sites you get 10 links, feature 200 sites you get 20 links)
-
- Example: 50 websites to visit if you want to be better at woodworking
- Example: 50 websites to visit if you want to be better at woodworking
2. Finding experts to include in your post
Once you’ve picked out a reasonably sized topic or angle, it’s time to put on your research cap and jump on Google.
Why?
Cause you need to make sure your list is actually a valuable list! There’s no faster way to devalue your post than featuring a bunch of blogs or influencers who have low traffic or aren’t worthy of receiving the recognition of a top influencer. To avoid this (horrible) fate, you got to do some digging and find the right experts to include.
Here are the keywords you can use to find the best influencers & bloggers to feature:
- Top [insert your keyword] blogs
- Top [insert your keyword] websites
- Top [insert your keyword] experts
- [Insert your keyword] blog
Once you’ve gone through Google and have started to collect a bunch of influencers you can promote on your post, it’s time to use another one of our favourite tools:
FollowerWonk from Moz.com
Here’s how it works:
Type in your keyword in the search bar.
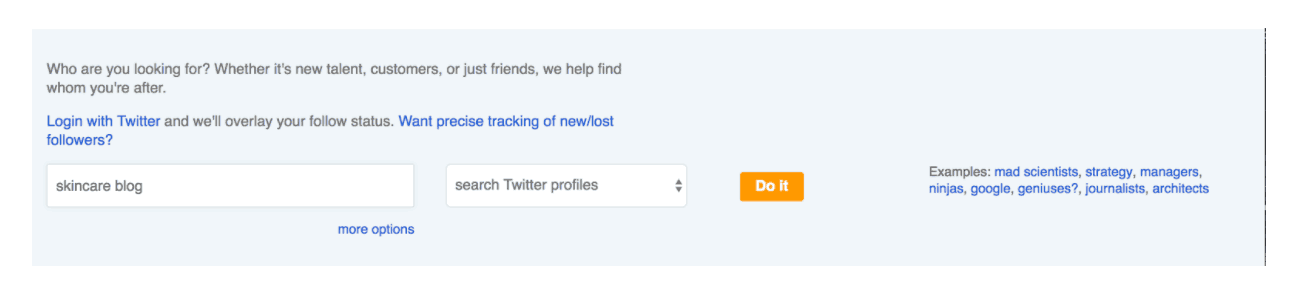
You'll see a list of Twitter users with your keyword in their profiles.
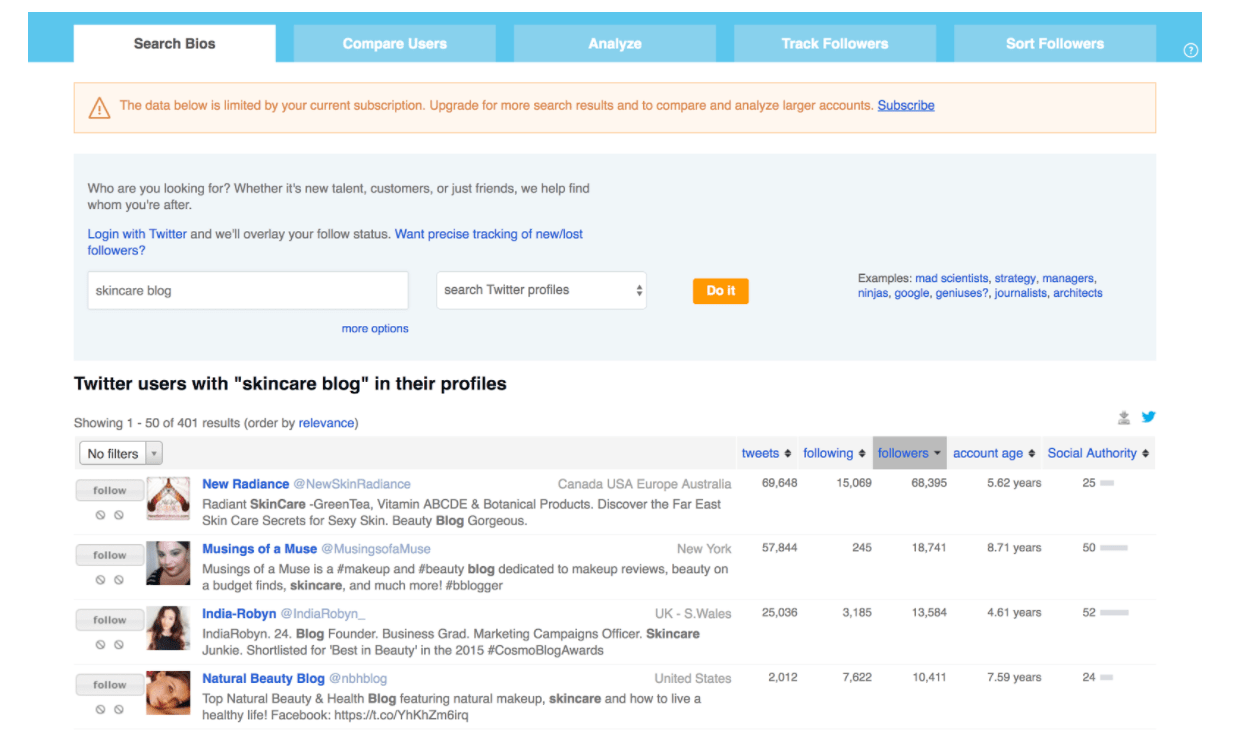
Narrow the list down by followers and social authority and then add the best names to your list of top influencers.
Once you’ve done the above, you should have a healthy list of top influencers and blogs in your niche and industry. Then you should load up an Excel spreadsheet and collect all the relevant information you’ll need.
Here are some things you’ll want to include:
- Website URL
- Contact information (use Hunter to find email addresses)
- Domain authority rank
- Amount of traffic
3. Create an awesome list post
After the research phase is over and done with, it’s time to roll up your sleeves and hammer out the writing.
Depending on your writing talents, you’ll either hate this part or love it.
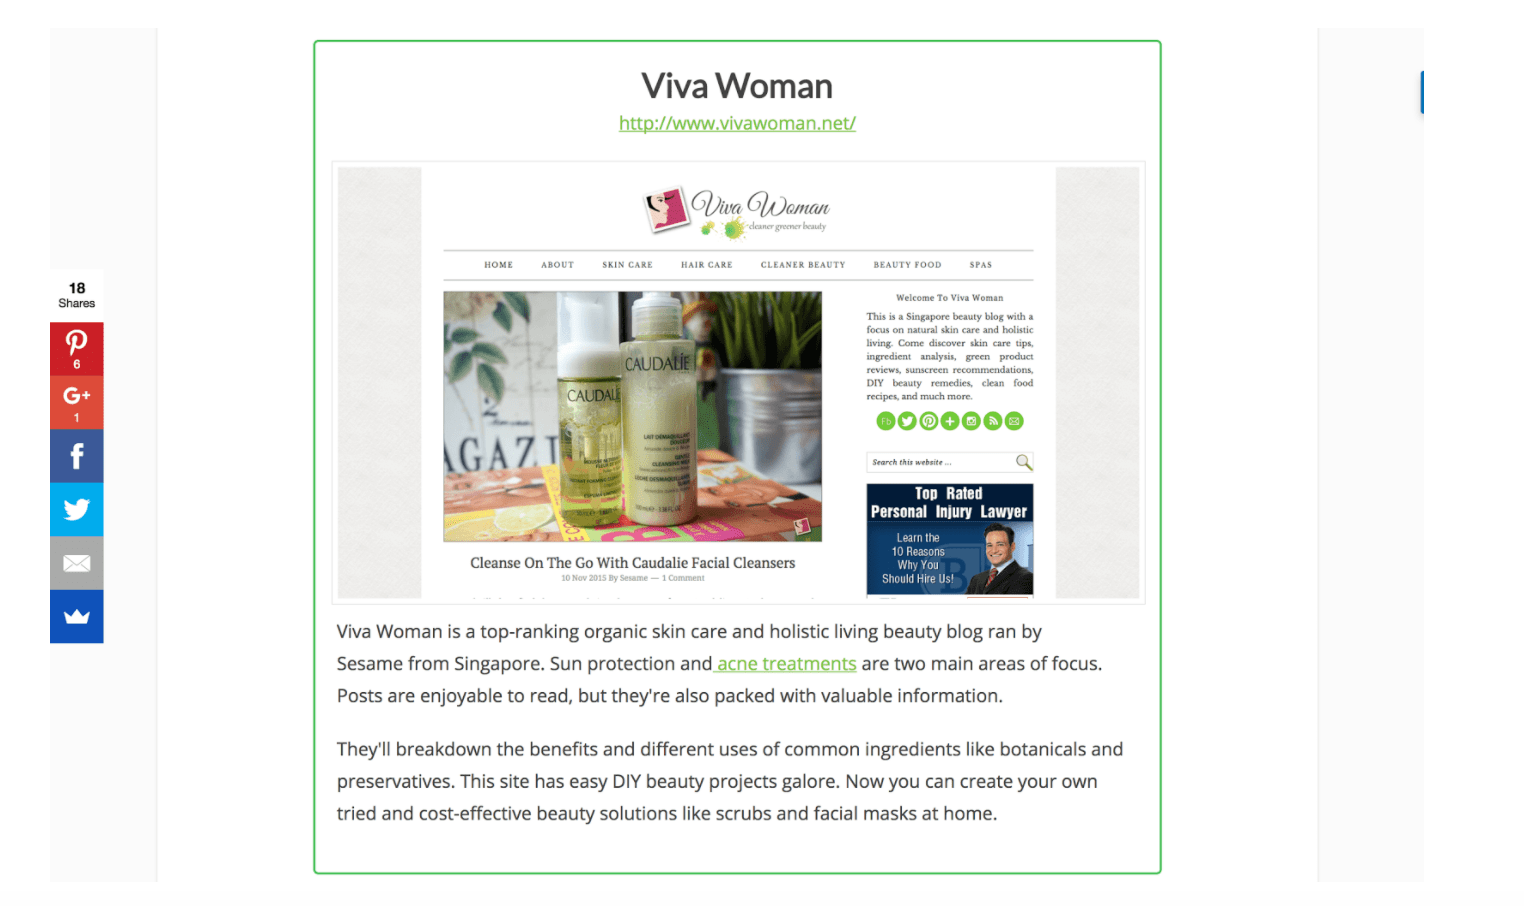
Regardless, you want to make sure you (or the writer you hire) include the following things in your post:
- URL to the site you’re talking about
- A screenshot of their homepage
- Optional: Add a description of their site
Here’s how it should look:
Bonus Tip: Create a badge for your post.
This instantly gives your post more credibility and increases the likelihood of the influencer grabbing your badge and reposting it on their own site. Here’s an example of a badge we created for our website.
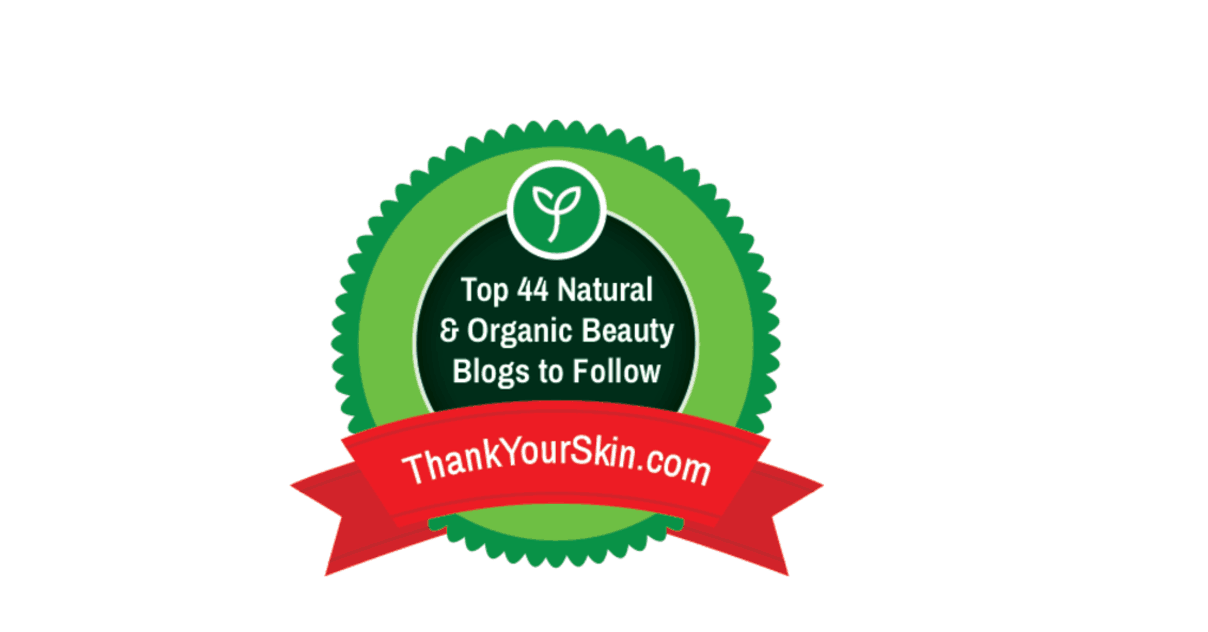
You can create similar looking badges for cheap on UpWork or Fiverr.
4. Notify your experts
Before we continue, let’s recap the ground we’ve covered so far…
- We’ve found a great topic
- Created a list of top influencers
- Wrote our post
Now what?
Is the job over and done with?
Nope. Far from it.
In fact, if you stop here, you’ll miss out on the most crucial step needed to turn this tactic into a huge success.
What’s that step?
Reaching out and letting the influencers know they’ve been featured in your post!
Here’s the email template we recommend you follow:
Subject: Love Your Awesome Blog!
Hi {NAME},
Love what you’re doing on {SITE NAME}.
Just wanted to give you a heads up that you were featured in my new article on {INSERT TITLE HERE}.
Here’s the link - {LINK}
I really hope it delivers some new visitors to your site!
Cheers,
{YOUR NAME}
5. Follow up and get your links
Great!
Now it’s time to follow up with the influencers and collect your links.
How do you that? And what happens if you send an email, but they don’t respond?
Should you curse at the top of your lungs and label this tactic to be ineffective?
You could…
Or you can use this email template instead (and increase the odds of receiving links):
Hi {NAME},
Just checking in to see if you received the email I sent a few days ago.
You were featured in my new article on {INSERT TITLE HERE}.
Here’s the link - {LINK}
Cheers,
{YOUR NAME}
Cool?
Awesome.
So what happens if they do reply back? Then what…
Well then it’s time to transform the goodwill you’ve built into a possible guest post opportunity.
Here’s exactly what you should say:
Hi {NAME},
Glad you liked it I’m a big fan of your blog.
By the way, I’m still new to this whole blogging world and would love to gain some exposure to my blog.
I was wondering if I could contribute a guest post for your blog.
Here are some ideas that I think your audience will really like:
- Idea 1
- Idea 2
- Idea 3
Let me know what you think and I’d be happy to get started right away.
Thanks,
{NAME}
If they say yes, pat yourself on the back and then write the post (more on that later).
If they say no, send this email:
No worry {NAME}.
I understand that {you’re not accepting guest posts at the moment/rephrase their reason for declining here}.
Thanks for your time.
Let’s keep in touch!
{YOUR NAME}
It’s important to note that you shouldn’t stop there, but rather continue to build the relationship. You never know what will become of a relationship.
Some of our best guest post opportunities came from people who initially said no to us.
So keep going! Don’t let it get you down.
This tactic is one of the best ways to build links, but it takes a little bit of work so stick with it. And you’ll be pleasantly surprised at the results.
2. Blog Commenting

I’m sure you’ve heard by now that blog commenting is one of the most common ways to build links. But the question remains…
Does it still work?
Hell yes!
So the better question is…
Are you leveraging this tactic to its full potential?
You should be!
Cause even though Google doesn’t strongly value links from blog comments, this tactic is still very much effective for the following reasons:
- Great tactic for building relationships and traffic - leaving thoughtful comments can actually build opportunities for guest posts
- To build a natural link profile - links from blog comments don’t help with rankings, but they help build a natural link profile (something that’s REALLY important)
- Brand recognition - if you’re constantly reaching out and leaving comments on high quality blogs within your niche, eventually you’ll start generating attention and receiving recognition. I like to call this building goodwill.
With that said, how can you leverage the power of blog commenting and build powerful links?
Here’s how:
- Find high quality blogs to comment on
- Create an action plan
- Focus on quality over quantity
Let’s discuss each step in greater detail below…
Find blogs to comment on
Finding quality blogs with a large enough readership doesn’t have to be difficult.
In fact, if you’ve been following the steps outlined in this article - majority of the work is already done.
Remember the top experts list you compiled?
Well that’s a GREAT place to start.
Simply go through it and identify the blogs you want to comment on.
Easy, right?
Thought so!
Aside from your top experts list, you can also find additional blogs to comment on by diving into Google and doing some more research (that’s always fun, isn’t it ;-).
Create an action plan
Once you have a healthy list of blogs, it’s time to get to work.
Now…
Commenting on blogs is something a lot of us know we should be doing, but do we actually?
If you’re anything like me, you probably don’t prioritize it as much as you should. In fact, it seems as if it’s one of those tactics that easily gets moved from one todolist to another without ever getting done.
Can you relate?
If so, that’s exactly why we advise you create an action plan.
Here’s the one we follow:
- Goal for each day: Leave high quality comments on 5 to 10 blogs
- Set aside 30 minutes first thing in the morning and make sure it gets done
Follow the above action plan and you’ll be amazed at how fast you start building traction for your new Amazon affiliate website.
But, keep in mind, that traction will only be possible if you follow the next step:
Focus on quality over quantity
Have you ever visited a blog, scrolled down to the comments section, and read comments that were clearly written with the purpose of generating links?
Of course you have.
They look something like this:
“I really liked this article. I also wrote about something similar, you can check it out here [inserts URL].”
These types of comments are completely worthless (and ineffective).
You, therefore, have to resist the temptation to leave generic comments that provide absolutely zero value. Instead, you should devote actual time to leaving thoughtful and valuable comments that are beneficial to the site’s audience.
Doing so will generate results you wouldn’t believe.
Just take a look at this…
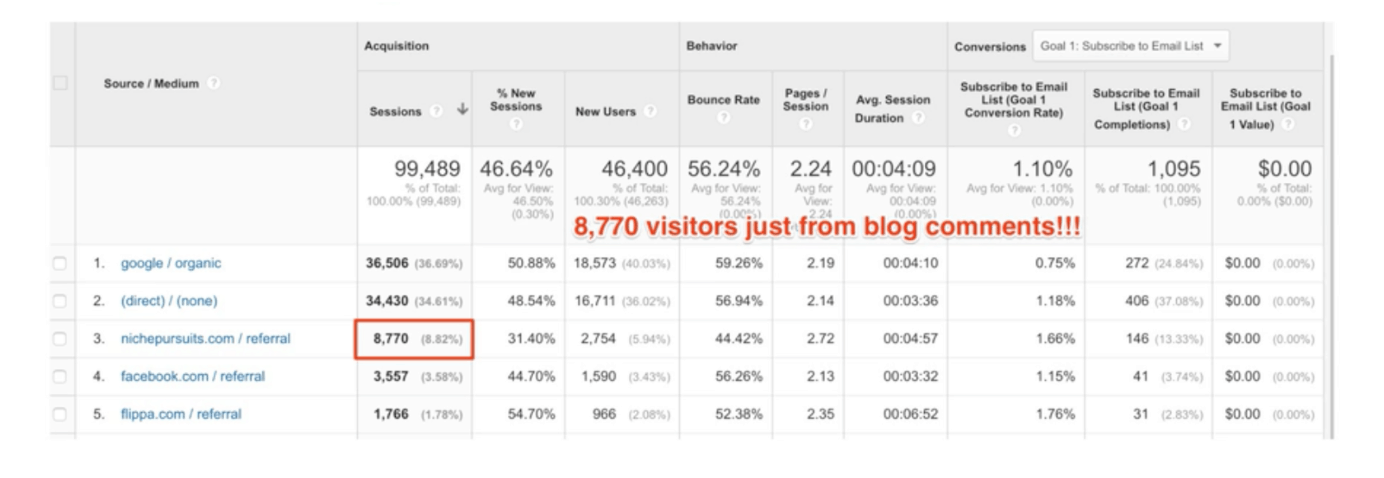
Notice how quickly I was able to build traction for my blog Cloud Living by leaving high quality comments on NichePursuits. This isn’t a fluke! And that’s because this tactic works super well.
Here’s some additional tips you can use to skyrocket its effectiveness:
- Make sure the link you insert in your comments is at the end, contextually relevant and doesn’t look spammy
- Increase name recognition by signing up for a free account at Gravatar
- Never put keywords in the comment name field. Only use your name or brand name to leave comments.
Do the above consistently and after a few short months, you’ll notice yourself with an army of links.
3. Guest Posting

I know. I know.
You’ve heard about guest posting a million times before and you’re sick and tired of reading about it on every link building article, but there’s a reason it keeps popping up…
It’s because it works.
In fact, guest posting is our favorite tactic for growing backlinks and organic traffic.
Yet a lot of newbies still struggle with this tactic.
Why?
Cause they’re constantly asking themselves the following (limiting) question:
“Who would accept my guest post?”
Look, I get it.
If you’ve never written a guest post before, it can seem flat out daunting. In fact, if you’re like the old me, you’re probably also questioning who in the world would even care about what you have to say on a given topic.
Sounds familiar? You’re not alone.
These are fears and doubts that we all had at one point or another. It’s perfectly normal.
But our fears aren’t rooted in reality.
Here’s why:
After spending a bunch of time online (and experiencing the highs and lows), I’ve discovered one thing to be true above all else…
If you can create awesome content that will help another site, then they want you to write for them. It’s as simple as that. Really.
So what is guest posting (and how can you use it to grow your site’s traffic?)
Guest posting is the process of submitting and publishing your content on other websites or blogs. In fact, guest posting is exactly what I’m doing right now!Instead of publishing this article on my own blog, I’m publishing it on NichePursuits.
Why?
For a couple reasons:
- To provide valuable, practical content to you - NichePursuits’ loyal readers
- Help NichePursuits rank for more targeted keywords
- Hopefully get you to check out my blog if you find this post helpful
See how it works?
It’s a win/win for everybody.
NichePursuits gets free awesome content. And I (hopefully) get high quality backlinks and referral traffic.
There’s really no better way to generate links for a newbie than through guest posting. I know a lot of people think it’s dead, but the truth of the matter is its powers are still running far and wide.
So let’s take a look at the different steps involved in the process:
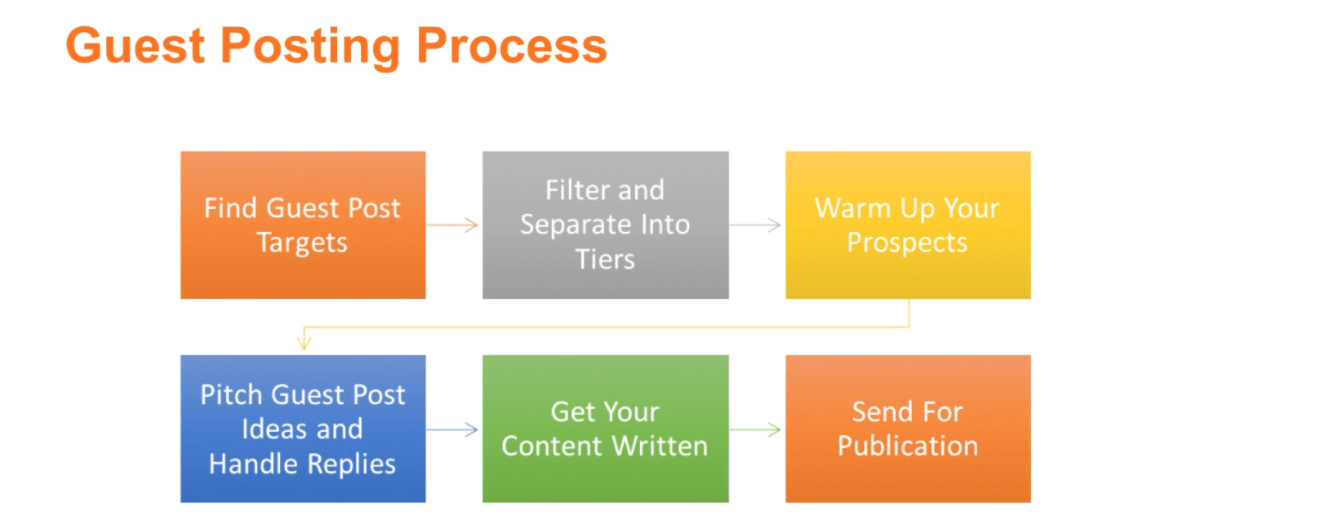
1. Finding guest post targets
First thing first, you have to get back in the trenches and create a list of sites that accept guest posts.
What’s the best way to do this?
We recommend you use this spreadsheet.
Simply enter your keyword. And you’ll receive a list of search terms you can plug into Google.
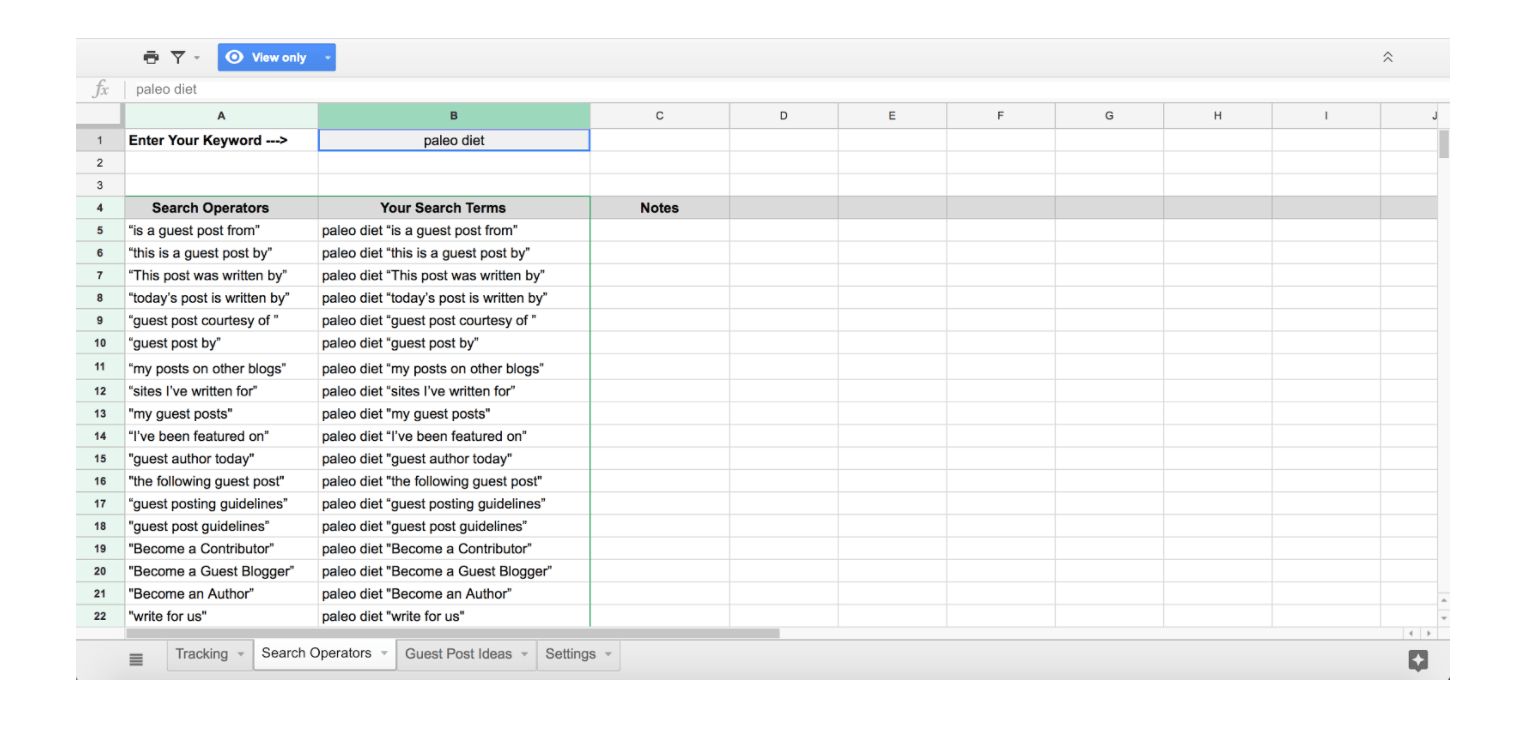
Once you do, you’re going to want to jot down the sites you find here.
2. Filtering and separating into tiers
Now that you have a list of sites, it’s time to prioritize your list.
This is extremely important because no two sites are created equal. One site may bring about great returns, whereas another may not have enough traffic or domain authority to deliver any results.
With that said, you want to narrow your list to only high quality sites and separate them into tiers so you know which ones to focus on.
Note: Skip this step and you’ll end up wasting a bunch of time and money on low quality websites (that’s no fun) - so make sure you do this.
Here’s how we check sites for quality and separate them into tiers:
- Delete any sites with domain authority < 20
- Make sure the site is regularly updated with quality and engaging content
- Run the site through SEMRush to see if they’re ranking well on Google. If no organic traffic but high Domain Authority, then check social media followings
- Make sure they don’t nofollow external links for guest post
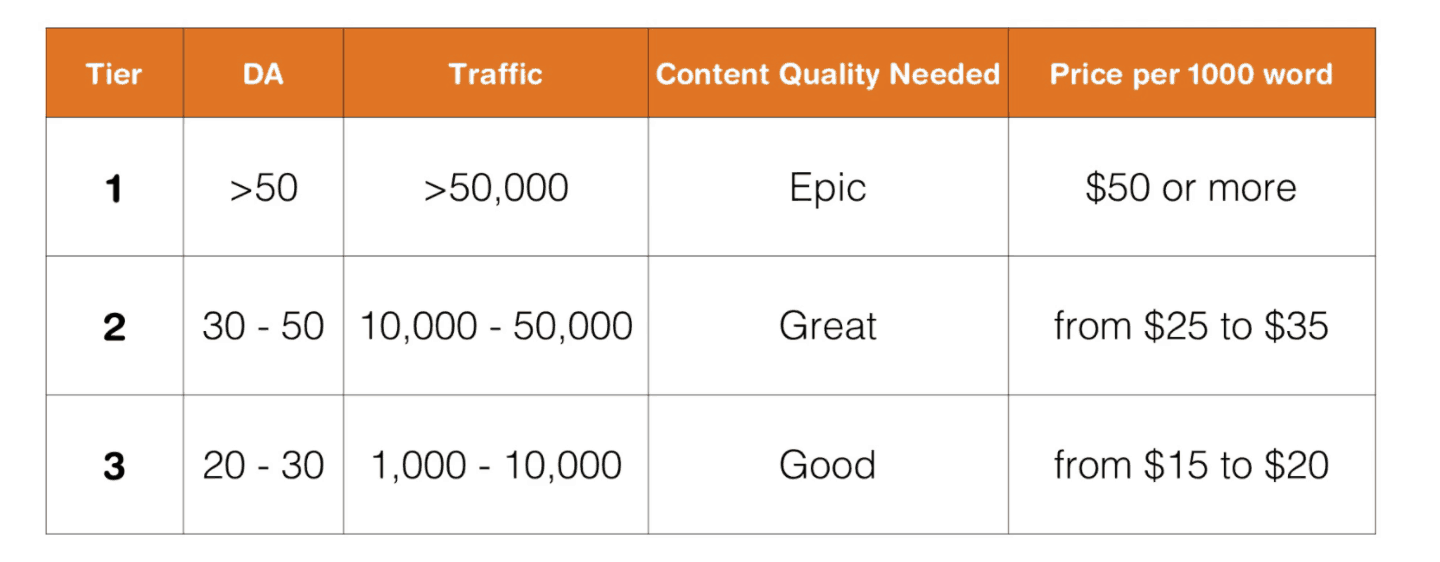
Based on the above assessment, you want to separate your sites into tiers.
Here’s how we do it:
We’ll get back to this in just a bit, but for now, let’s move on to the next step.
3. Warming up your prospects
Now that you have a high quality list of websites that you’d love to publish a guest post on.
What’s next?
Well it’s time to increase the odds of them saying yes to you.
Here’s how you do it:
You butter them up. And start building a relationship.
Now…
It’s easy to skip over this step. But if you do, that’ll be a huge mistake.
And that’s because the results aren’t even close. Those who engage with site owners (and warm them up) perform FAR BETTER than those who simply bounce around, looking for guest post opportunities from one site to another (without ever taking the time to build any type of relationship).
Here’s how you can warm up your prospects:
- Follow them on social media
- Share some of their recent articles (make sure you tag them)
- Leave engaging and thought provoking comments on their posts
Do the above and you’ll notice that (eventually) they’ll start seeing your name and face everywhere (make sure you’re using the same avatar across all social media outlets) and you’ll enter their radar.
This will make things a lot easier for you when you go in for the kill (and pitch your guest post ideas).
4. Pitching guest post ideas
Now it’s time to send your pitch.Before we discuss best practices, you need to remember that not all of the sites will say yes.
In fact, most will probably say no. That’s ok.
Don’t take it personally and keep outreaching - it only takes a few guest post opportunities to strike it big.
Got it?
Cool.
Here is the email template you can use to pitch your guest posts:
Hey {NAME},
Love what you’re doing on {SITE NAME}.
You may have noticed my share and comment on your post on [POST TITLE] (awesome article by the way).
I was checking out your site today and found this guest post you published: {URL OF THE GUEST POST}
I’d love to be your next guest author.
I’ve been brainstorming some topics that I think your readers would get a ton of value from:
- Idea 1
- Idea 2
- Idea 3
To give you an idea of the quality I’ll bring to your site, here are some other posts that I’ve published:
- Example 1
- Example 2
- Example 3
Let me know what you think and I’d be happy to get started right away.
Thanks,
{YOUR NAME}
Notice how simple, valuable, and intriguing the above email is?
You bet.
It’s super effective because it actually shows that you care. And you took out enough time to check out their website, before pitching a guest post.
Use it.
Just one caution before you go and use this template. This post is exposed to thousands of NP readers so it’s very likely that they will be using the same templates too.
And that’d cause a big problem if you and a dozen people outreaching to the same sites are using the same email template.
So it’d be best if you personalize the template so that it’s unique and reflects your voice and personality.
5. Getting your guest post written
So you sent a guest post request and the site owner said yes?
Congratulations!
Now it’s time to roll up those sleeves and write a kick ass (and highly valuable) guest post.
How should you do that? And how can you decide how much to pay if you’re going to outsource the writing?
Good questions.
Remember the tier chart we created in step 3?
Well now it’s time to pull that chart back out and see how much effort (and money) you should devote to writing the post.
Here it is once again for your reference:
Based on how valuable the site you’ll be guest posting on is, you want to decide whether you should create epic, great or good content. The better the site, the more you’ll have to step your game up (just keep that in mind).
Here are some additional tips for writing your guest post:
- Format your article mirroring the ones already on the site
- Do a spell and grammar check before submitting your article. Double check if you hit the required word count
- Make the opening line count. Your first sentence should be able to hook your readers.
- As much as possible, bring new ideas to the table. Avoid writing generic tips.
- Be conversational and engaging. Ask questions frequently and be friendly in the post. Try to relate to reader situations and stories.
- Short, concise sentences are preferred. Convey your ideas as simply and clearly as possible. Avoid fluff/filler words for the sake of meeting the word count.
- Take a good look at the site's content. Know:
-
- Their target audience
- Writing tone
- How other guest posts wrote their content
6. Sending for publication
When you got your kick ass post written and ready to go, it’s time to send it out for publication. This step is arguably the easiest. And that’s basically it only involves one action from your end:
Sending your post for review. And including an author bio with it.
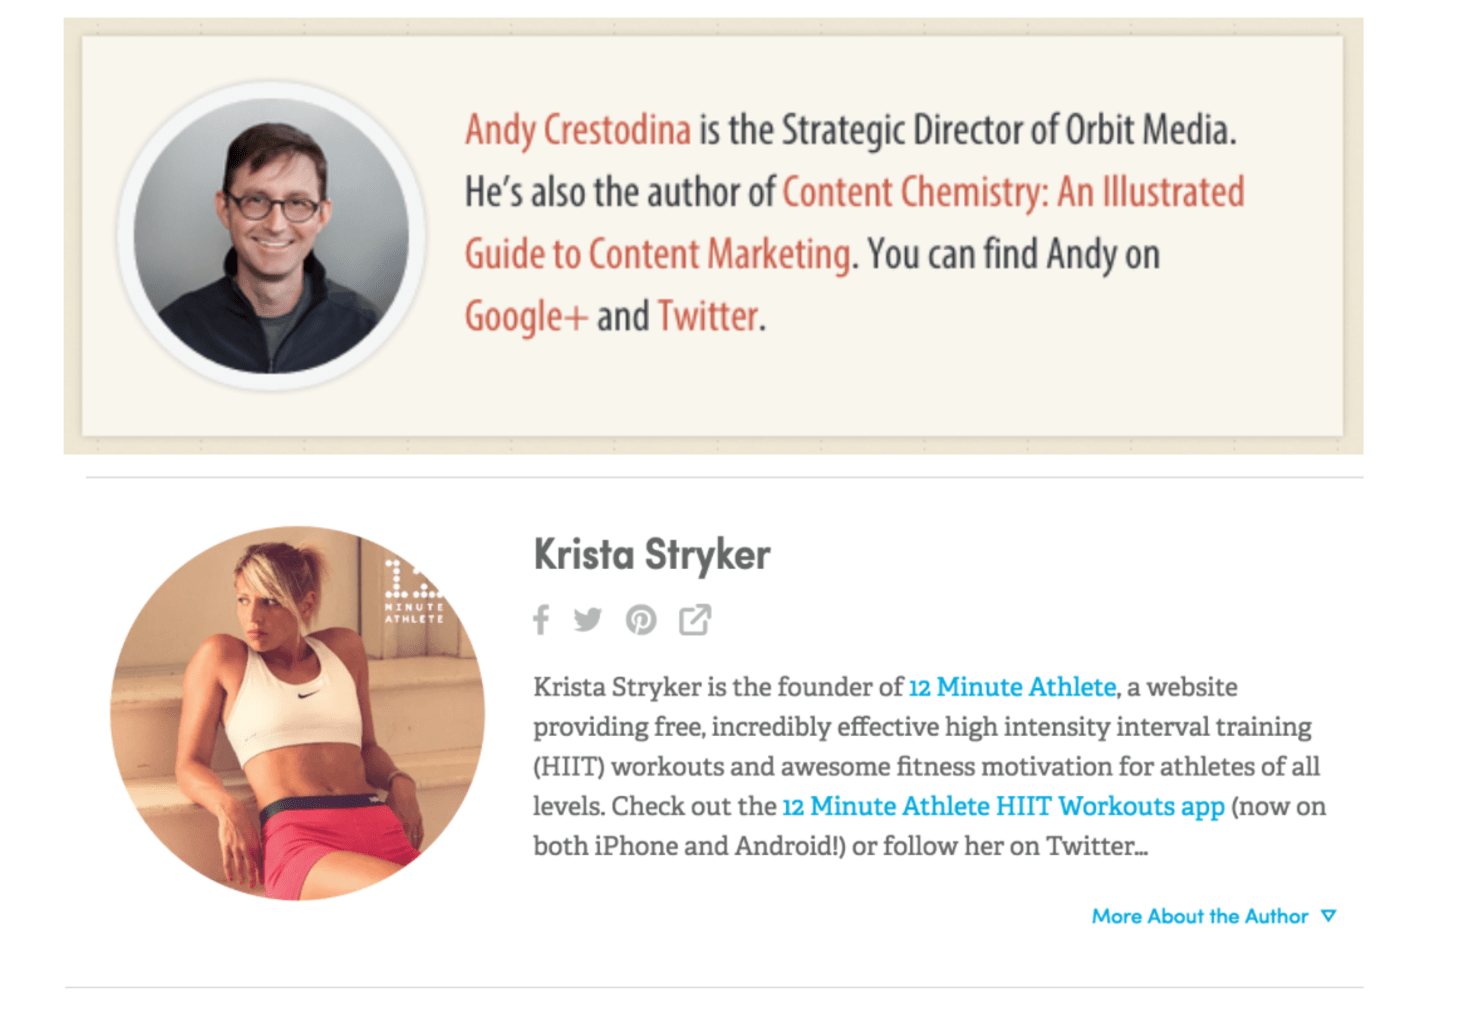
How can you write a kickass author bio?
Here’s how:
- Make it short and interesting.
- You could insert 2-3 links to your website but don’t overdo this or it’ll look spammy. Ideally, you should have 1 link to your homepage and 1 link to an internal page that you want to rank high in Google.
- Don’t worry much about the anchor test. Just use whatever makes sense and looks natural.
Looking for an example to get your creative juices firing?
Check these out:

7. Post publication checklist
Once your guest post is published, your job isn’t done.
In fact, this is when the FUN begins.
Here’s some of the things you should do to give your guest post an instant boost:
- Be the 1st commenter on your own guest post - This is a little trick that could help you get a little bit more traffic and brand recognition as people often like to scroll down to the comment section. You could say thanks to the blogger and let visitors know that you’re available to answer any comments that they have.
- Share the post on your social media channels - This shows that you actually care about the post. Site owners would love this!
- Reach out to commenters who have blogs - You could get some more guest posts published this way. Just reach out to them and say you could contribute to their sites too.
- Repeat the process to get more links!
Follow the steps outlined above. And you’ll greatly increase the number of backlinks your efforts generate. Try it once and you’ll be hooked, forever.
Yep…
Guest posts are really that powerful!
4. Epic Content

Have you ever read a comprehensive blog post that made you say wow (and dropped your jaw to the floor?).
If so, that’s an example of epic content.
You know it’s epic because it provides 100% coverage on a topic, making it the best resource out.
As a result, it’s one of the fastest ways to build links.
Here’s what epic content looks like:
How to Create Amazing Articles Even If You Suck at Writing
If you’re going through the above and thinking to yourself…
Jeez...this looks like A LOT of work to create.
You’re absolutely right.
Epic content takes work to produce. No getting around that. But the efforts are well worth it. Here’s why:
- Epic content ranks better
- It gets more social shares and backlinks (promotion becomes MUCH EASIER when you have a great quality post to promote)
- It builds your authority
- One piece of epic content will do wonders for your site. And turn you into a real believer and user of this tactic. Trust me.
Ready to see for yourself?
Sweet.
Let’s dive into the details now...
Ultimately, you have to follow 3 steps to produce epic content:
- Choose a proven content idea
- Create your epic content
- Promote it
To help you successfully navigate through each stage, we’ve prepared a step by step guide for you below.
Step 1: Choose a proven content idea
Choosing a proven content idea is something a lot of beginners struggle with.
But it doesn’t have to be difficult.
In fact, you don’t have to reinvent the wheel much at all.
That’s because I’m going to share with you how to find content that has already generated a ton of links, making your life WAY easier because then you simply have to improve it (or update it) - instead of having to start from scratch.
Here is the quick and easy process I follow to choose proven content ideas:
Start with ahrefs.com
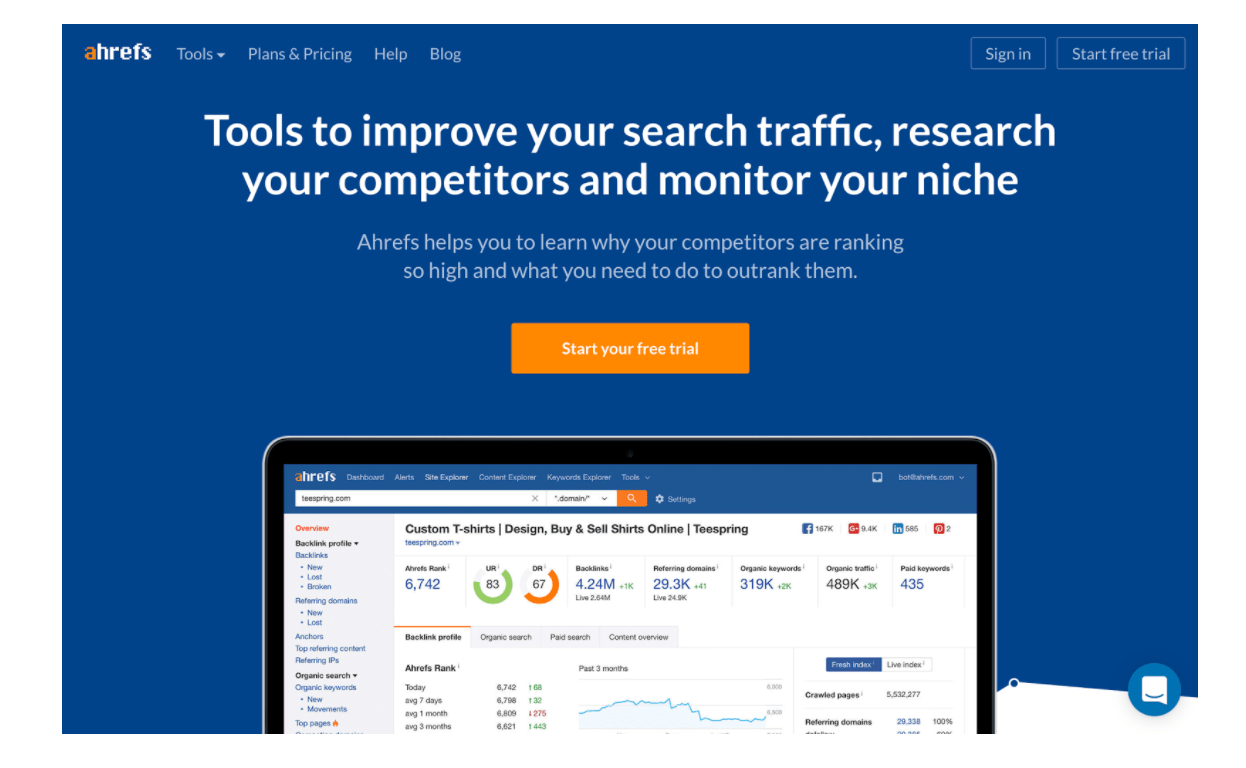
If you’ve been in the online marketing industry for awhile now, you’ve without a doubt heard about ahrefs. For those who haven’t, Ahrefs originally started as a backlink checker tool, but it’s transformed into much more in the last few years.
Today it’s one of the best SEO and online marketing tools available, making it a must have tool for any marketer. If you don’t have it yet, I highly recommend you pick it up. The lowest plan starts at $99 per month. And in my opinion, it’s well worth the investment.
But if you’re just starting out and you don’t have the budget for it - worry not! Ahrefs offers a free 14-day trial so try to conduct all your research during those two weeks!
Here’s how to do that:
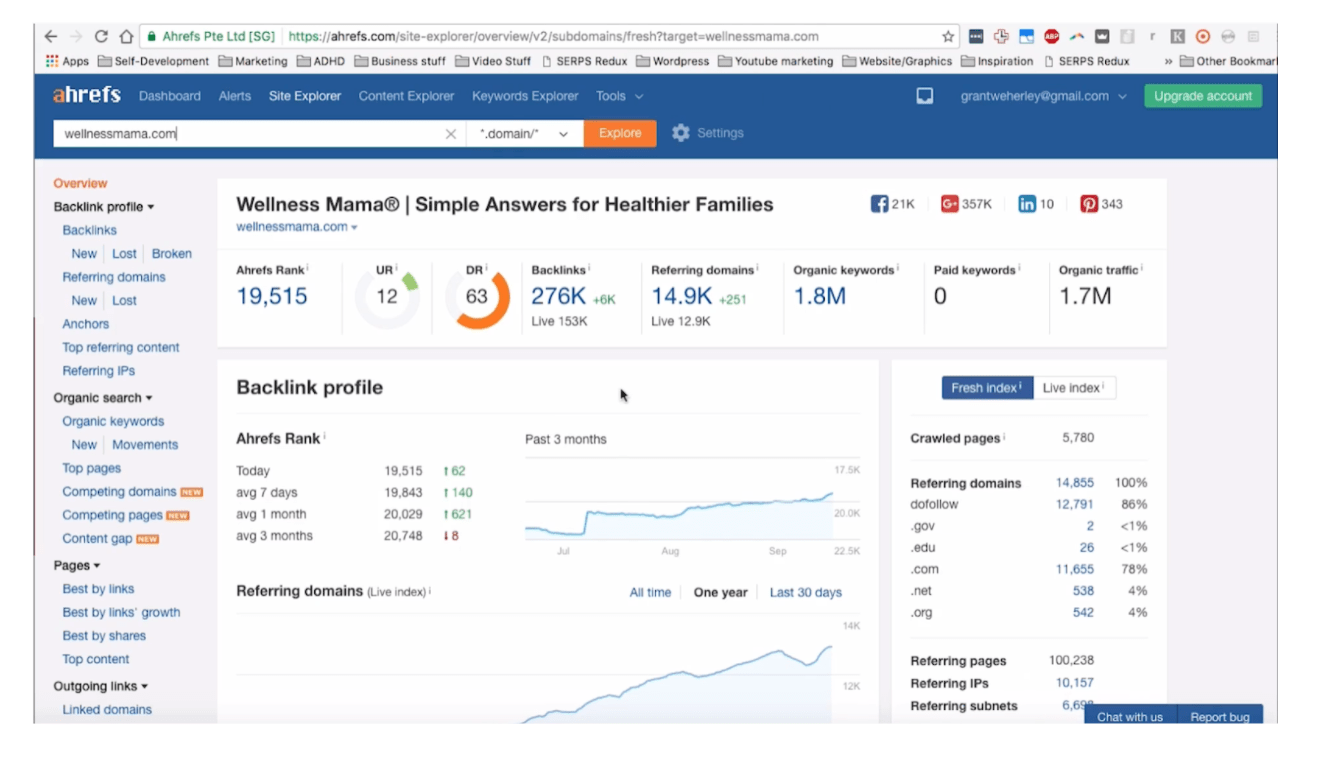
- Pick a couple websites in your niche. You want to pick bigger websites because they usually have more links to their content. For example, if you were in the natural health and beauty niche, you should pick Wellnessmama.com because it’s a huge website in the beauty space and a great place to start.
- Once you’ve picked out your sites, simply enter the URL in the search bar. Sticking with our example of Wellnessmama, we can see that it’s getting over 14,000 referring domains, or backlinks from different domains. It’s also ranking for 1.8 million keywords and receiving 1.7 million organic visits from Google.
Looking good, right?
Definitely.
Now you want to use Ahrefs to analyze Wellnessmama’s content.
Here’s how:
1. Select pages on the left menu bar and click ‘Best by links’. Once you do, you’ll see a list of all the content pages on the website with columns on the right with varying metrics such as ‘UR (URL rating’) and ‘RD (Referring domains’) for the specific pages.
You want to focus on the referring domains column.
2. Click on the word ‘RD’ and sort the results from highest to lowest.
Why?
Cause this allows you to see the content topics that are already generating a lot of backlinks for the website, so it’s a good guess that creating something similar, but better is likely to help with your backlinks as well.
3. Choose a few topic ideas from the list with at least 25 referring domains.
4. After you have picked out a few, open up an Excel spreadsheet and enter the URL and RD number.
5. You’ll also want to jot down the main keyword. To do so:
- Click on the arrow below the page title on the Ahrefs page
- Select Organic keywords, where you’ll see all the keywords that the page is ranking for.
- Look at the keyword with the highest volume to find the main keyword.
- Once you find it, you can paste it into your Excel spreadsheet
After you have done the above, you should be able to look at your spreadsheet and see the potential traffic you stand to receive if you ranked for the main keyword. This should give you a pretty strong indication for what type of content you should create.But your job isn’t done yet.
You still need to repeat the process with other pages until you have a healthy list of proven content ideas.
Sounds good?
I agree.
But is there another way to leverage the power of Ahrefs?
You bet.
Another strategy I recommend is searching for highly competitive keywords in your niche by using Google. For example, if you were in the weight loss niche then you would search for ‘how to lose weight’.
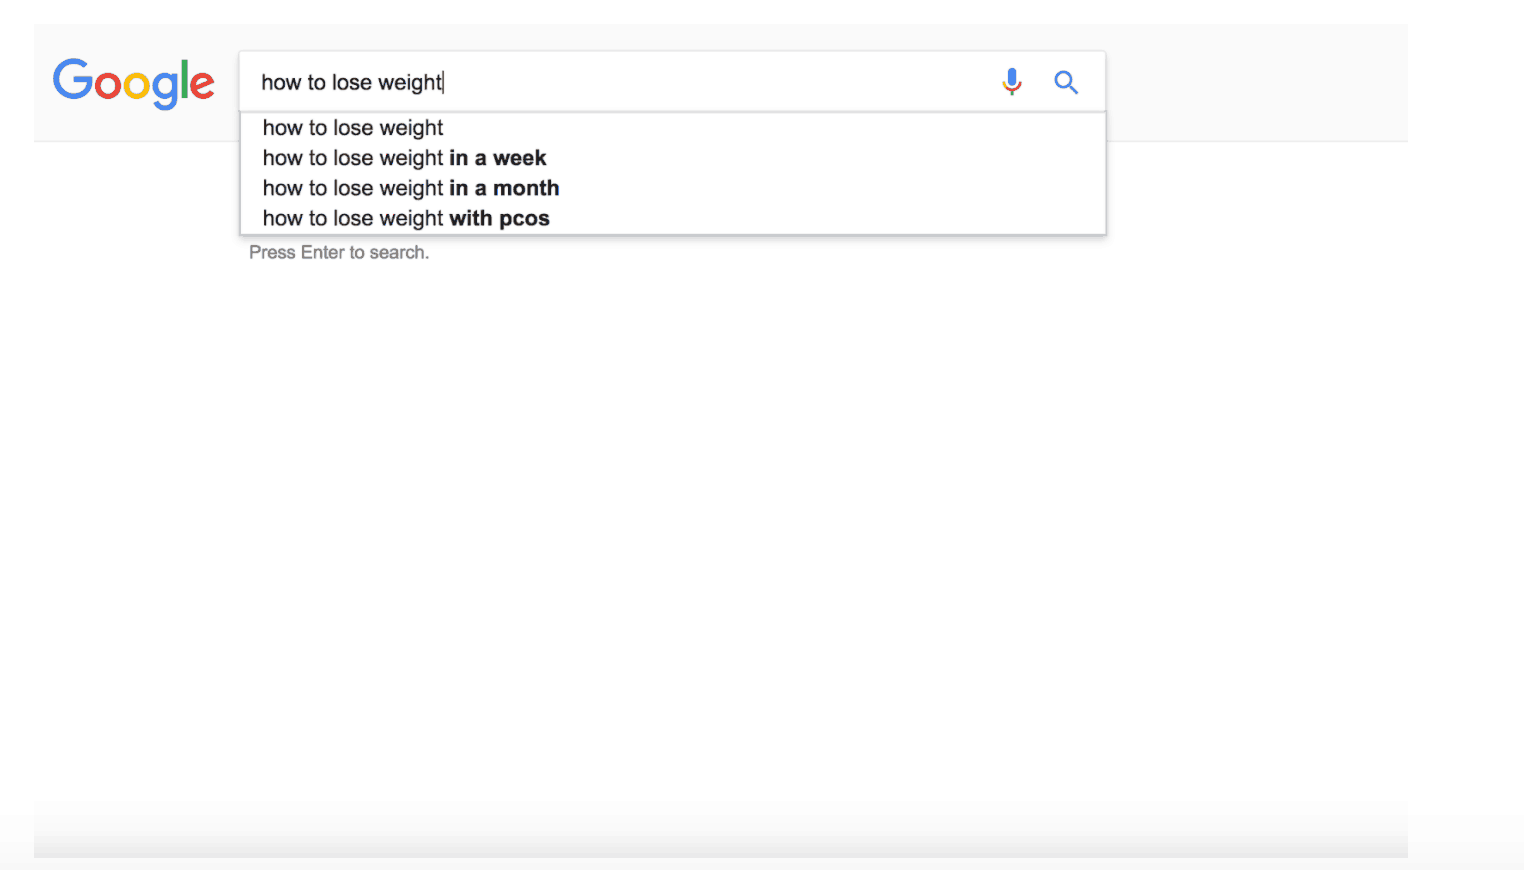
Once you do, simply go back to Ahrefs, select Keywords explorer and search the keyword to see how much traffic it’s getting.
Then look at the top ten results and check how many backlinks those pages received. If the pages are ranking for highly competitive keywords, then it is likely that they’re getting lots of backlinks as well.
Keep in mind, when it comes to an epic content campaign, you shouldn’t hesitate to select competitive keywords.
The more competition there is, the more likely you can get links from your campaign. Epic content tends to be quite results intensive, so you’ll want to make a worthwhile investment.
Cool?
Awesome.
Now it’s time to check the backlinks for the top search results.
So open a few sites, copy the URL and paste it in Ahrefs’ Site explorer section.
When we checked the number one search result on Google for ‘how to lose weight’ it had already generated over 300 referring domains, so you can tell it’s a good one.
You can continue to do this with several of the top Google search results. You will know that the content idea is proven to get backlinks after doing this a few times.
Note: Even though an example such as ‘how to lose weight’ is quite a competitive keyword, if you can create something even better than what is already in the top ten results then it will be very easy for you to get backlinks later on.
Repeat this process a few times and try to come up with a minimum of five ideas that you’d like to do. Then select the best one and you’re ready for step two.
Step 2: Create your epic content
Not much needs to be said about creating epic content, besides…
IT SHOULD BE EPIC.
Like really epic.
Here’s some quick tips to make sure your content is awesome:
- Do intensive research (step one) and improve upon what you’ve found
- Create something better by being more thorough, using better design, and being more up to date
- Leverage the power of stats
- Be specific
- The more practical strategies you outline, the better
- Make sure it’s easily digestible
Here’s some baseline criteria to include in your epic post:
- A compelling title (use this to come up with awesome headlines)
- Incredibility comprehensive content
- The most up to date and accurate information
- Good formatting
- Links
Once you’re finished writing your epic post, it’s time for the next step.
Step 3: Promote it to the right people
Now that you have your epic content, it’s time to promote it so you can generate high quality backlinks and referral traffic from other websites.
I know promotion is often a big problem for newbies.
And that’s why I’ve made this step super easy and digestible.
Below you’ll find three different templates you can use to promote your content. Each of these templates offers varying ways to find prospects, which we’ll discuss in more detail now.
Template 1. People that you linked to in your epic article
If you actually created an epic (and valuable) post, it should have linked out to a bunch of relevant websites and blogs within your niche.
Now that you have done that, you need to leverage this fact by doing the following:
- Go through your article and compile a list of all the sites you linked out to
- Find the appropriate email address for those people
- Use the template below to create your email
- Send your email and (hopefully) get social shares & links
Hey {NAME},
I gave you some love on my latest blog: [INSERT LINK]
Feel free to share it or shout it from the rooftops
Thanks,
{Your Name}
Template 2. People who linked to your competitors
Another way to promote your epic post is by reaching out to people who are currently linking out to your competitors.
How do you do that?
Well if you’ve been paying careful attention, you’ll remember that earlier we compiled a list of articles with high referring domains. This list is pure gold because since these articles have already linked to content that is similar to yours, there’s a good chances they’ll link to your article as well if it’s bigger and better.
Here’s how to make this happen:
- Put the links you gathered from earlier into Ahref’s Site Explorer for analysis
- Click on Backlinks, followed by One link per domain to download their backlinks to your computer
- Now you’ll have a .csv file that gives you all the links.
- Go through the links one by one and jot down the ones you want to contact
- Find their email address
- Use the template below and simply fill in the blanks
- Send your email and sit back and prosper
Hey {Name},
I was checking out some of your articles at {Site Name} today and came across this page: [URL]
I noticed that you linked to one of my favorite articles ever: {Title}
But I thought it could be better so I set out to write a more thorough and up-to-date version: [Your URL]
I’m doing my best to get this in front of people who could really benefit from it, so if you even decide to add a link to my article from your page, I would be more than happy to share it to my thousands of social followers to help you gain some visibility in exchange.
Either way, keep up the awesome work!
Cheers,
{Your Name}
There’s actually another template that no one else has talked about before, but it’s too valuable and effective that I have to reserve it only for students of AMZ Affiliate Bootcamp. But you can get awesome results with the above 2 tactics.
5. Guestographics
Want to quickly drive an insane number of powerful editorial backlinks to your website?
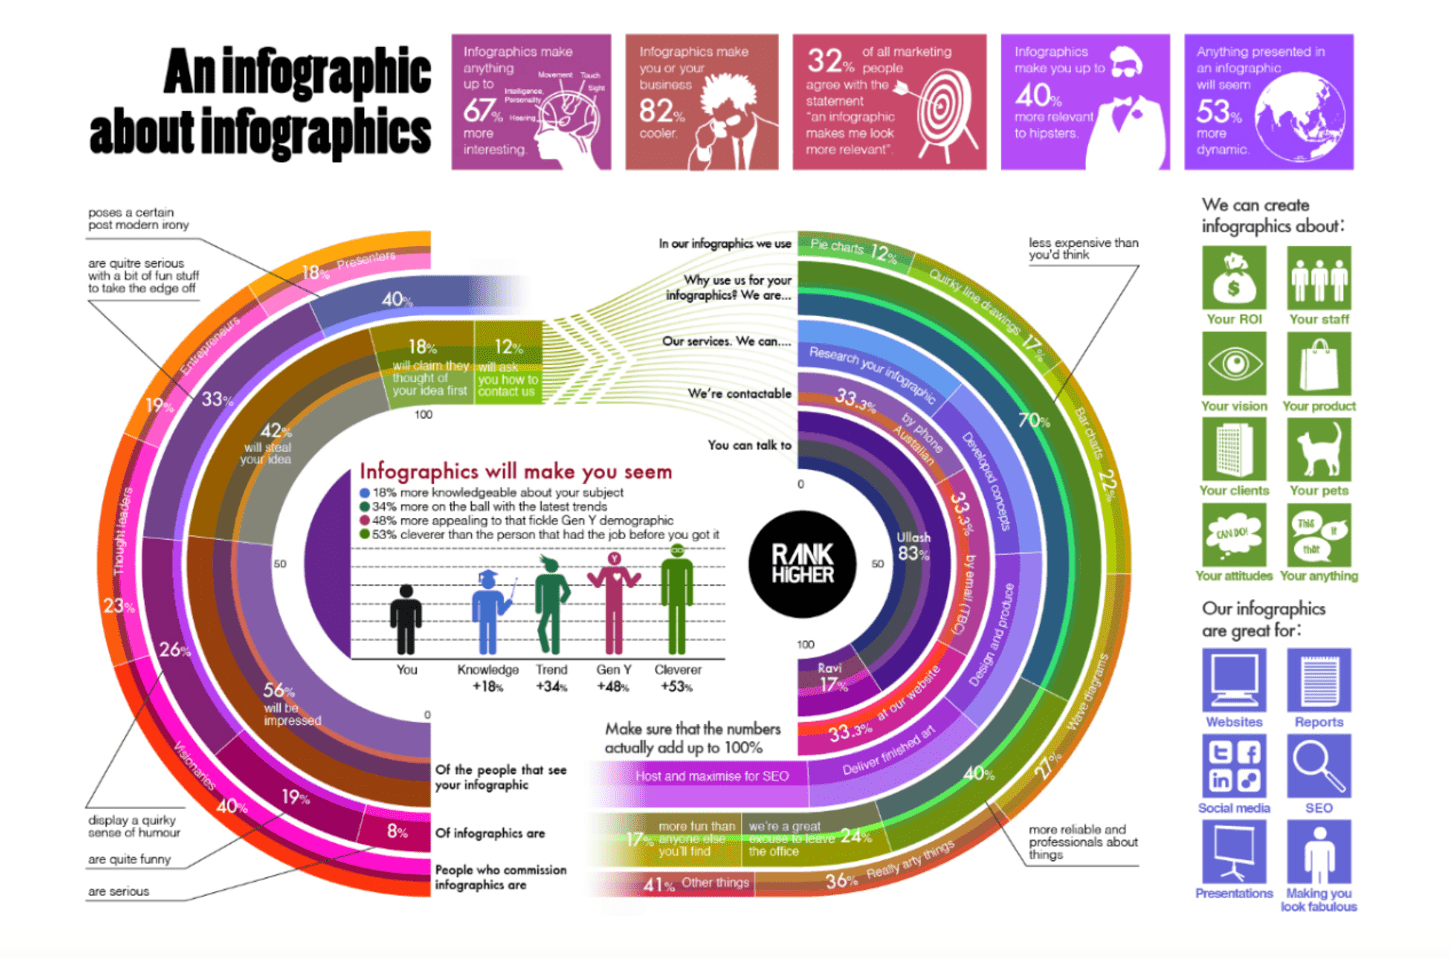
Create a highly shareable infographic.
Here’s why they’re so darn effective:
People love visual content
- Visuals are processed 60,000 times faster in the brain
- 40% of people will respond better
Infographics are highly shareable
- KissMetrics published 47 infographics that generated 2.5 million visitors and 41,000 backlinks - impressive, right? You bet.
So are you ready to leverage the power of infographics?
If so, here’s the process you should follow:
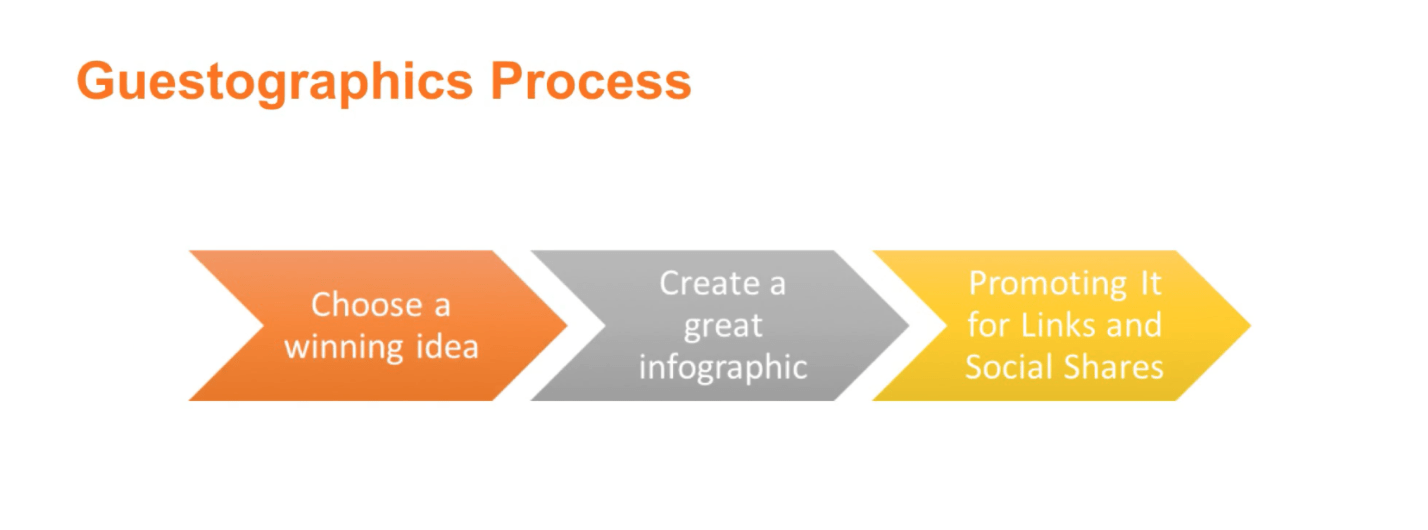
1. Choose a winning idea
Coming up with a winning idea is 90% of the battle. Find a topic that your audience will want to share and you pretty much have it made.
Here’s how to find winning ideas:
- Go to visual.ly/view
- Browse categories or search for your keywords.
- Sort by most viewed (pay careful attention to # of views, likes and comments)
- Use the top infographics as a guide for what kinds of infographic you should produce
After you have done the above, you should also repeat the same exact steps but conduct your research on Pinterest instead. Do this and you’ll have a great indication for what ideas are likely to succeed (and which ones will most likely fail).
2. Create a great infographic
Once you have finalized your infographic idea, it’s time to create it.
Ideally, you want your infographic to:
- Tell a story
- Provide exceptional information
To achieve this you ultimately need great design and solid pieces of information.
Here’s how to find solid data:
- Go back to visual.ly
- Search for your keywords
- Browse through the various infographics
- Jot down data/information you can use for your own infographic
Another strategy you can use is to Google your keyword and browse through the first 50 or so results, pulling out pieces of data that’ll help you create a compelling infographic.
Once you’ve done the above, you should have exceptional information.
Now it’s time to design the infographic.
If you don’t have the design abilities, hop on over to UpWork or Fiverr and get it done for you. Doing so will ensure you come away with an eye catching infographic that has the potential to generate a lot of backlinks and social shares.
3. Promote it
Last, but not least, you’re going to want to promote your newly created infographic.
Here’s how to promote it:
Use Visually
- Go to visual.ly/view
- Submit your infographic to their directory (this is really important to do because this is where editors come to find infographics for their posts and publications)
- Sit back and count your social shares
Use Pinterest
- Search for “[insert your keyword here] board”
- Click on boards
- Follow the ones you like
- Reach out to the admins of the boards and request access
- Once approved, post your infographic inside the board
Use Google
- Search for your keywords
- Look at the top 50 results that pop up
- Reach out to these individuals by using the templates I’ve put together for you here
Reverse engineer other successful infographics
- Right click on the successful infographic of your choice and click ‘search Google by image’
- You’ll see all the places where the infographic has been published
- Use these templates to reach out to these sites (chances are if they linked to a similar infographic, they’ll link to your infographic as well)
Got it?
Sweet.
Follow the above strategy and you’ll have high producing infographics very quickly.
Now that we have covered the five white hat link building tactics for Amazon affiliate websites, you might be scratching your head, wondering…
This is great and all. But how do I put everything into practice?
Well, good question.
To help you, I’ve prepared the following 5-month link building plan.
The 5-Month Link Building Plan for a New Amazon Affiliate Website
It’s important to note that before you put this plan into action, you need to first make sure you have a site that meets the following criteria (this will maximize success rate):
- Make sure you have posted at least 20 high quality articles.
- Make sure that your website is well-designed with a good WordPress theme and logo. Good branding is important to increase people's perception of your website which leads to higher outreach success rate.
- Create a persona to represent your site if you don't want to show your real name. You'll use this persona to outreach to people so think carefully.
- Set up social media profiles like Facebook, Twitter and Pinterest.
- Create a custom email with Google Apps so your email could look like this name@domain.com
-
- You can buy one Grandfathered Standard Edition Google Apps Account for an one-off price at http://getgapps.com/ to save money on recurring fees.
Once your site fulfills the above criteria, it’s time you embark on the 5-month link building plan.
Here’s the goal for the 5-months:
Your goal: 50 links in 5 months
Why did we pick this goal?
Well for a new website, link building is all that matters. You can slow down on content production after having posted 20 articles if you don't have enough time and budget to do both at this stage.
Your goal is to build 50 links in 5 months which is only about 10 links a month.
Doesn't sound like a lot right?
You bet.
That’s because you don't need hundreds of links to rank if you did your keyword research right. Links acquired through manual outreach are extremely powerful. With that said, 50 are more than enough to give you good initial traction.
So here’s your 5 month link building plan:
Month 1
Your website is brand new and you have zero connection with people in your niche.
That's why you should always start with a Top Experts campaign which is basically a post featuring top bloggers and influencers in your niche. Write your top experts post. And you’ll notice that most people will be inclined to share your post with their blog audience/social followers because they're featured in it.
That's a quick and easy way to generate links and referral traffic.
Also, you should begin reaching out and commenting on other blogs during month 1 as well.
Note: The 50 links we're shooting for should be dofollow links from outreach only and don't include blog comment links.
Month 2 through 4
In month 2 through 4, you'll be focusing your effort on guest posting which is our favorite way to build foundational links to boost up your Domain Authority. Aim for around 30 guest posting links in this period.
You'll still need to continue doing blog commenting on a daily basis as it's a very effective way to network with other bloggers (5-10 comments a day).
Month 5
If you have done a good job with guest posting, by now your website would have gotten some initial organic traffic. And you're very likely to make your first dollars as well.It's time to make a decision.
- You can either continue guest posting for more links.
- Or you can switch it up a little bit and try a new tactic which is building links through content assets (if you choose to go down this route, buckle up and start pumping out EPIC POSTS)
That’s pretty much it.
Do the above and you’ll have 50 links in 5 months.
Not bad, right?
Time for you to get to it.
Conclusion
Building links for new Amazon affiliate websites seems difficult.
But as you can see from this post, it’s really not that hard.
Follow the above 5 methods and you’ll quickly build traction (and start making your first few dollars in a span of a few short months).
Enjoyed this article?
Leave a comment below with your thoughts & questions - I’ll make sure to answer each and every one
Before you do, I have something for you that you’re going to enjoy even more.
You see, I have prepared a very special 2-week offer for Niche Pursuit readers that allows you to get my premium AMZ Affiliate Bootcamp course ($997) for only $497.
What is the AMZ Affiliate Bootcamp?
It’s my complete step-by-step system designed to take you by the hand (as in step 1, step 2, step 3) to build, rank and profit from Amazon affiliate websites. It’s the absolute fastest way to get from Point A to Point B.
Here’s what you get:
- 8 module step-by-step digital course that walks you through the 7 steps
- Video course (100 lessons) + transcripts + worksheets + checklists
- Literally step-by-step. Nothing is left out.
- Direct access to me and my team for help and guidance
- We don’t just wait for your questions, we actively work with you and coach you through the entire process.
- And we have a community of customers going along with you to help support you, network with you, and guide you.
- Bonus #1: 3 exclusive audio interviews with 6-figure Amazon affiliates (not available anywhere else)
- Bonus #2: The most comprehensive WordPress for beginners course (24 videos)
You can check it out here
But before you do, you should know that I offer an unbelievable personal guarantee.
You can try the AMZ Affiliate Bootcamp System out for a full year… if it doesn’t pay for itself many times over, I’ll refund you every cent...and personally coach you to your first $1,000 monthly with Amazon affiliate websites!
Sounds good?
Great!
Looking forward to working with you.
Enter your text here...
The post 5 White Hat Link Building Tactics for Amazon Affiliate Websites appeared first on Niche Pursuits.
from Niche Pursuits http://ift.tt/2oIZ3k7
No comments:
Post a Comment