In a perfect world, all of your website traffic would be organic. That’s the most ideal scenario for everyone.
But sometimes it can take 6, 12, or even 18 months for you to really notice the benefits from your organic search strategies. That’s not to discourage you. While you should stay the course and continue to prioritize SEO best practices, you can always use paid ads for the time being to drive more traffic to your site.
So for those of you who have available funds in your marketing budget, I’d definitely recommend that you give PPC campaigns a try.
The best way to run paid ads is with Google AdWords.
Google does an amazing job of giving you the tools to ensure that your ads are viewed by people who are most interested in your business. One of the most effective campaign approaches is remarketing.
What is remarketing?
It’s a way to expose your ads to people who have previously viewed your website in the past. Since these visitors are already familiar with your brand, it’s more likely that they’ll convert when they see your ad in SERPs or on a Google partner site.
Getting traffic to your website is obviously great. Who doesn’t want more traffic? But if those visitors aren’t converting, you’re not going to see a high ROI on those paid ads.
That’s where remarketing comes into play. Here’s a simple visual representation to show you exactly how remarketing works.
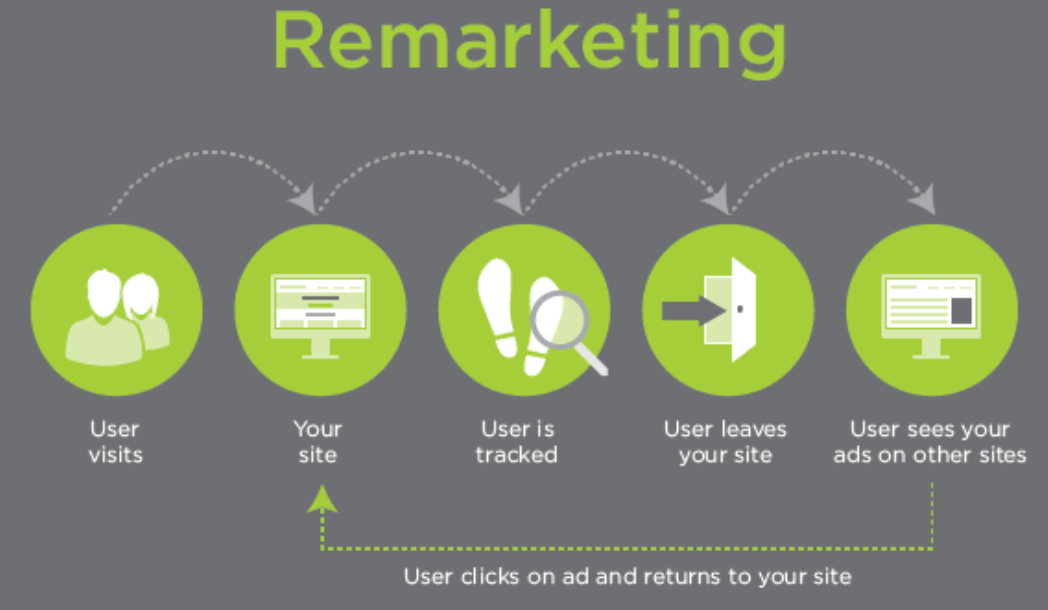
It’s a very easy concept to understand.
Basically, your website visitors will be tracked based on their behavior. Then your ad will appear when they’re browsing on another site in the future.
I’m sure this has happened to you before.
You search for something like “hotels in Miami” and then later that day you see an ad for a hotel website that you were browsing earlier. That’s a remarketing campaign.
For those of you who have never used this strategy, I’ll explain every step you need to take to set this up with Google AdWords. Implementing a remarketing strategy will boost your conversion rates and generate a higher ROI for your ad spending.
Generate the remarketing code
The first thing you need to do is generate a remarketing code from your Google AdWords account. Then you’ll eventually add this code to your website so Google can track visitors and ultimately apply this strategy via partner sites.
I’m going to assume that you already have a Google Ads account.
If not, take a moment to set that up. It’s a quick process and free to do so. You won’t pay anything until you actually start running ads.
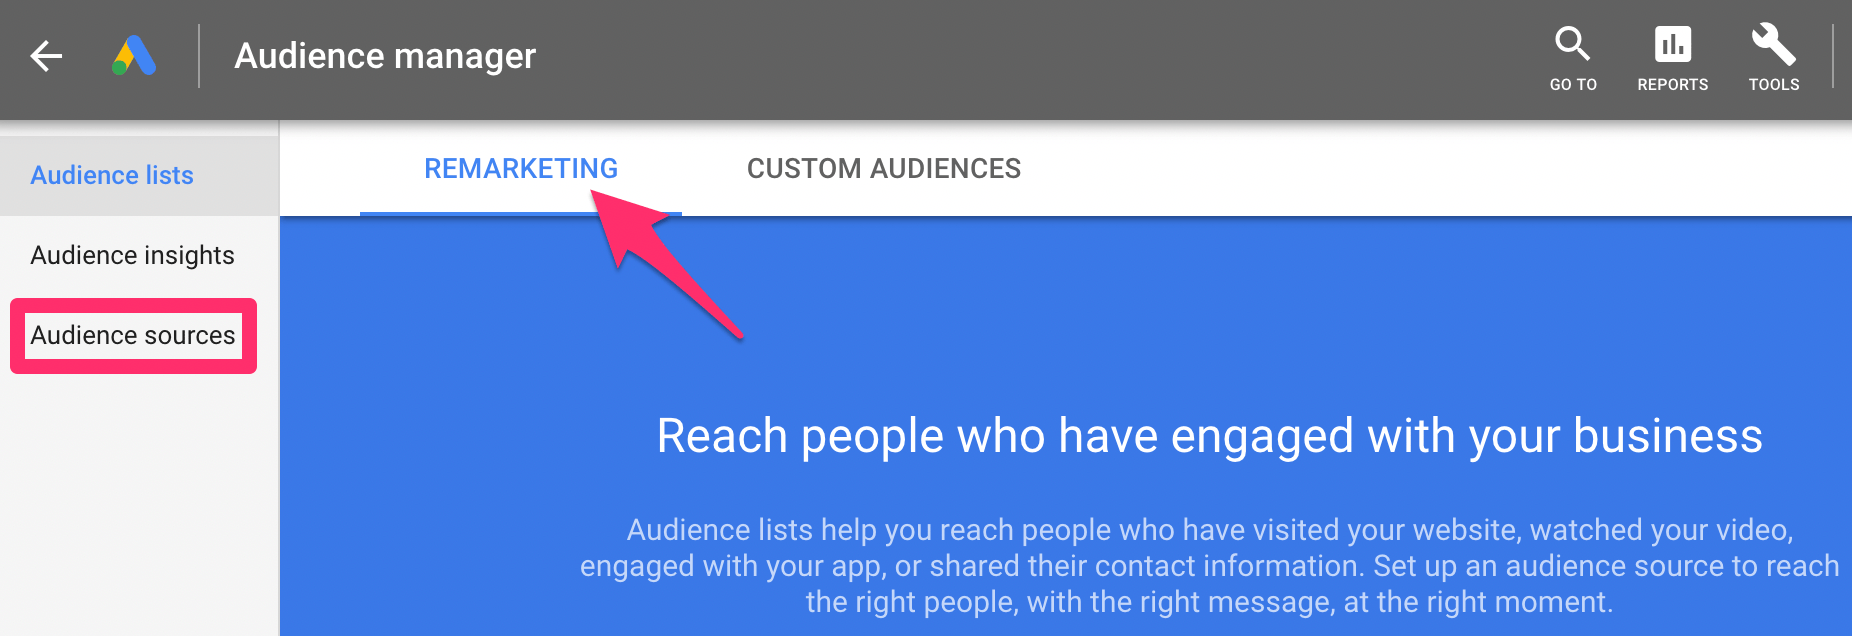
Once you’re signed in to Google AdWords, click on the “tools” icon at the top of your dashboard to expand the menu.

Then navigate to the “shared library” column and select “audience manager,” as pictured above.
When you land on this page, you’ll see that you’re already in a remarketing section. On the left side of the screen, click on “audience sources” to continue.
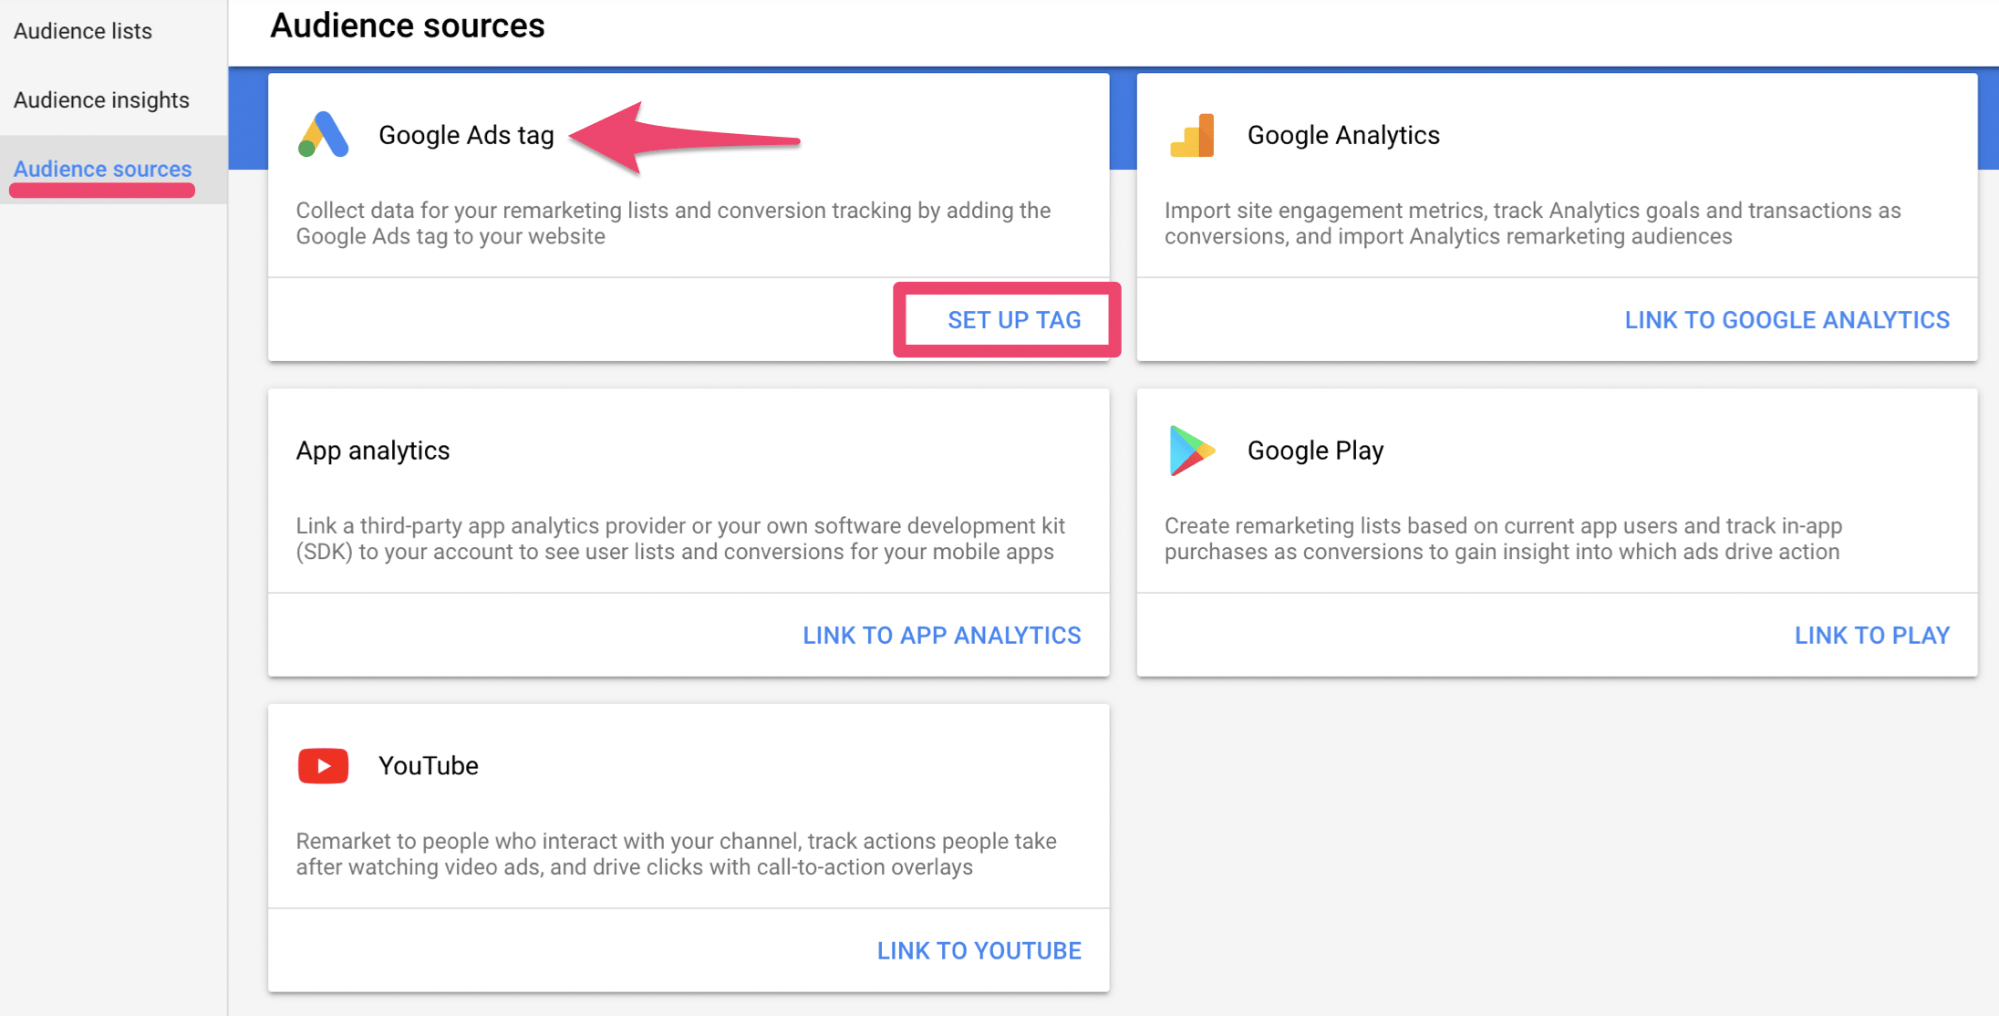
When you get to this page you’ll see five different options:
- Google Ads Tag
- Google Analytics
- App Analytics
- Google Play
- YouTube
These are all ways that you can track customers for remarketing campaigns. But for our purposes today, you’re going to select “set up tag” from the “Google Ads tag” box.
Now you need to determine the type of remarketing campaign that you want to run. You’ll be presented with two options.
The first choice is very straightforward; collect general data about website visitors.
Basically, this means that if someone lands on your site, they will be a candidate for your remarketing campaigns.
But just because someone visits your site, it doesn’t automatically mean that they’re interested in what you’re offering. Sometimes people will land on your site by mistake. Or maybe they realized that what you’re offering isn’t actually what they need. It’s possible that your products are out of their price range. There are tons of different factors at play here.
So remarketing to everyone and anyone isn’t always the most effective way to drive conversions. That’s why you should consider the second option.
Google lets you collect data based on specific visitor actions to show more personalized ads to people. For example, you could target only people who added something to their shopping cart but didn’t convert.
After you pick the type of remarketing strategy you want to pursue, Google will automatically generate a code for you.
Add the tag to your website
Once the remarketing code has been generated, you need to install the tag on your website.
For those of you who choose the second option involving specific visitor actions, you’ll see that two codes have been generated.
- Global site tag
- Event snippet
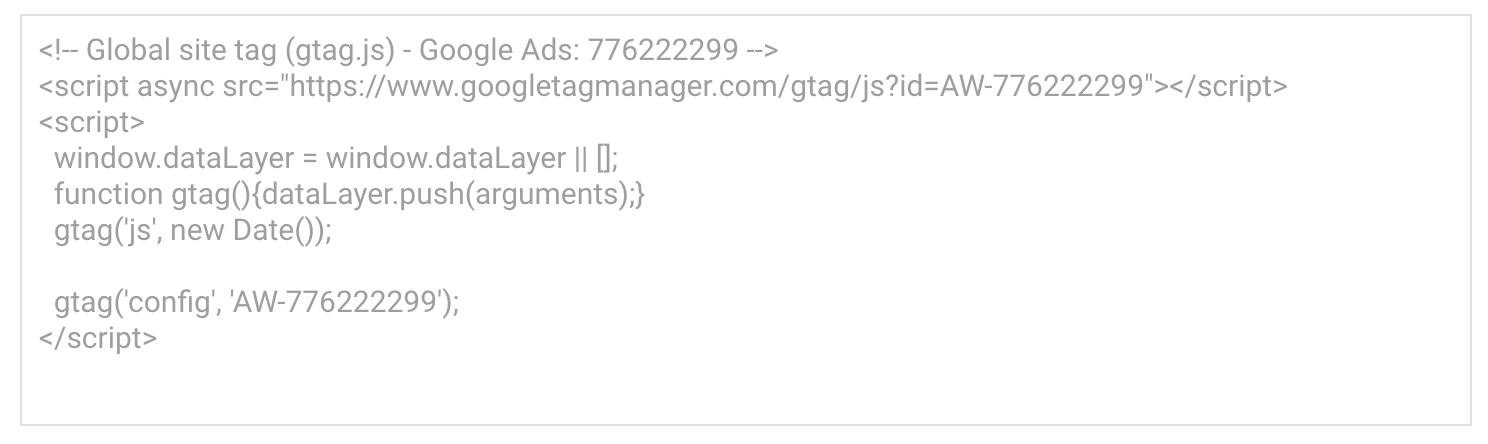
The global site tag should be added to every page on your site. This will be installed in the <head> section of your page HTML.
Here’s an example of what it looks like when the tag gets generated for you on AdWords.
The event snippet tags are a little bit more complex.
You cannot just install the code on your site as it reads in the auto-generation box. There are placeholders in the code that need to be updated based on the type of event you’re tracking for remarketing.
Remember, the whole purpose of this strategy is to find people who are most likely to covert.
So the snippets won’t go on every page of your site. Instead, they’ll only be added to pages where those certain actions take place, such as an add-to-cart page or a product page.
Here’s an example of an event snippet code with those placeholders.
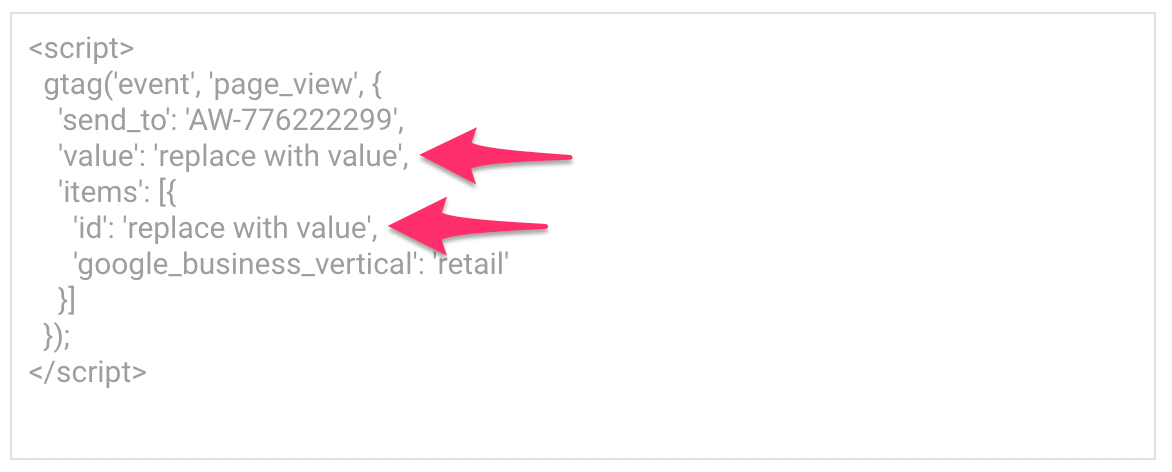
As you can see from what I’ve pointed out above, there are parts of the tag that need to be replaced with a value for tracking purposes.
Let’s break this down even further.
From the top, you can see that this snippet is measuring page views by default. But other examples of events include things like:
- view_search_results
- view_item_list
- view_item
- add_to_cart
- purchase
Once you set an event, you need to change the value items, and ID parameters to correspond with your remarketing campaigns.
This all depends on your business and the type of website you have.
These choices are extremely versatile. Google gives you the option to be very specific within your business vertical.
Recently, Google updated the code for their tags. So for those of you who previously installed a remarketing tag on your site in the past, you should update those old tags. Google says that the old ones will still work, but they recommend generating new global tags and event snippets for future use.
There are three ways to install these tags on your website.
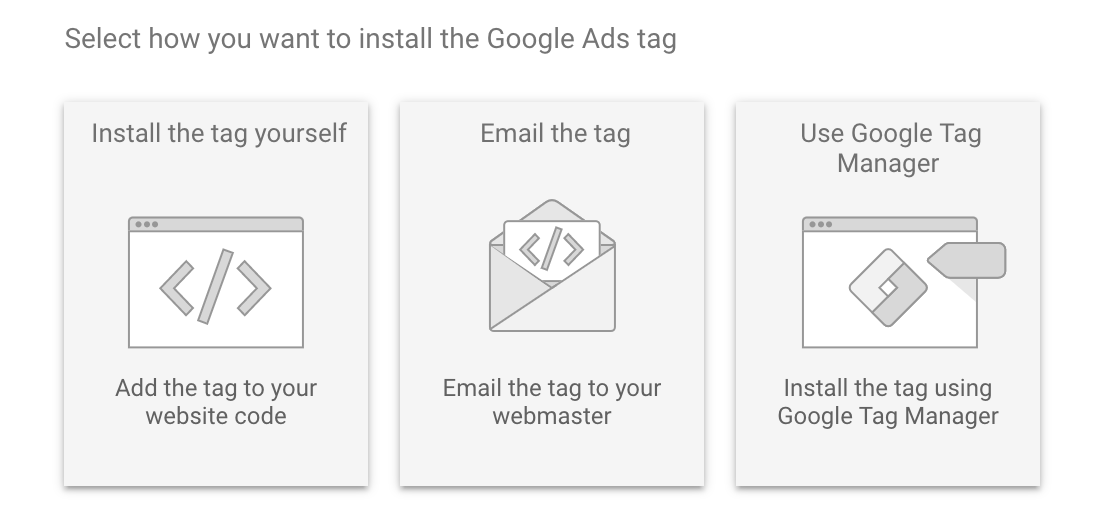
- Install it yourself
- Email the tag to your webmaster
- Use the Google tag manager
Every option is pretty self-explanatory. Google will walk you through the process each step of the way. If you decide to do this on your own, just make sure you realize that the placeholders need to be changed. Otherwise, the campaigns won’t work.
Item parameters
As I explained before, you need to update the placeholders in the event snippet code to track specific actions by visitors on your website. The item parameters will vary based on the type of business vertical that you choose.
These are the categories:
- Retail
- Education
- Flights
- Hotels and rentals
- Jobs
- Local deals
- Real estate
- Travel
- Custom
So if you have a retail site, the ID could represent something like a unique product.
Here’s another example using a different vertical. If you have an airline or operate a website that sells flights, your event snippet tag could look something like this:
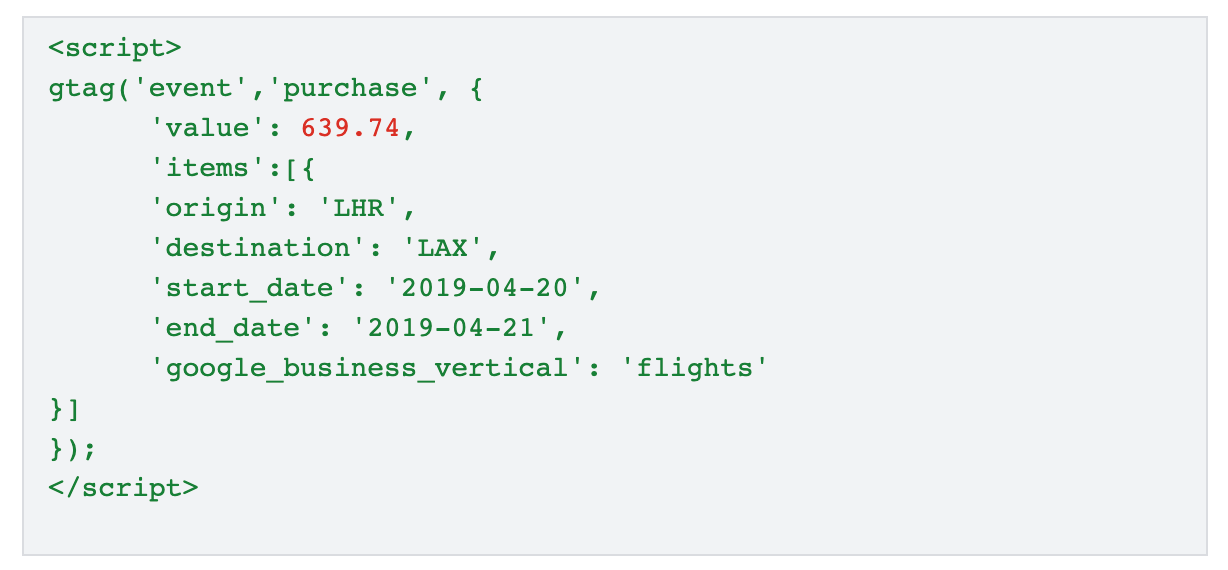
This event is specifically tracking people who purchased a flight from London to LAX.
So one of their remarketing campaigns could be an ad for upgrading their seat, getting a hotel, or renting a car when they arrive at their destination.
To view the full list of requirements and examples of item parameters in your industry, check out this resource from Google. I’d also recommend reading this Google support page that discusses custom rules for remarketing campaigns.
Update your privacy policy
Once you have all of this set up and the code is installed on your site, you need to make some additional changes to your website as well.
Your privacy policy needs to be updated to tell your site visitors exactly what you’re doing.
According to Google, these are the requirements for what your updated privacy policy needs to cover:
- Describe how you’re using remarketing to advertise on the web.
- Explain how Google and other third-party sites are showing ads from your website all over the Internet.
- Explain how Google and other sites use cookies as well as other device identifiers to display ads based on user behavior on your site.
- Give instructions for how website visitors can opt-out of cookies and device identifiers.
Don’t skip this step. It’s unethical to deceive your website visitors. Plus, Google states that you need to disclose all of this information if you’re using AdWords for remarketing.
Create custom audience lists
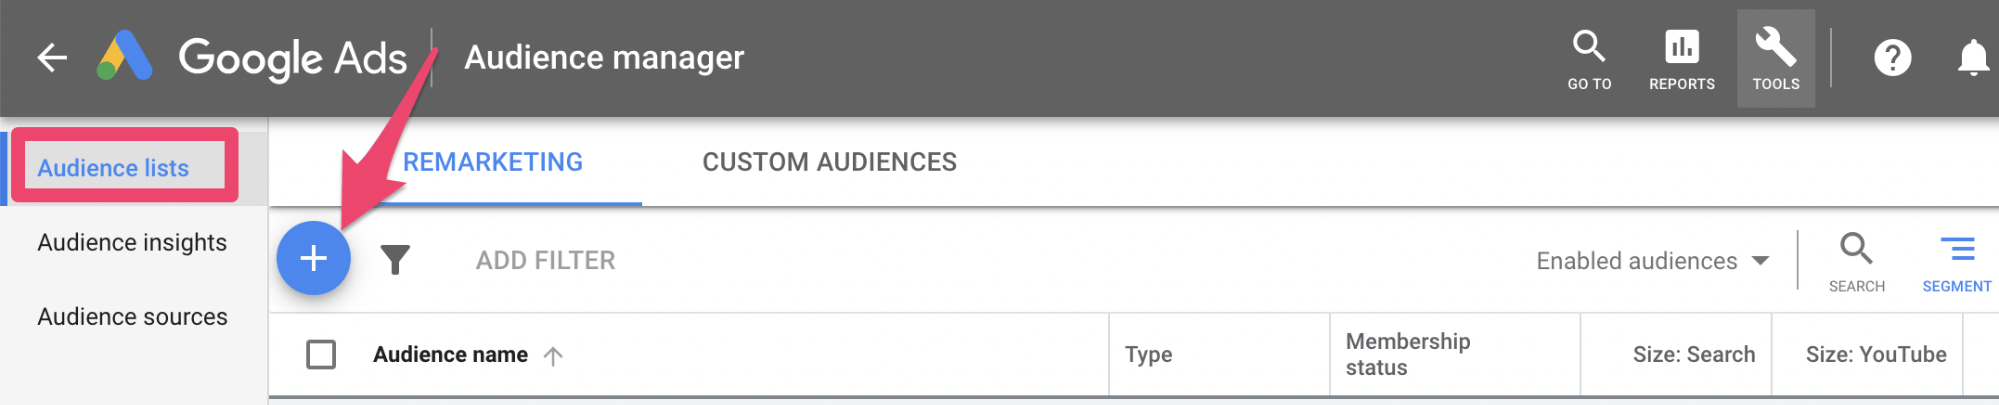
Now it’s time to customize exactly who you’ll be targeting with remarketing.
Go back to the “audience manager” page on your AdWords dashboard. Then navigate to the “audience lists” tab and click on the plus (+) sign to add a new audience.
Next, you’ll be presented with different options for where this list will come from.
- Website visitors
- App users
- YouTube users
- Customer list
- Custom combination
For our purposes today, go ahead and select the “website visitors” option.
Next, you can add more information about this list by naming it and changing the settings. Here’s what that page looks like:
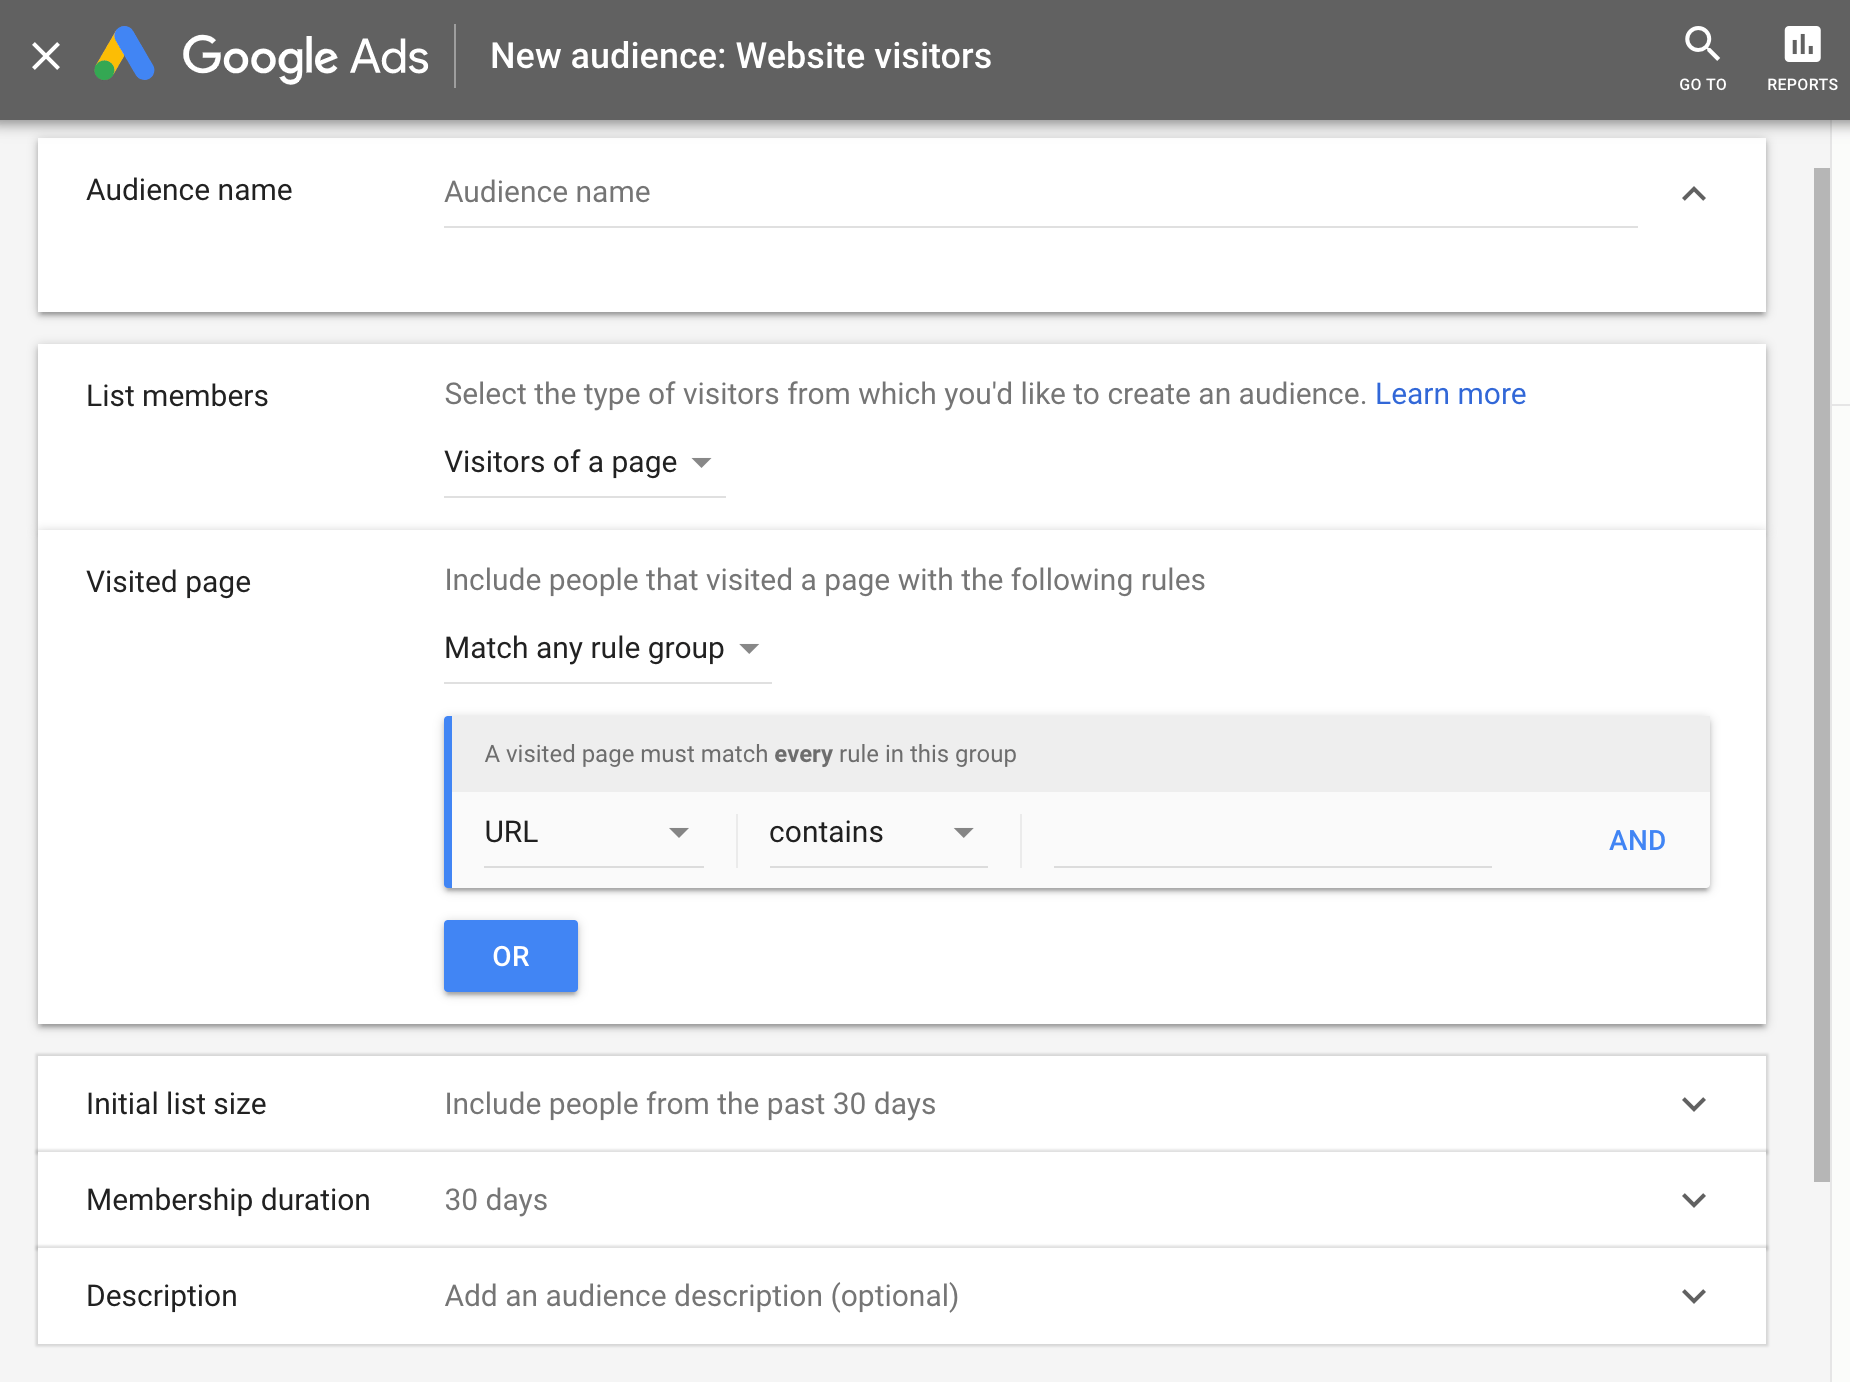
First, you should name your audience.
Be specific so you’ll be able to distinguish it from other lists. You’ll be able to select this audience later on when you run your ads.
Next, you can update custom information about their behavior and actions on your site. Here are your options:
- Visitors who landed on a specific landing page
- Visitors who landed on a specific page and another specific page
- Visitors who landed on one page but did not land on another specific page
- Visitors who landed on a page during specific dates
- Visitors who landed on a page with certain tags
For example, maybe you want to target website visitors who landed on your “about us” page but didn’t visit your product page. Or maybe you want to target people who visited a product page and a shopping cart page.
Depending on the options you choose, you’ll add those specific URLs as well.
Then it’s time for you to determine how long you want this audience list to be kept on file. By default, this is set to 30 days, but it can be as long as 540 days.
Depending on the page and campaign, you’ll want to adjust this accordingly. If you’re promoting impulse buy products, you’d probably want it set significantly lower. Or if you’re promoting a specific landing page for a holiday sale, you’ll want to make sure the ads don’t run past that holiday.
For the most part, 30 days should be fine. You can always experiment with other periods of time when you create new audience lists.
Launch your remarketing campaign
After your settings are in place, it’s time for you to put all of this to the test. You need to create and run your ads.
Go back to the AdWords dashboard. Find “campaigns” on the left side of the screen.
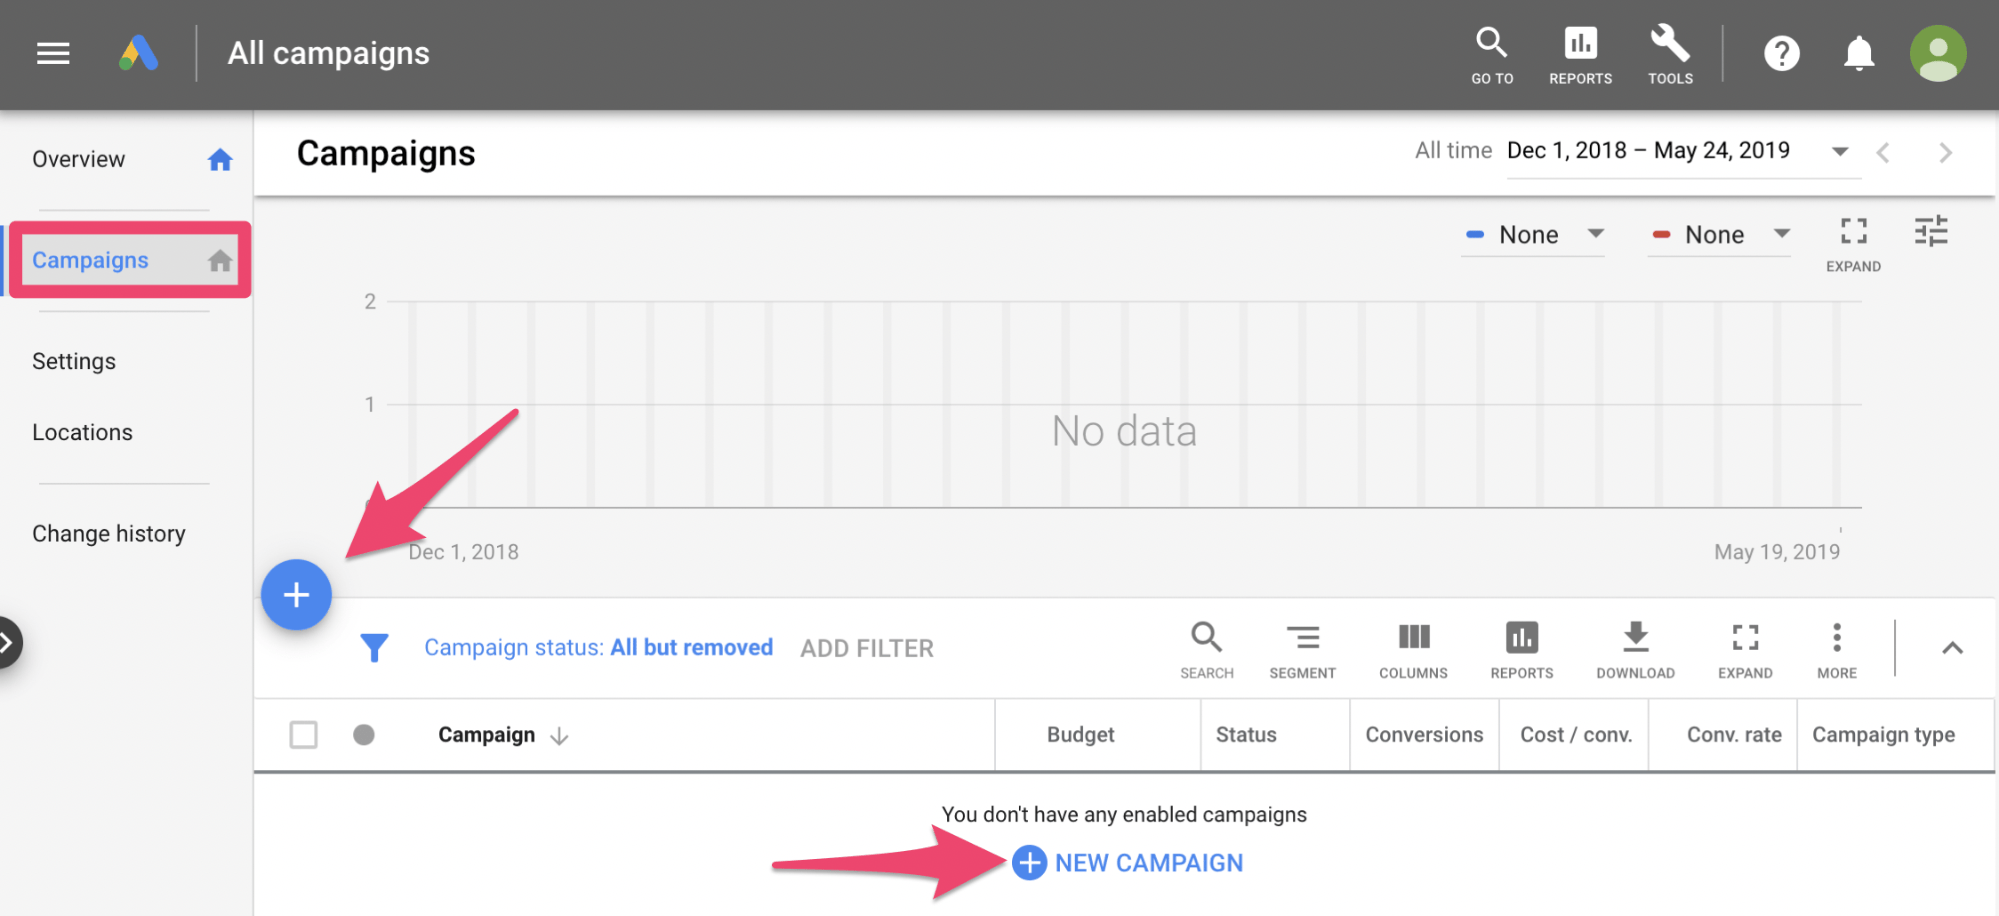
Click on one of the plus signs to start a new campaign.
Next, you’ll be prompted to choose your goal from one of the following options:
- Sales
- Leads
- Website traffic
- Brand awareness and reach
- Product and brand consideration
- App promotion
You can pick whatever you want from this list. But for conversions, you’ll probably want to choose sales, leads, or product consideration.
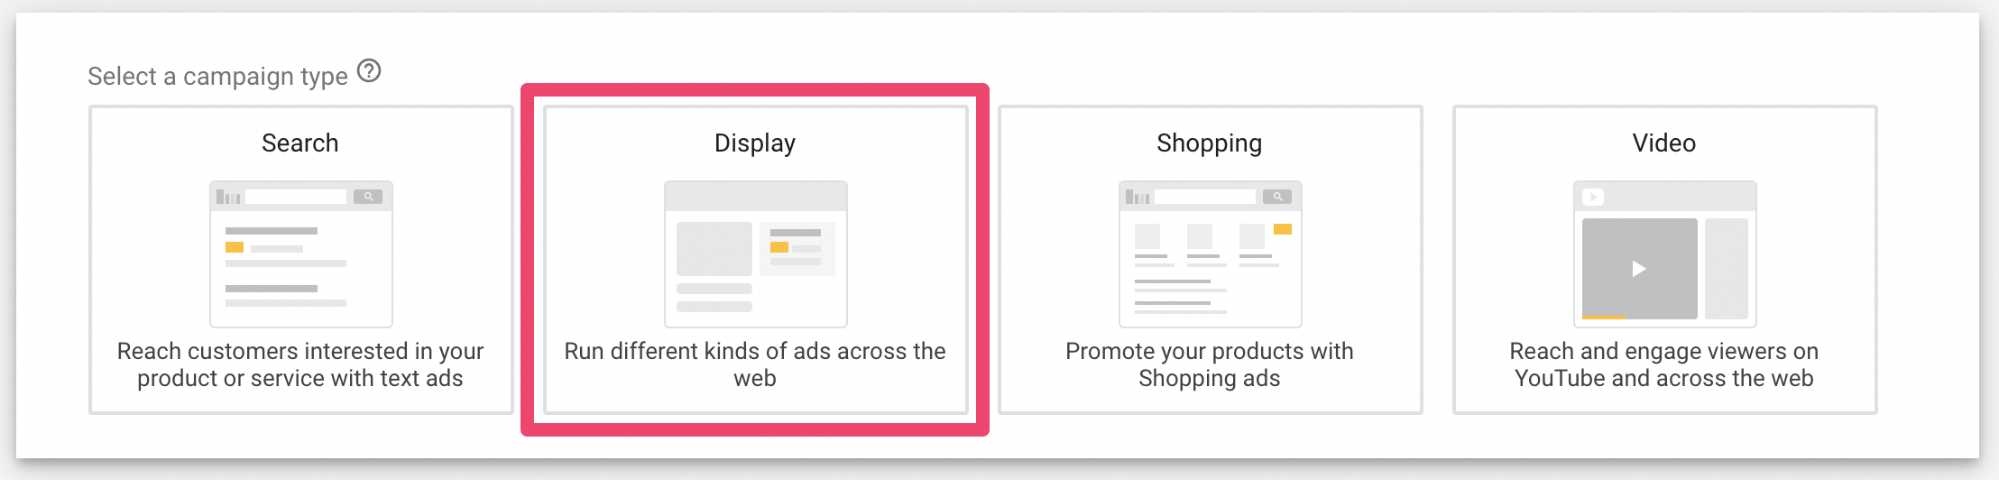
Next, you’ll decide on the campaign type. For remarketing, select the “display” option.
This is your chance to customize all of the settings and parameters for your ad. You’ll set things like:
- Campaign name
- Locations you want to target
- Languages
- Bid settings
- Budget
After you finalize all of this, scroll until you see the “audiences” section.
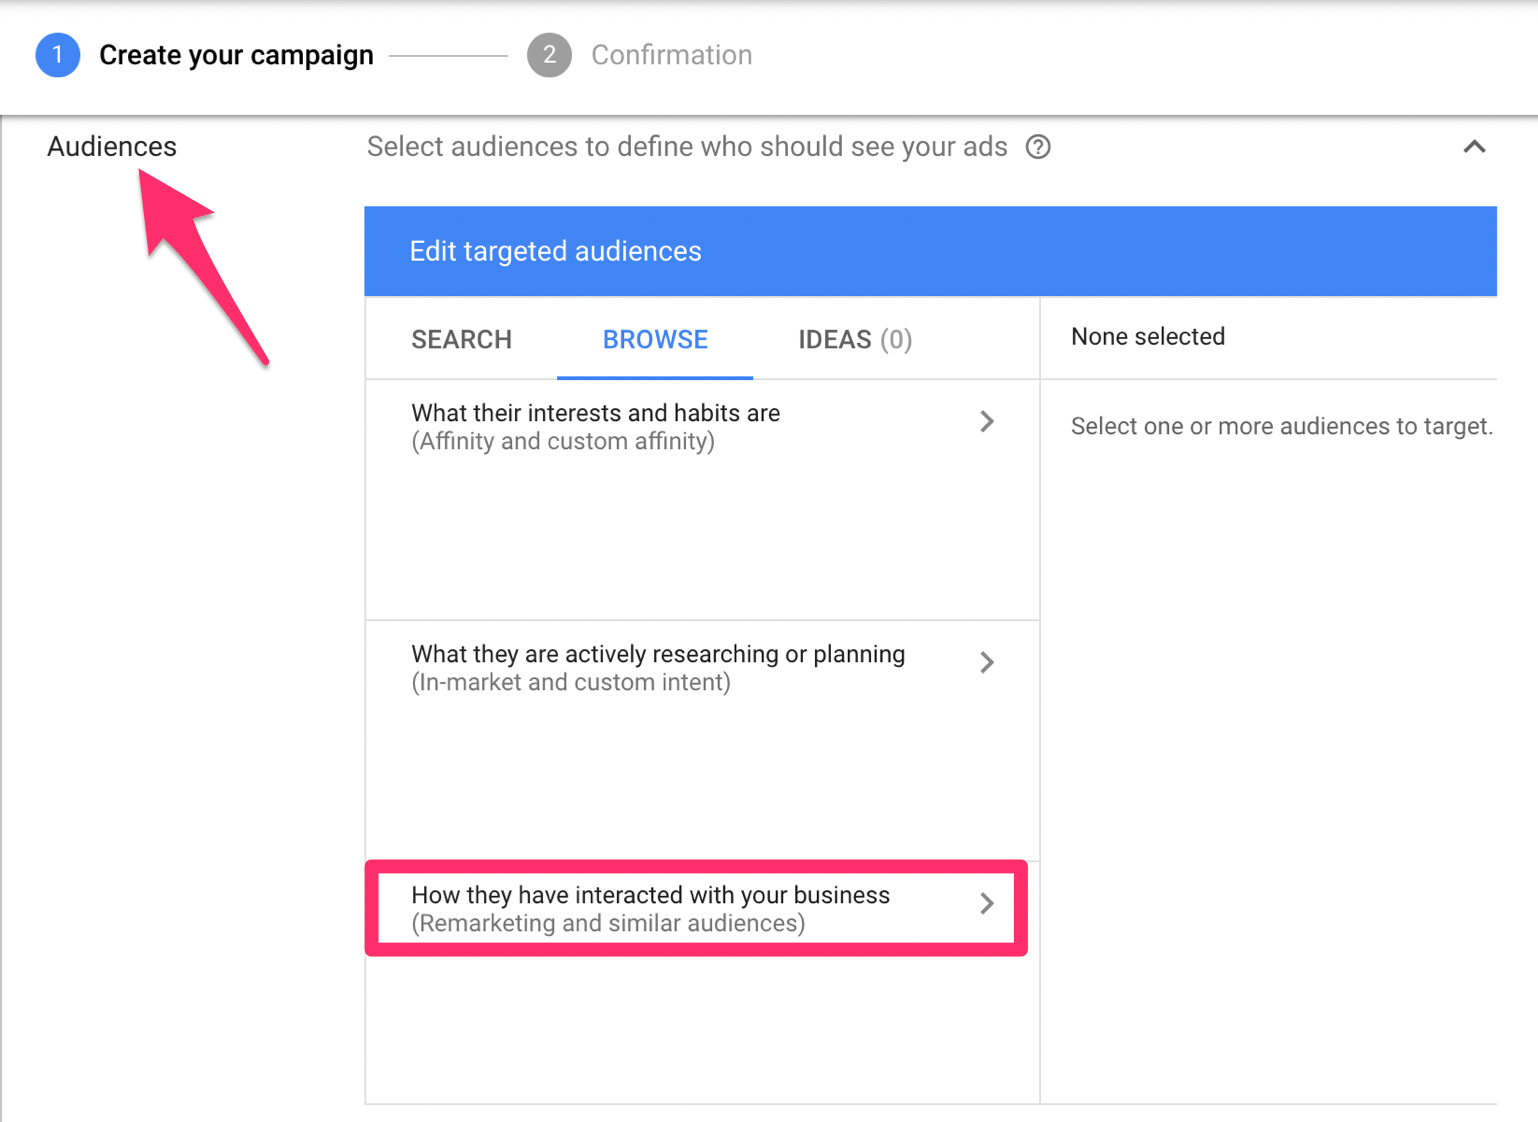
Click on the “browse” tab in the middle of the “edit targeted audiences” window.
Navigate to the third option, as I highlighted in the screenshot above. This will allow you to pick how certain audiences have interacted with your business.
From here, you can choose a list from the custom audiences that we created in the previous step. You could also choose all audiences or audiences that have been optimized by AdWords.
Then it’s just a matter of creating your ads and launching the campaign.
Your ad creation process will vary based on your remarketing campaign. For example, if someone viewed a specific product and already purchased it, then it wouldn’t make sense to show them an ad for that same product. Whereas if they added an item to their cart but never finalized the purchase process, showing them that same product again would entice them to buy.
Conclusion
If you’re going to spend money on PPC campaigns with AdWords, I strongly recommend you run remarketing ads.
With remarketing, you have the ability to target qualified leads. These are people who have already been to your website and completed some type of action that was close to converting.
Since they’re already familiar with your brand, website, products or services, getting those visitors to finalize the conversion will be much easier than advertising to someone who has never heard of you.
Track your conversions. See which types of ads, actions, and custom audience lists are driving the best results and highest ROI. Then you can double down on those campaigns and make changes to ones that aren’t performing as well.
That’s how you drive conversions with Google AdWords using remarketing campaigns.
from Quick Sprout http://bit.ly/2VYae4Z
No comments:
Post a Comment