One of the most common questions that I get from readers is, “How do you create an Amazon product comparison chart for a niche site?” I've mentioned several times on the blog here that I used TablePress, a free WordPress plugin, but I think I need to give a better answer!
Actually, I know how much I appreciate it when someone has written a detailed blog post for a process that I am hoping to learn, so I hope to accomplish that today about product comparison tables.
Before I jump into the nuts and bolts of how to create a product comparison chart, I want to review WHY you would want a comparison table on your blog or website.
When people are searching online to buy something, they want information and they want to be able to compare different options. The easiest way to compare the pros and cons of different products for many people is to have a list of all the top products along with prices, reviews, features, and more right in front of them on one page.
So, if you can provide all the detailed information for the user, they are much more likely to do their analysis and make their buying decision through your website (meaning you would get an affiliate commission from Amazon). A shopping comparison chart is priceless in this process; and as a result it can convert browsers into buyers very well.
While some themes like these here offered by Thrive actually have table comparison software built in, most WordPress themes don't offer this feature.
Update! Since writing this article, I've created my own software tool to make creating product comparison charts. You can see my software tool, Table Labs, right here.
Here's an image of the comparison table on my survival knife site, that I created as a public niche site example. I'm going to show you step by step how to create a table like this using the free plugin called TablePress:
Find Top Products
Before you can create the best possible comparison table for your niche site, you need to put in the research and make sure you REALLY are selecting the best products. I cannot over-emphasize this step; you truly do need to do your research and select the best products to review. People are smart, and will eventually know if you are not recommending the best products. So, do your research!
Amazon.com is a great place to review potential products. Not only can you see just about everything that is available in your market, but reading reviews can give you a great sense of what customers actually think. Yes, ideally you will have purchased and used the product. But I don't think its realistic to own all 10 or 20 brands in a niche.
When I created my survival knife niche website, there is no way I could have purchased all 50 knives and compared them first hand. But by doing research on Amazon, reading the survival knife forums, and other websites, you can quickly pick up the products that customers truly value.
You need to do this research for your own niche.
In a nutshell, select the products with the highest ratings on Amazon, are most talked about on forums in your niche, and have been highly reviewed by other bloggers/websites. If you can find the 10 to 15 top products to compare, you will have really helped the end consumer in their buying decision!
Find Features to Compare
Once you have done your research to find what PRODUCTS to compare, you should already have a good idea of what FEATURES to compare.
Try to put yourself in the shoes of the buyer and think about what features are most important to consider. Two options that you should almost always have in your chart are price and ratings. People always want to know how much something costs and how well it has been rated by others.
In addition, you should be able to find a couple of other features to compare as well. For example, in my survival knife comparison chart, I also have columns for: Overall Length, Blade Length, Weight, and Blade Material.
On Perrin's niche site for safety razors, he has Price, Ratings, Size, and Type (along with Name and Picture). Here's an example of his Amazon product comparison table below:
Using TablePress to Create Charts
So, now that you know what information you want in your chart, you need to actually start creating it!
I am going to review 2 different plugins that I'm aware of that will allow you to create these comparison charts for free.
The first plugin is called TablePress. This is the plugin that I used on my survival knife website. You can download it here.
I wish I could say there was a way to automatically create the chart with all your desired information, but in reality it needs to be manually input. So, here's a look at the back-end of the TablePress plugin with my survival knife comparison chart:
Update: If you don't want to manually input information like you do with TablePress, I created a software tool that now pulls everything in automatically! Check out Table Labs right here.
Overall, here's the steps needed to create an Amazon product comparison chart using the TablePress WordPress Plugin:
- Gather all the data you need from Amazon or other websites and input directly into TablePress or in a spreadsheet.
- Make sure you manually insert your affiliate links or use EasyAzon to assist in affiliate link creation (or other tools).
- If you collected all your information in a spreadsheet, you then need to save it as a CSV and upload it to TablePress.
- You can reorder the columns or rows using the drag and drop features in TablePress
- You can also change how the chart looks with a few options in TablePress
Overall, it's a very manual process, but it's not overly complicated.
Then if You Select an Individual Chart:
Click to Enlarge
Using TablePress, you can either input the data directly in WordPress, as shown in the screenshot; OR you can input all the data in a spreadsheet, then upload that CSV file into WordPress. Using a CSV file is actually what I did for my survival knife site.
See this image of the spreadsheet I created before uploading it to Table Press (yes, I had to input all that information manually):
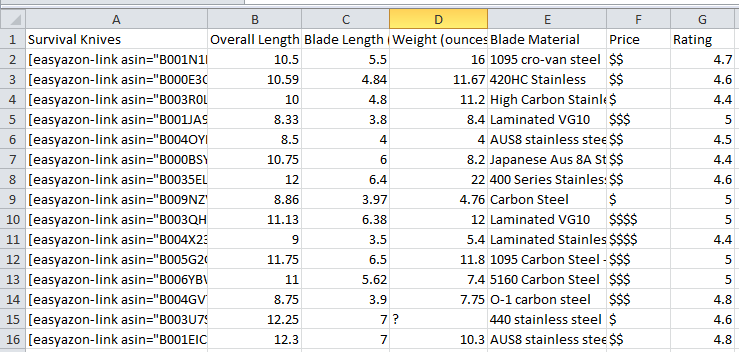
Now as you can imagine, the most important part of creating the chart is getting the links correct (column A above). Your affiliate links is where you make your money, so you want to make sure they work properly to send people to Amazon. I'm going to cover that in-depth below.
However, for my survival knife site, you can see that I used EasyAzon for the links in my chart. (Special $20 off page for EasyAzon). Perrin for his site, actually used links directly from Amazon. I'll show you how to do both.
And again, here's what the TablePress chart looks like. (You can actually change colors and format it quite differently using the TablePress options):
How to Use WebSimon Tables to Create a Chart
The other free plugin that you can use to create comparison tables is Websimon Tables (Updated as of 2017, this plugin is no longer maintained). This is the WordPress plugin that Perrin used for his site, aPennyShaved.com.
The process is actually exactly the same. You can either input the data directly into WordPress, or you can input it into a spreadsheet, then upload the CSV. Here's what the Websimon Tables Plugin looks like on Perrin's site:
Select and Edit an Individual Table:
Customize Layout and Style:
Notice that there are pre-made “skins” to easily customize look and feel of table.
Overall, both table plugins work great. Websimon has more built in options to make the tables look nicer compared to TablePress. In addition, Websimon will auto-size your images to all be the same size. So, if you input a link to a really large image, no worries, Websimon will size it for you.
The downside of Websimon tables is that you can't sort the table. With TablePress you can, and users often state that they love that about my table on my survival knife site.
With TablePress, you can customize the colors, etc, but its not as easy – and Websimon appears to look more professional “out of the box”.
How to Create the Links Using EasyAzon
Now, I'm finally going to get to the “tough” part. If you've been playing around with websites and html for a while, you can probably figure it out on your own. But if you just want to see how I did it, that's what this is all about!
There is no magic button in these plugins that allow you to insert your Amazon affiliate link or insert an image with all the link options you want. You have to build the link manually. However, EasyAzon does make things a bit easier in my opinion.
Update: I built a software tool that automatically creates the affiliate links and charts for you. It's a big time saver. Check our my software tool call Table Labs right here.
I am going to show you how to create the first column in this table:
So, in a nutshell the links are made of 3 parts:
1. The affiliate link
2. The text
3. The image
So, let me show you what the link looks like for the highlighted column above, and then dissect it, so you can create your own. Here's the link:
Ka-Bar Becker BK2 Campanion Fixed Blade Knife<br /><img src=”http://ift.tt/2CUP1AQ;
- So, the entire row is just 1 affiliate link because its all between: (One big link)
- Then you can see the text immediately following the opening is the visible text on the site: Ka-Bar Becker BK2 Campanion Fixed Blade Knife
- The final part is the image. Everything between the <img src:” “</img> tags, is the image source.
To create the EasyAzon affiliate links, I went to any blog post, and found the product I wanted, and created the link temporarily in that post. I then just copied and pasted the link in my table. Then repeated for all the products in the table.
So here's the steps using EasyAzon:
After selecting “Text Link”, then you get your link:
Now find the image you want. I get mine directly from Amazon, and don't even download them to my WordPress. I researched quite a bit to find out if it's okay (legally) to use Amazon images on your site. The best I could find, seemed to agree that's it okay, since you are sending traffic to Amazon sellers and trying to increase their business.
You are an affiliate of theirs, trying to promote their products. But if you want to do your own research, I highly encourage you to do so.
Update: Since writing this article, I've since changed my mind about using Amazon images. I would strongly encourage you to use the Amazon API to pull in your images. I know when you are just starting out this might be difficult and so you may just be willing to accept the risk. But technically, according to Amazon you are not supposed to use their images unless you get them through the Amazon API.
There are some WordPress plugins that can help with this, including EasyAzon. Or you can check out Table Labs, my software tool which not only pulls in the images and price using the Amazon API, but streamlines the entire chart creation process.
To get the image link on Amazon, just search for your product, then right click and view the image on the search results page:
The copy the Image URL:
Then finally just add whatever Text you want, and you have built your link. Now just do that for every product in your table!
Yep, its time consuming, but the few hours you will spend building your table, will make your site more useful than most niche sites out there.
How to Create the Links Using Amazon Directly
I like using EasyAzon for a couple of reasons.
1. You don't ever have to leave WordPress
2. If I ever want to change how users interact with my affiliate links, I can do it without actually changing any of the links. This is not true when you create links directly in Amazon Associates.
In other words, if I want to have a pop-up when users hover over the images in my table, or make my links no-follow, or cloak my links, or other options; I can do that directly in the EasyAzon management panel, without ever touching my links.
However, you can create the links directly from Amazon Associates, you don't need to have EasyAzon. This is what Perrin did. So, lets take a look at what the code looks like for this first column in his chart:
<a href=”http://ift.tt/2CTd7w9 width=”100px” src=”http://ift.tt/2E7DCxl; /></a>.
The second column (Name) is a second affiliate link:
<a href=”http://ift.tt/2CW6byp Long Handled Chrome Safety Razor</a>
Amazon Associaties gives you this link, just edit it down to what you need:
Then you need to once again search Amazon to find the image that you want. Perrin got his images directly from the Amazon product pages, so they are larger than the ones I used; but Websimon auto-sized them to fit nicely in the table.
Once you have the image URL you want, just combine it with the affiliate link you created, and insert the code into your table. Rinse and repeat for all products!
Again, the only real downside of getting your links directly from Amazon, is that if you decide to change how your links act, you would need to go back and edit each individually. This is not the case with EasyAzon.
Chris Guthrie, the owner of EasyAzon, has agreed to give my readers a special $20 discount on EasyAzon that you can get anywhere else right now.
Go Here to See the Special $20 Discount Page for EasyAzon. (Yes, its an affiliate link. It's a product I use).
How to Automatically Create Product Comparison Charts Using Table Labs
Since originally writing this article a couple of years ago, I've made my own software tool called Table Labs that makes creating Amazon product comparison charts much easier and faster. In fact, what usually would take 2 to 3 hours (or more) with TablePress using the process I just demonstrated, now only takes about 5 minutes or so.
To demonstrate, here's a video that shows just how easy it is to use Table Labs:
When you get started using Table Labs, you simply link up to the Amazon API and then the software does all the heavy lifting for you. So, if I wanted to create a chart comparing my favorite business books, here's the steps I would take using Table Labs.
Step 1: Search for the product I want to select in Table Labs
Step 2: Click the + Symbol to Add the Products I want to my chart
I selected a few books that I like, notice that the titles, images, price, and my affiliate links are automatically pulled in…I didn't do anything manually to get this data to show up like that!
Step 3: Rearrange Columns and Rows using drag and drop, and make a “top pick”.
Step 4: Select a professionally designed theme OR use a color picker to make a custom looking table
Step 5: Embed the Table code on your site and start earning money!
Your chart is now created and you simply copy and paste a small snippet of code on your website. The code works on WordPress, regular html, PHP, or any other type of website builder out there.
Here's a screenshot of how to insert the embed code on WordPress:
Below is the chart I just created using Table Labs! You can see how it looks and works with my affiliate links inserted. This took less than 5 minutes to create.
You can also completely change the look of the tables with just a few clicks and you don't have to re-insert embed code, it will update automatically.
Overall, I spent a few years creating product comparison charts manually using Table Press or other plugins because they are free. They still work and there is nothing wrong with using them. However, I found that tables convert so well that I wanted to create more and more. That's why I created Table Labs.
If you want to see more details about Table Labs and some of the additional features that I didn't mention here, go to TableLabs.com.
Overall and Your Thoughts
Overall, I hope that the great detail provided here on how to create your very own comparison table for your niche site is helpful! When creating a niche site, I think it is important to create as much value as possible to the end user, and one way to to do that is to create a well-researched table of the top products in your chosen niche.
Now, I'm sure there are many other ways that you can create a comparison table, and if you find a better way that works for you, that would be great! However, this is the process that I have used on my survival knife site and many other niche sites.
I know that many of you have already been implementing this same table strategy, as I've seen your niche sites popping up as I do research…I'm in awe actually of how many niche site creators are out there reading..thank you! But for those of you that haven't jumped into creating tables, this should be the only post you need to get started.
I would love to hear your thoughts! If you have any input that you would like to add to the process, please let us know. I look forward to the discussion below.
The post The Ultimate Guide to Creating a Product Comparison Chart for Your Niche Site appeared first on Niche Pursuits.
from Niche Pursuits http://ift.tt/2CUWqAj
No comments:
Post a Comment